Fall is when I usually want my manicure to feel a little richer, moodier, and more polished. But does that mean short nails have to be boring? Not at all. In fact, 2026 nail coverage is leaning into short, wearable shapes, deep burgundy, playful French variations, and more creative takes on familiar classics. Vogue has also highlighted the return of bold 90s-inspired reds and chocolate tones for fall, while Allure has called burgundy one of the key nail colors of 2026.
For me, short coffin nails are especially interesting because they give that neat, structured silhouette without requiring the maintenance of very long extensions. I can wear them to work, type comfortably, pull on a sweater without immediately snagging something, and still have plenty of room for a beautiful design. So which fall look feels right this season – glossy burgundy, olive green, soft florals, barely-there pink, or something more playful? These are the ideas I would save before my next manicure appointment.
Glossy Burgundy Short Coffin Nails With a Tiny Heart Detail
I would start fall with this deep burgundy manicure because it has exactly the kind of polished drama I want when the weather turns cooler. The nails are filed into a short coffin shape with straight sides and a softly squared free edge, keeping the silhouette practical rather than overly sharp. Most of the nails are covered in a glossy wine-red shade that looks almost like dark cherry syrup under the light. Two accent nails break up the richness with a sheer pinky-nude base, burgundy French tips, and tiny heart details near the cuticle. The result feels romantic without becoming overly sweet.
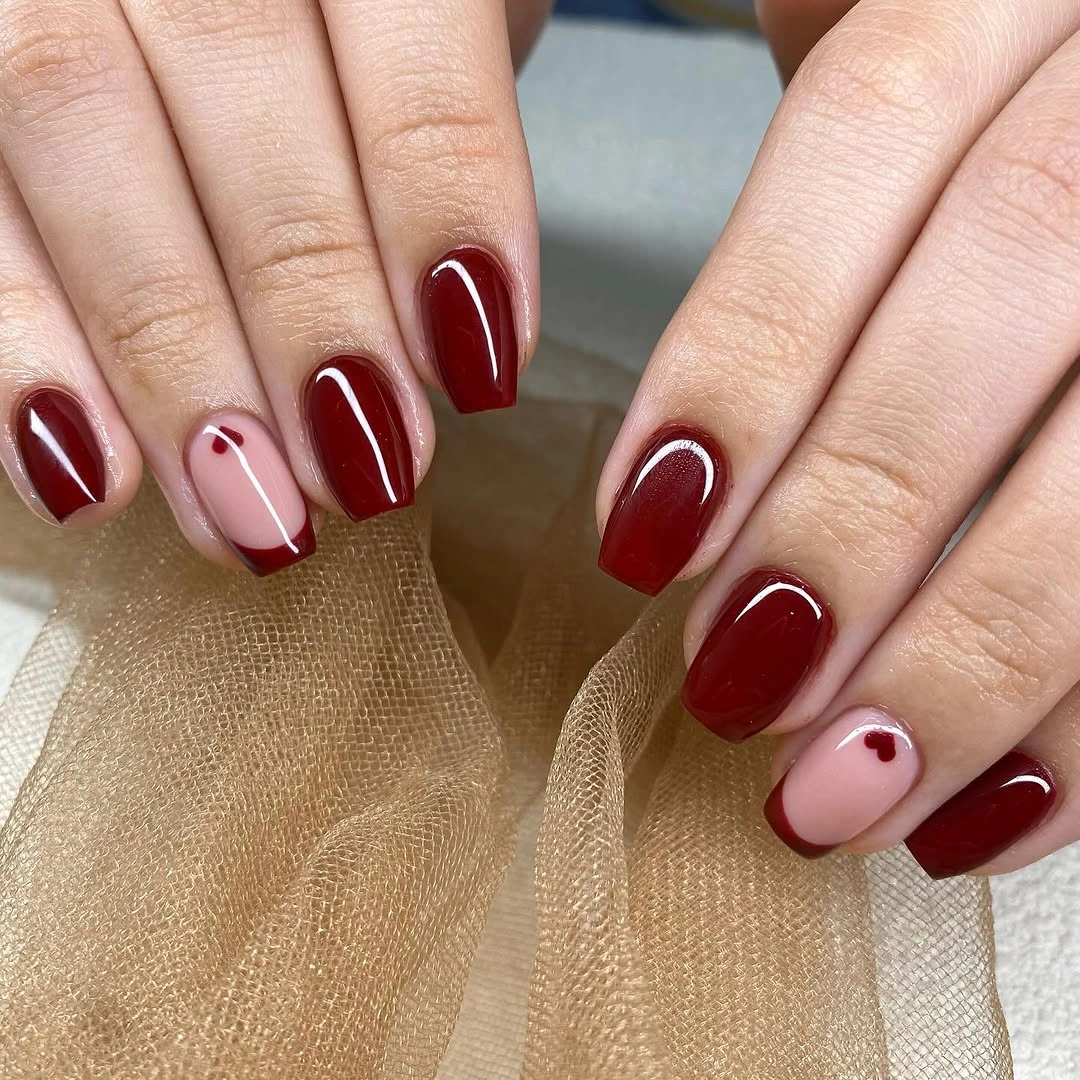
For this manicure, I would look for a deep burgundy crème polish rather than a bright red. OPI Malaga Wine, Chanel Rouge Noir, or JinSoon Audacity are good color references for the mood, with a sheer pink nude such as OPI Bubble Bath or a similar milky nude for the accent nails. I would also keep a very fine nail-art brush nearby for the tiny hearts and French tips, plus a high-shine top coat to create that glassy finish. The shine is important here – without it, the burgundy loses some of its luxurious depth.
At home, I would shape the nails first and make sure the sidewalls stay fairly straight before softening the corners. After a thin base coat, I would apply two coats of burgundy, leaving the accent nails nude. The French tips can be painted with a fine brush rather than trying to make one thick swipe, which gives much better control on a short nail. For the little hearts, I would place two tiny burgundy dots close together and pull them gently into a point. It sounds almost too simple, but tiny details are often where a manicure starts looking intentional. I would finish everything with a glossy top coat and give the cuticles a little oil once the polish is completely set.
Olive Green French Tips With Metallic Swirls
Olive green gets a much more modern treatment here. Instead of covering every nail in a solid green, I would keep the base sheer and natural-looking, then build the design around vivid green French tips and curved metallic lines. The short coffin shape gives the manicure enough structure for the geometric details without making the nails feel crowded. Some tips look almost like a ribbon wrapping around the nail, while the fine green outlines create movement across the nude base. It is graphic, but not loud, and that balance is exactly what makes this version so wearable.
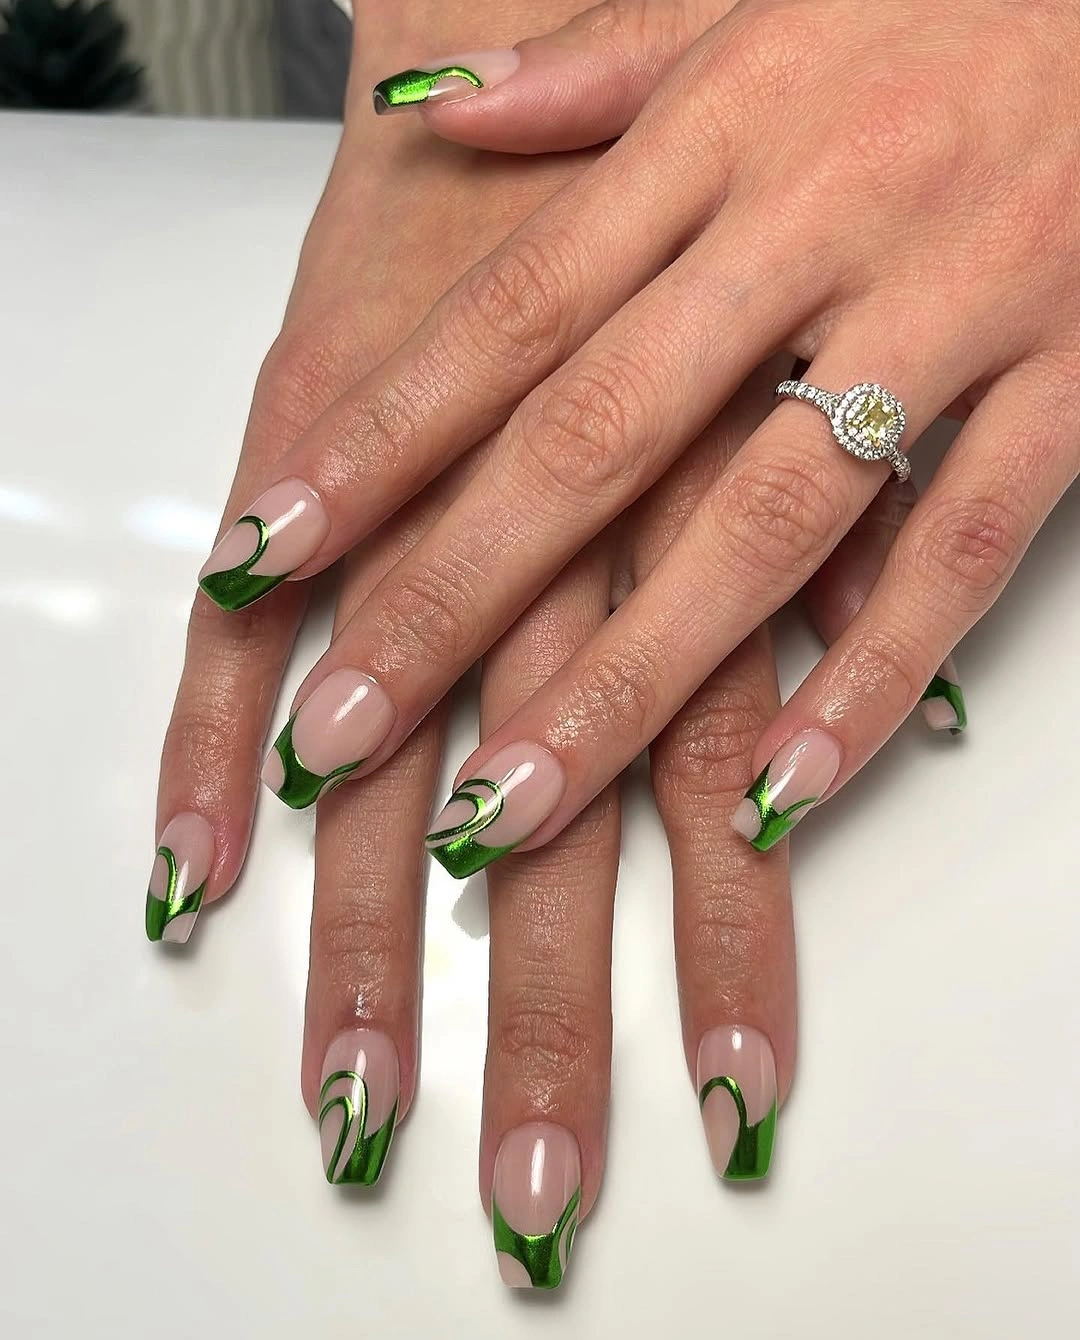
I would use a translucent pink or neutral builder-gel base, a saturated olive or emerald green gel color, and a reflective metallic green for the finer lines. A chrome pigment can create a similar effect if I want the accent lines to catch more light. For the design itself, I would use a very thin liner brush and a no-wipe top coat, especially if I want the metallic details to stay crisp. This is one of those manicures where having the right brush matters almost as much as the polish.
I would begin by creating the nude base and curing it properly, then map out the French tips with the green polish. On short coffin nails, I prefer keeping the colored edge relatively narrow because it preserves the visual length of the nail. Once the tips are cured, I would add the curved lines one at a time rather than trying to paint the entire pattern in one motion. A slightly imperfect curve can actually make the design feel more artistic, so I would not obsess over making every nail identical. The final top coat pulls everything together and gives the green that beautiful wet-look shine.
Soft Green French Tips With Tiny Daisy Flowers
This manicure takes the olive-green idea in a softer direction, using a pale leafy green instead of a deep autumn shade. I see a short coffin silhouette with a sheer pink base and fresh green French tips, while tiny white daisies sit where the natural nail meets the colored edge. Each flower has a sunny yellow center and delicate dark accents that give it just enough definition. The contrast is gentle rather than dramatic, which makes the manicure feel like a late-summer memory carrying quietly into September.
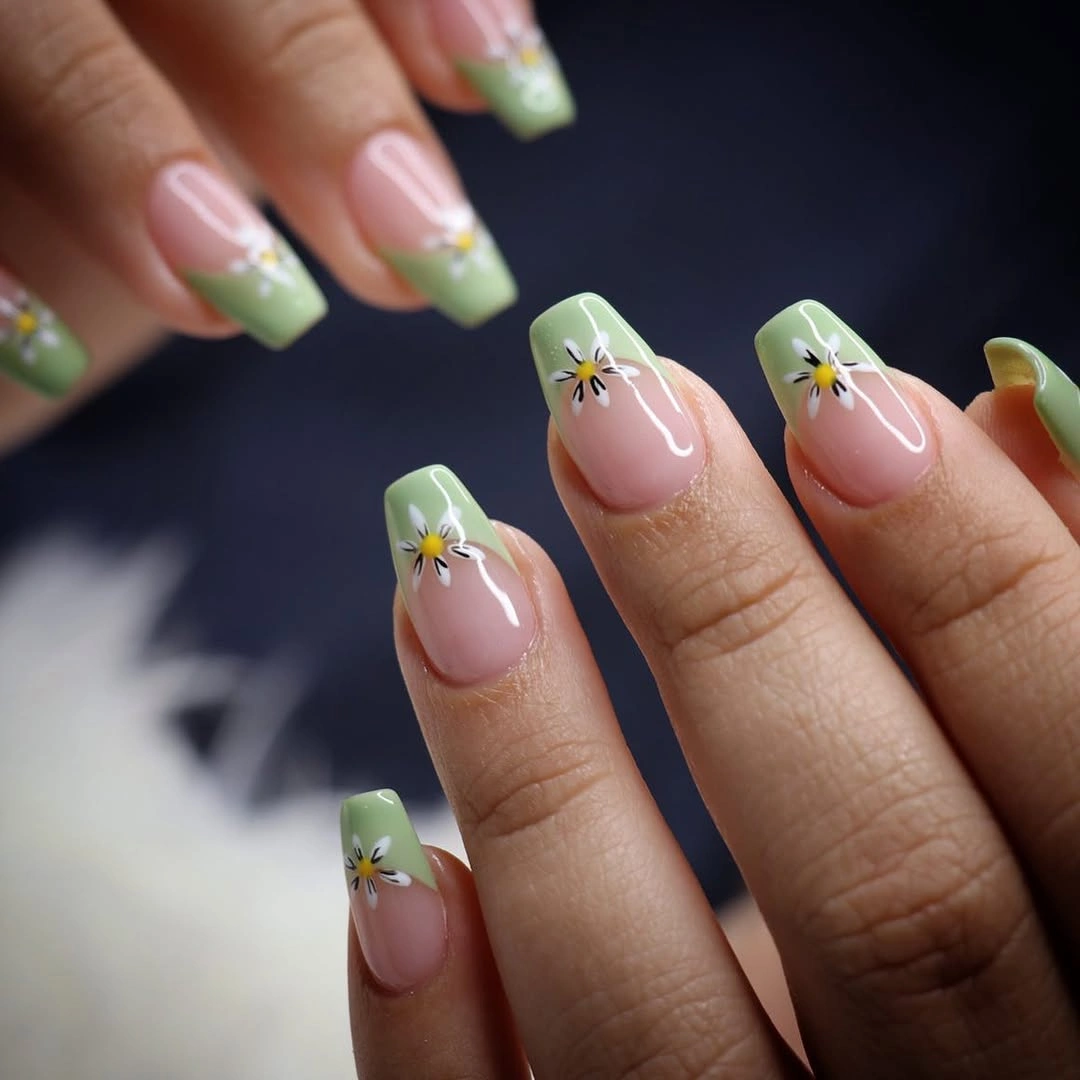
I would keep the materials uncomplicated here. A sheer pink base, a pastel sage-green polish, white nail-art paint, yellow for the flower centers, and a very fine detail brush are enough to recreate the look. A dotting tool is useful for the centers, although the end of a clean detail brush can work too. I would choose a glossy top coat because the shine makes the green tips look fresh and helps the tiny flowers stand out against the soft base.
For the home version, I would paint the sheer base first and let it level completely before adding the green tips. The French edge does not need to be perfectly thick, especially on short coffin nails. Then I would create each daisy with five small white petals and finish with a yellow dot in the middle. I would add the tiny dark strokes last, using almost no pressure on the brush. The trick is restraint – too many lines or too much pigment can turn a delicate flower into a blob surprisingly quickly.
I would wear this one when I want fall nails that do not immediately scream fall. There is something charming about keeping the palette light while the season is changing, especially in those weeks when mornings are cool but afternoons still feel warm. It would also be an easy choice for someone who normally lives in neutral manicures but wants to experiment with nail art. I like that the flowers are small enough to feel like a detail someone notices after looking twice, rather than the first thing they see.
Blush Pink Short Coffin Nails With Crystal Bow Details
Sometimes the most beautiful fall manicure is not dark at all. This blush-pink set uses a glossy nude-pink base across short coffin nails, then adds delicate crystal and metallic bow details for a dressed-up finish. The shape is slightly longer than a natural short nail but still compact, with straight sides and a squared tip. The decoration is concentrated around selected nails, which keeps the manicure from becoming too heavy. I especially like the combination of translucent pink, pale nude, and sparkling silver because it feels elegant without looking overly bridal.
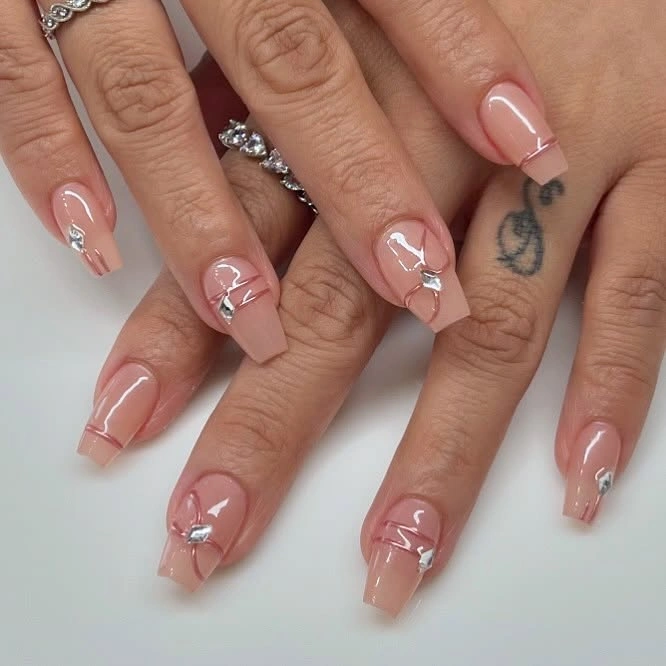
For this design, I would choose a glossy pink-nude gel polish, a clear builder gel or nail adhesive for the embellishments, and small silver rhinestones or crystal charms. A tiny metallic bow can be used as the focal decoration, while individual crystals create the delicate sparkle around it. I would also keep a pair of precision tweezers and a small dotting tool on hand. With embellished nails, neat placement matters more than having a huge collection of decorations.
I would prep and shape the nails first, then apply two thin layers of the pink-nude base. Once cured, I would place a small amount of builder gel or suitable nail adhesive where the crystals and bow will sit. I would position the larger detail first and then build the smaller stones around it, rather than scattering everything at once. After curing, I would carefully seal around the embellishments without completely covering the top surface of raised charms. That helps preserve the dimensional effect while giving the manicure a more secure finish.
Pastel Blue Yellow and Green French Tips With White Waves
For anyone who thinks fall automatically means burgundy and brown, this manicure makes a convincing argument for breaking the rules. The short coffin nails start with a glossy pink-nude base, while the tips alternate between soft yellow, pastel blue, and fresh green. Fine white lines sweep across the nails in loose curves, creating a playful almost hand-drawn effect. The design feels cheerful but still polished because the colors are softened rather than neon. It has that lovely quality of looking different from every angle.
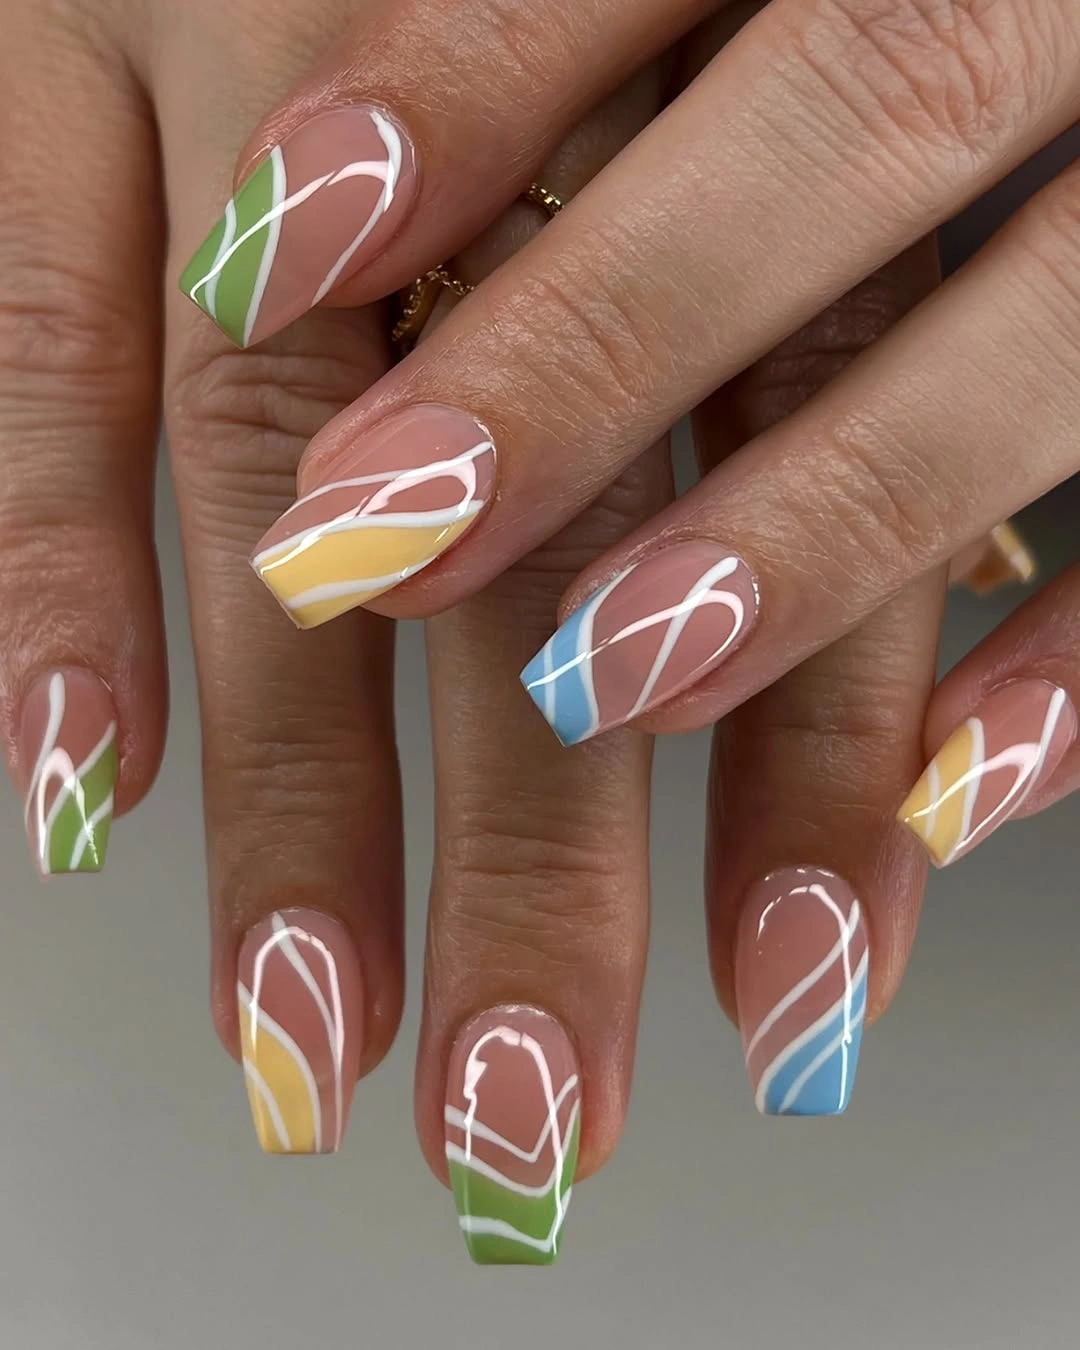
I would reach for creamy pastel versions of blue, yellow, and green rather than highly saturated colors. A sheer blush base keeps the manicure sophisticated, while an opaque white liner gel or nail-art polish creates the fine curves. I would also use a long, flexible liner brush because the white lines need to flow rather than look stiff. If I wanted to make the manicure feel more autumnal, I could swap the yellow for muted ochre and the green for sage without changing the overall design.
I would paint the nude base and then create each colored French tip separately, curing between shades so the colors stay clean. After that, I would use the white liner to draw loose curves that follow the natural direction of each nail. I would not try to make the lines symmetrical – the charm comes from their slightly spontaneous movement. A glossy top coat is the final step, and I would apply it carefully so the white details remain smooth rather than dragging across the colored sections.
Matte Black French Tips for a Moody Fall Look
I love how this short coffin manicure turns black into something surprisingly refined. The base is a deep matte black, while the tips are finished in glossy black, creating a subtle contrast that only really appears when the light catches it. The short coffin shape keeps the look clean and wearable, while the monochrome palette gives it that cool late-fall attitude.
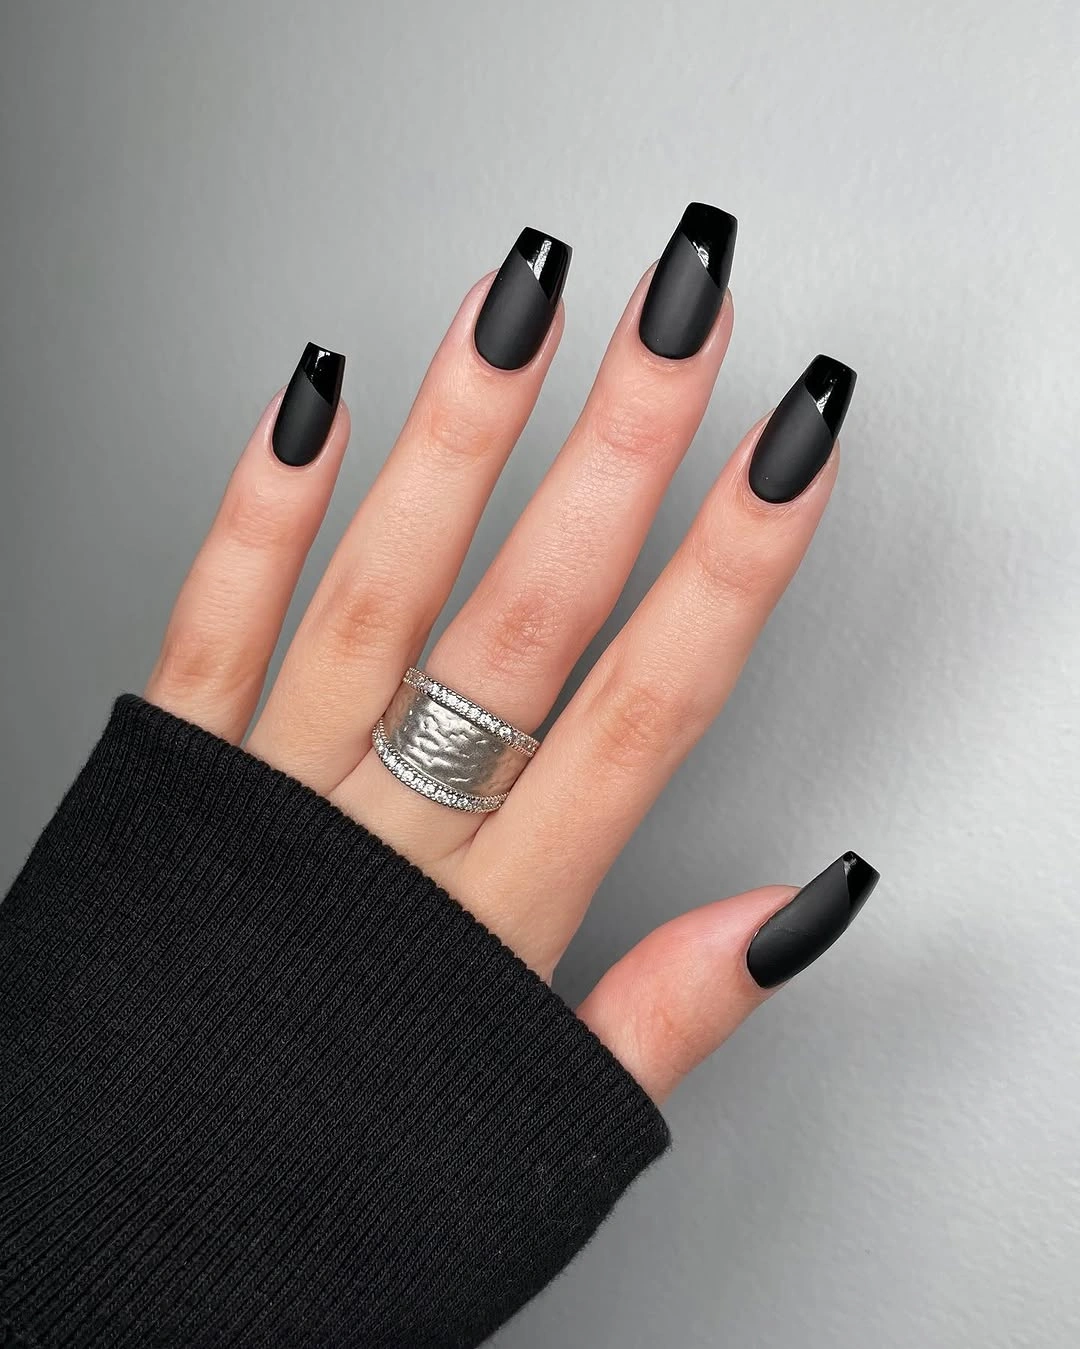
I would use a black gel polish, a matte top coat, and a high-shine top coat for the French tips. The trick is keeping both finishes on the same black base so the difference comes from texture rather than color.
I would apply the black color first, cure it, and cover the entire nail with matte top coat. Once cured, I would paint a narrow glossy French tip and seal only that section. I would keep the line crisp but not too thick – on short nails, a slimmer tip usually looks more balanced.
For me, this is the perfect manicure for black coats, silver jewelry, and those first seriously cold evenings. It feels dramatic without needing crystals, art, or extra color. Sometimes less really does more.
Milky White Short Coffin Nails With a Pearly Finish
This soft white manicure goes in the opposite direction, using a translucent milky base with an almost icy pink-blue glow. The short coffin shape looks especially polished here because the color is clean and uninterrupted. It has that fresh, pearly quality I always want when I am tired of darker fall shades but still want something that feels seasonal.
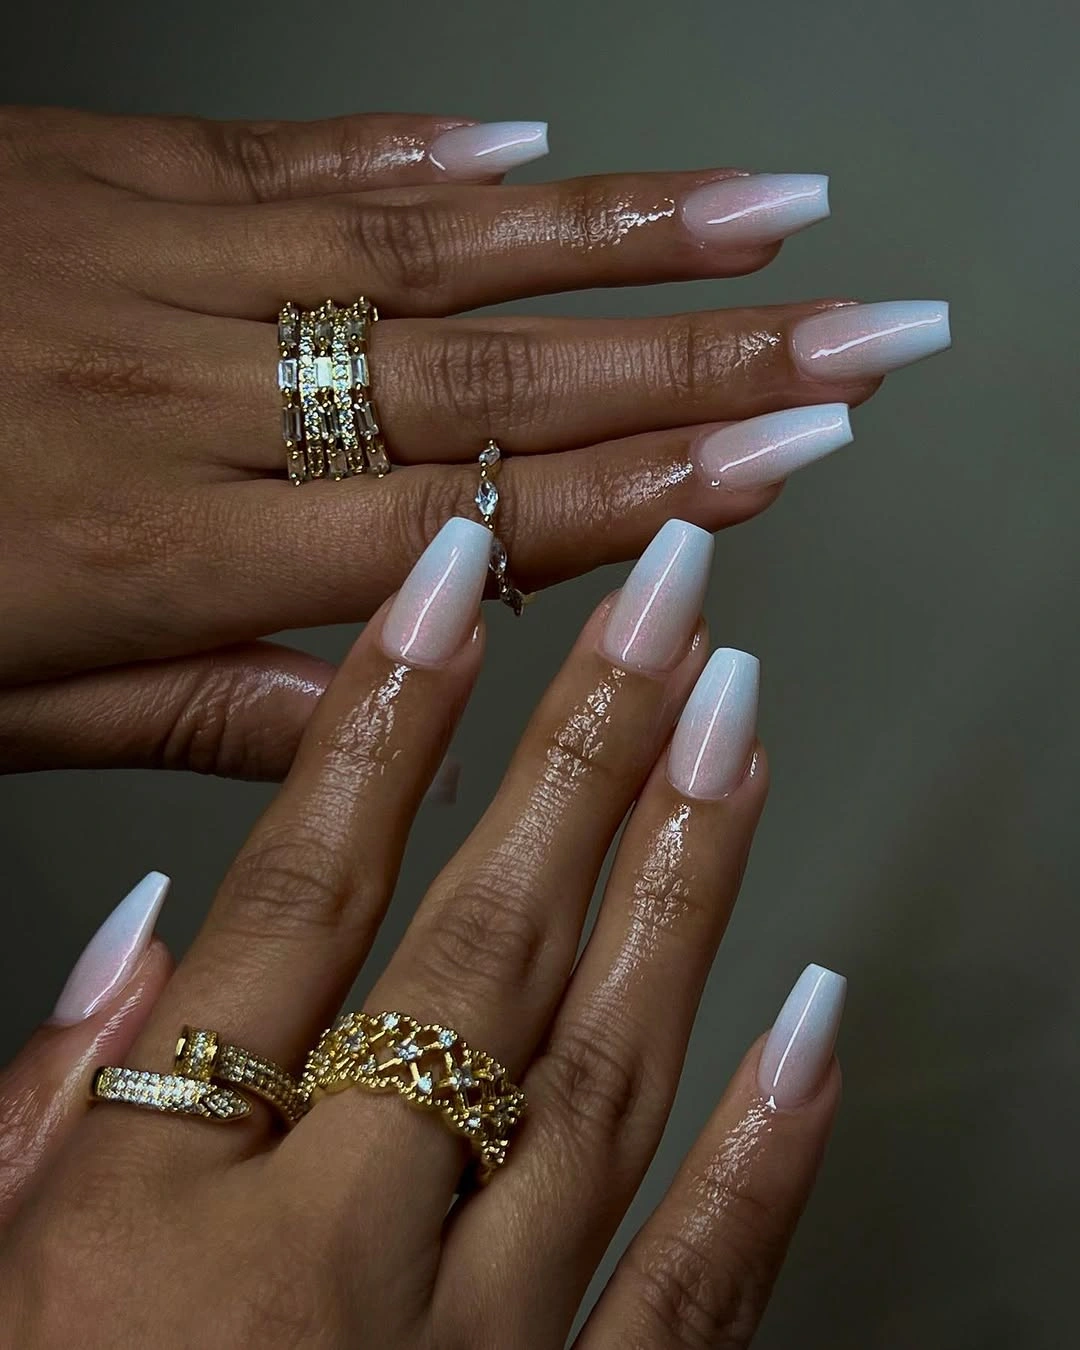
I would reach for a milky white gel, a sheer pink builder base, and a subtle pearl or chrome powder. The finish should stay delicate rather than metallic, so I would use a very fine layer of powder and a glossy top coat.
After shaping and prepping the nails, I would apply the sheer base and build the milky white color gradually. Once cured, a light layer of pearlescent powder gives the surface that soft glow. I would finish with top coat and cuticle oil for an especially glossy result.
I think this is one of the easiest choices for someone who wants classy fall nails without committing to burgundy or brown. It works with everything from chunky cream sweaters to evening dresses, and honestly, that versatility is hard to beat.
Chocolate Brown Cat Eye Short Coffin Nails
Chocolate brown feels almost made for fall, but the magnetic finish makes this manicure much more interesting than a basic brown polish. The short coffin nails alternate between warm mocha and deeper cocoa tones, with a soft cat-eye shimmer moving across the surface. The result is cozy, glossy, and just a little mysterious.
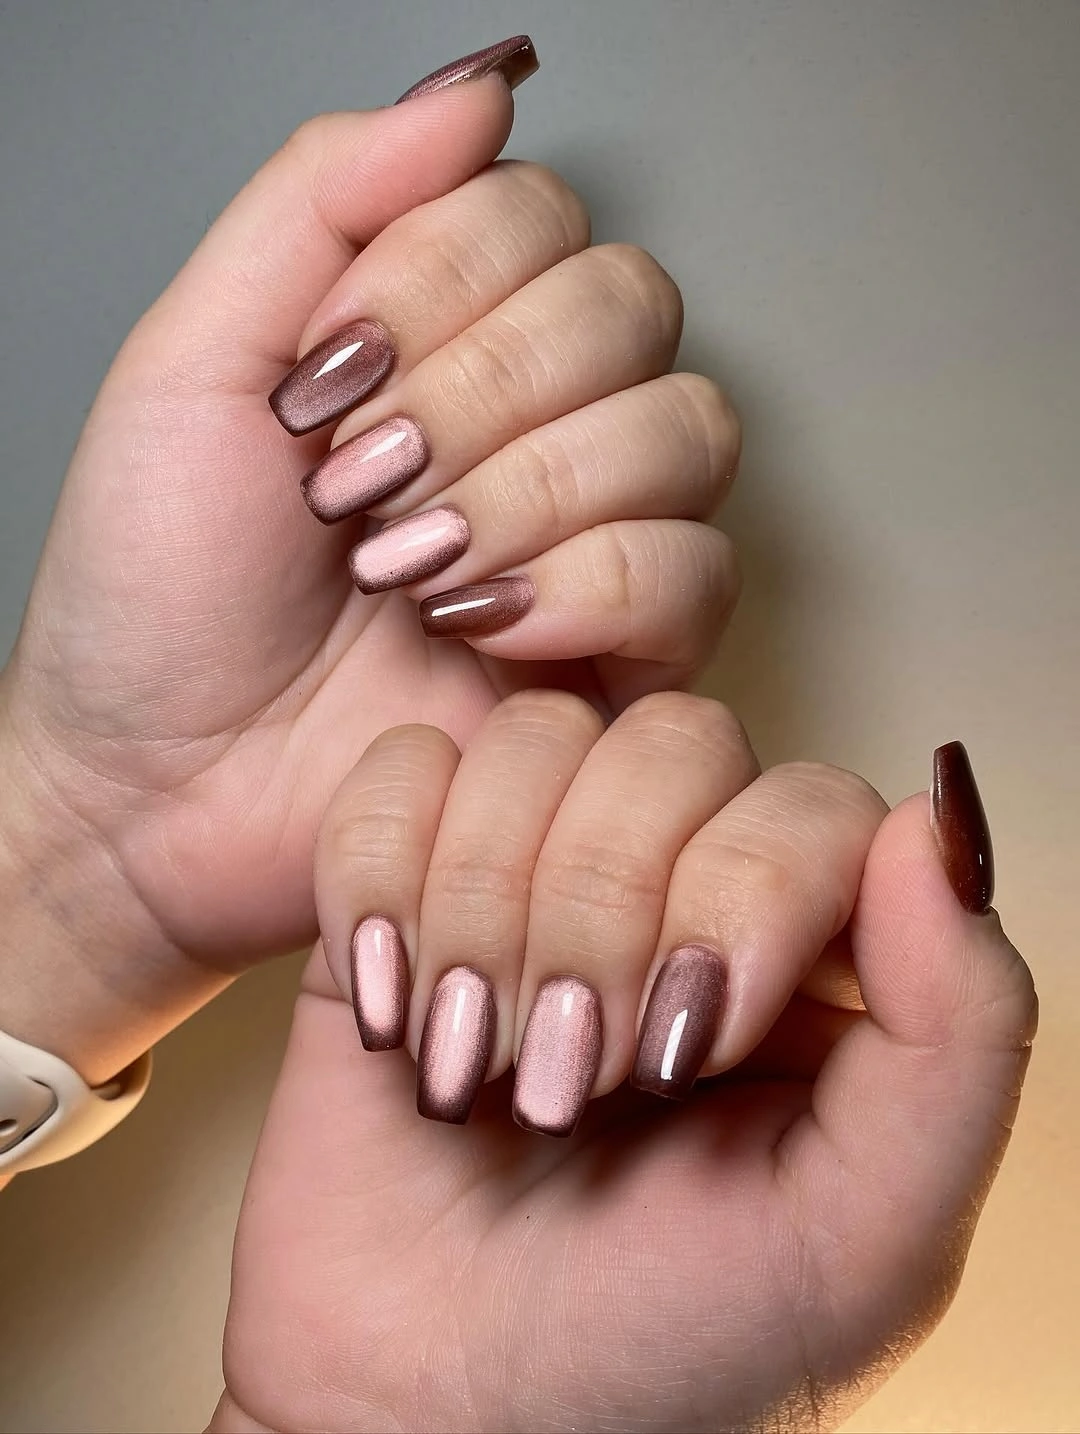
For this look, I would use brown magnetic gel polish in two related shades, a magnetic tool, base coat, and glossy top coat. A medium chocolate shade gives the shimmer enough depth to show without making the nails look too dark.
I would apply one thin coat of brown, cure it, then add a second coat and hold the magnet close to the wet polish to pull the reflective particles into a soft line. I would repeat this nail by nail because magnetic polish can lose its effect if left sitting too long.
This is the set I would pick for October and November. It has the warmth of coffee, chocolate, and suede all at once, and the cat-eye effect gives even a simple manicure a little movement. Very fall, without being predictable.
Sunny Yellow Fall Nails With Playful 3D Details
Yellow can absolutely work for fall when it is paired with warm neutrals and richer details. Here, bright yellow French edges frame sheer nude nails, while white swirls, raised floral elements, and textured honeycomb details add dimension. The short coffin silhouette gives the busy artwork a neat frame, so the manicure still feels organized rather than chaotic.
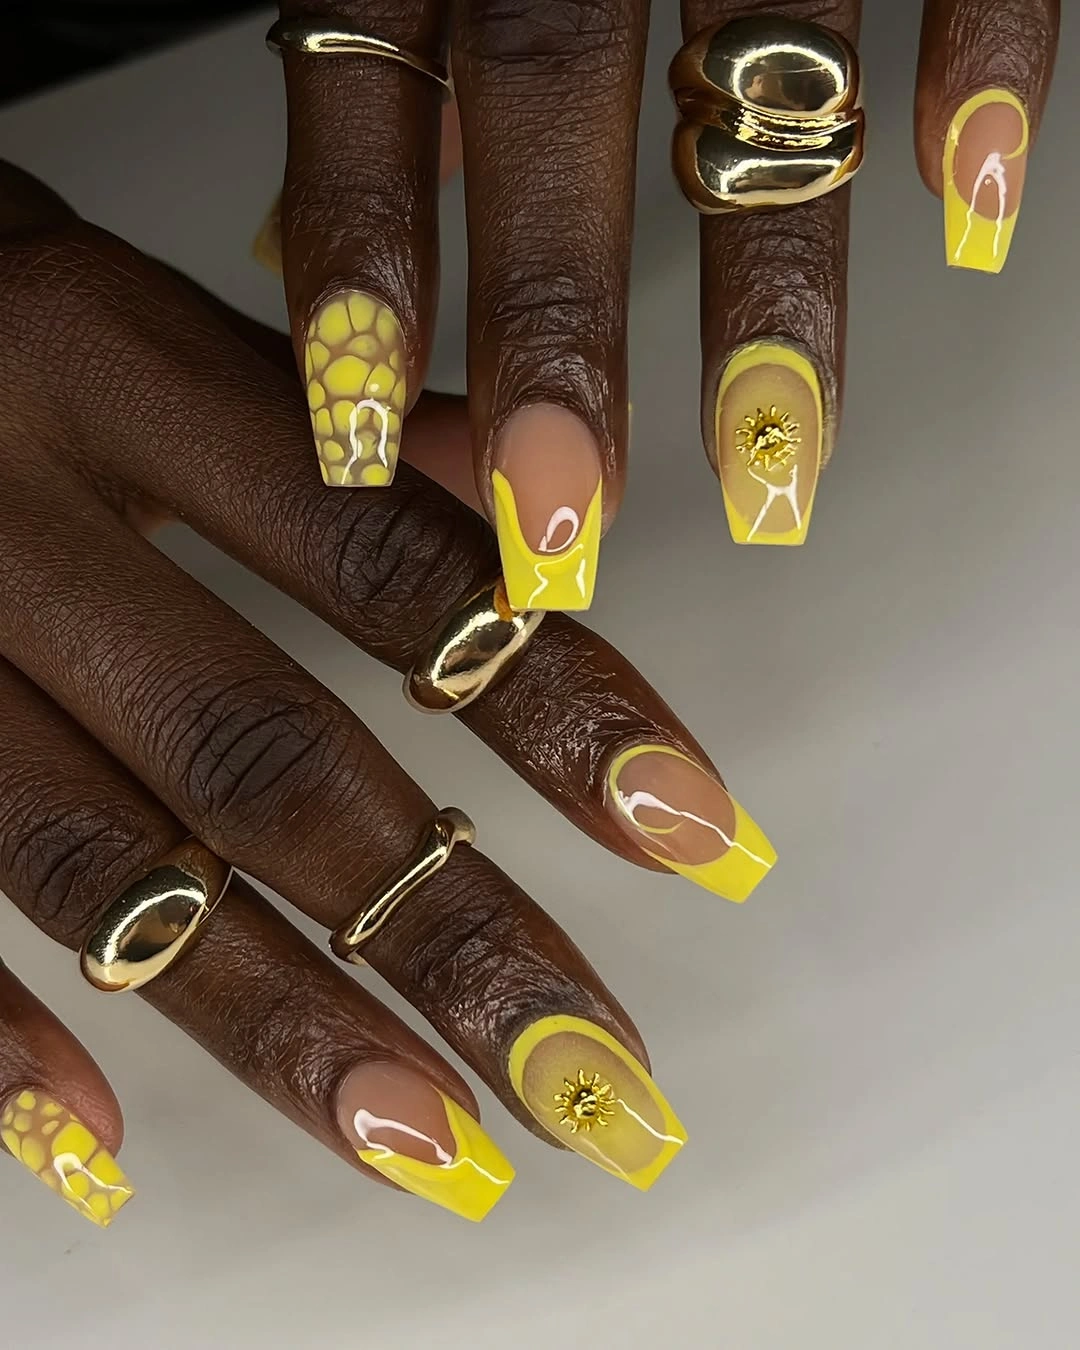
I would use a nude gel base, vivid yellow gel polish, white liner gel, gold or yellow 3D embellishments, and a thicker sculpting gel for the raised details. A fine brush is essential for the swirls, while a dotting tool can help create the textured pattern.
I would build the nude base first, then add the yellow French borders and cure them separately. After that, I would draw the white details and create the raised elements with small amounts of sculpting gel. I would avoid adding too much volume – short nails need dimension, but excessive 3D art can overwhelm their shape.
I would wear this when I want my manicure to feel cheerful rather than traditionally autumnal. The yellow looks especially fun with chocolate brown, camel, denim, and gold accessories. It is a little unexpected, which is exactly why I like it.
Emerald Green French Tips With Gold Cross Details
This emerald French manicure has a completely different energy. The base stays sheer pink and natural-looking, while metallic green tips frame each short coffin nail with a high-shine finish. Small gold cross embellishments add a decorative focal point without covering the entire nail. Green and gold together feel rich enough for fall, but the nude base keeps everything surprisingly light.
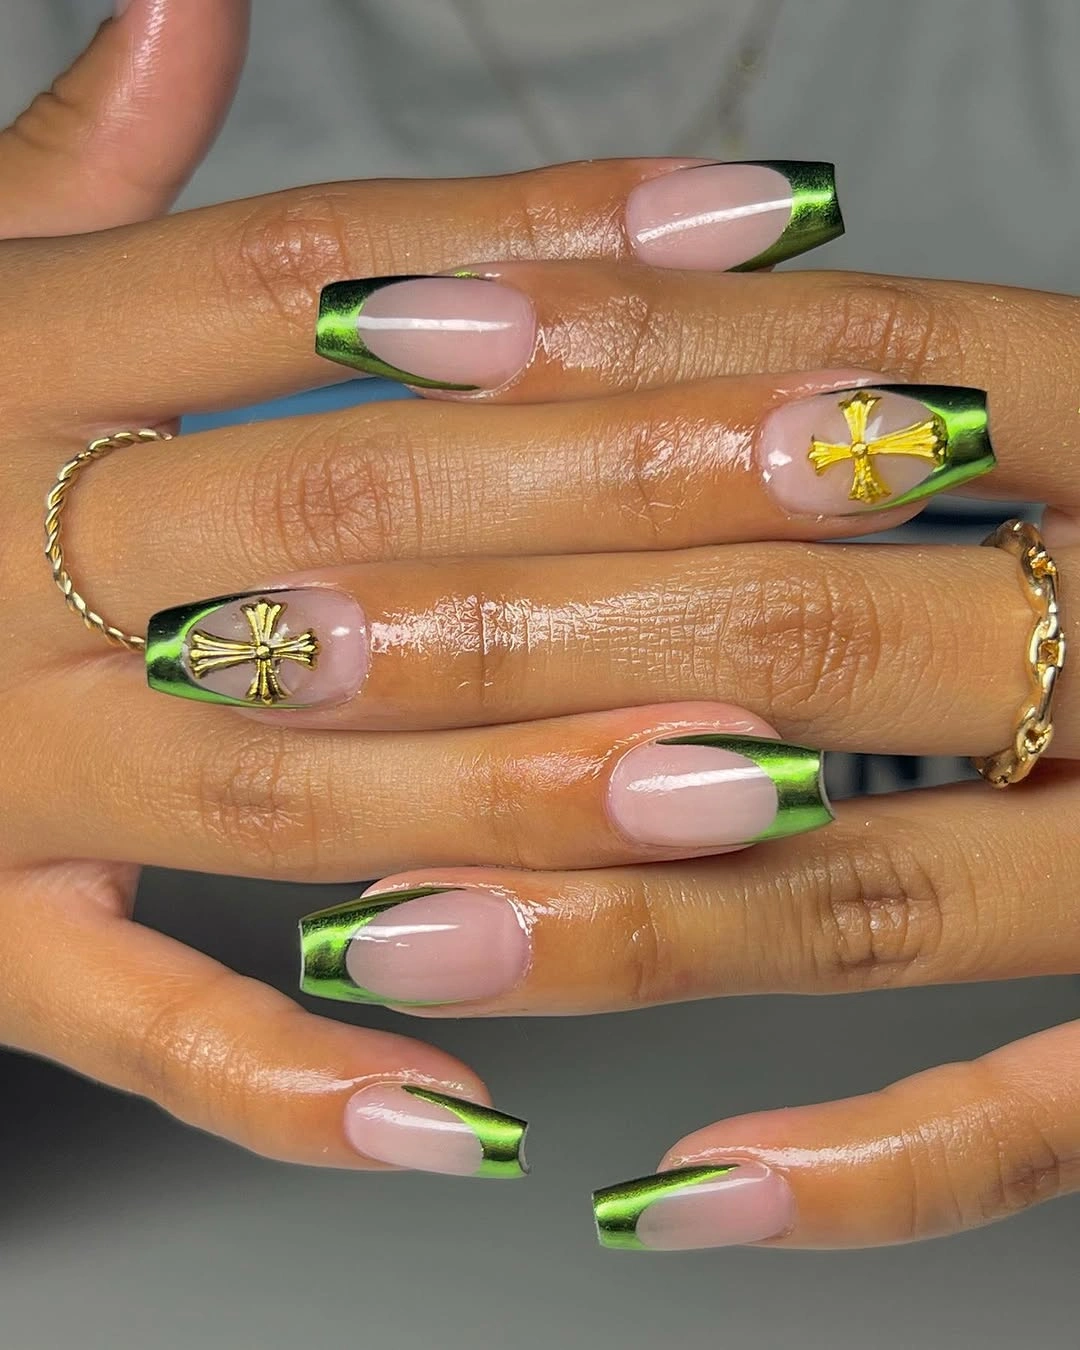
I would use a sheer pink nude gel, metallic emerald-green gel polish, gold nail charms, nail adhesive or builder gel, and a glossy top coat. A fine liner brush can help sharpen the curved green edges, while tweezers make placing the gold details much easier.
I would create the nude base first, then paint the green French tips with careful attention to the side edges. Once cured, I would place the gold charms near the center of selected nails and secure them before finishing with top coat. Keeping the embellishments limited makes the manicure feel more expensive and less busy.
I especially like this version for the holiday stretch of fall when gold jewelry starts appearing everywhere. The emerald shade feels luxurious, the metallic finish catches the light, and the short coffin shape keeps the whole thing practical. If I wanted one manicure to take me from a cozy November dinner straight into the festive season, this would be high on my list.
Playful Pink and Neon Yellow Cow Print French Tips
I would choose this manicure when a classic French tip feels a little too predictable. The base is a sheer, glossy pink that keeps the nails looking fresh and feminine, while a vivid neon yellow outline traces the curved French shape. The real surprise comes at the tips, where irregular black and white cow-print spots replace the usual solid polish. On a short coffin shape, I would keep the free edge fairly compact so the pattern does not overwhelm the nail. It is playful, slightly nostalgic, and exactly the kind of fall manicure that refuses to take itself too seriously.
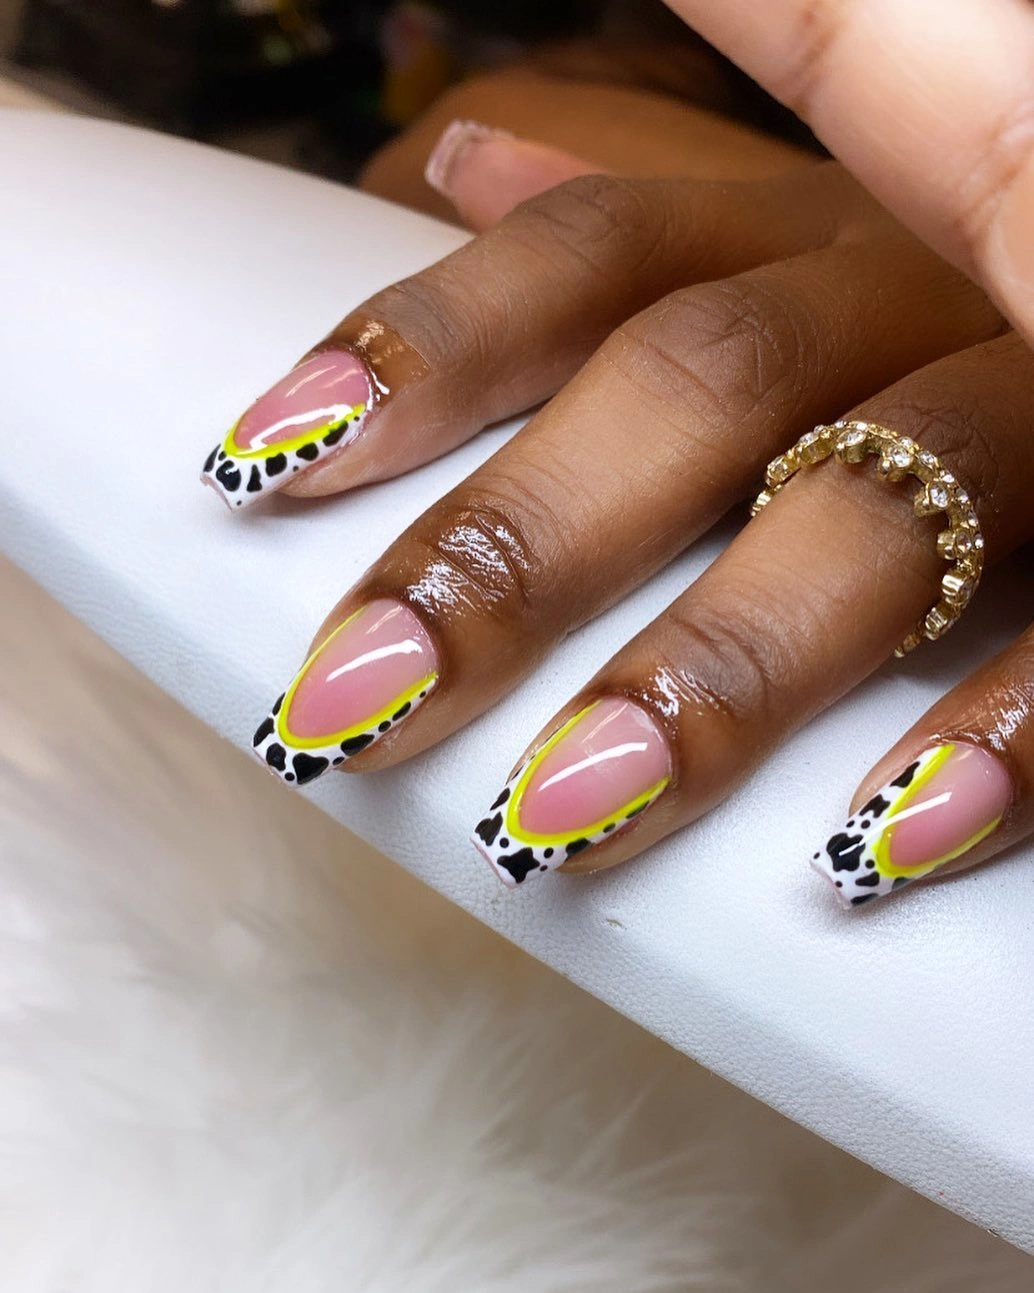
For this look, I would start with a sheer pink nude such as OPI Bubble Bath or a similar milky pink gel. A bright yellow gel liner is useful for creating that ultra-thin neon border, while black and white gel polish handle the spots. I would also keep a fine detail brush nearby because the charm of this manicure is in those imperfect, organic shapes. A high-shine top coat brings everything together and makes the pink base look almost glassy.
At home, I would shape every nail into a short coffin first, making sure the sidewalls stay straight and the free edge is gently squared. After the base color cures, I would create the yellow outline rather than painting a thick French tip, then add small black-and-white spots along the edge. The spots do not need to match. In fact, they look better when they are slightly different. I would finish with top coat and cure carefully, especially around the free edge.
This is one of those designs I would save for the weekend when I want my manicure to become part of the outfit. A chocolate-brown sweater, denim, gold jewelry, and these tiny flashes of neon? Yes. Fall does not always have to mean muted colors. Sometimes one bright detail is exactly what keeps a seasonal manicure from looking expected.
Deep Teal Chrome for a Moody Fall Manicure
There is something about deep teal that instantly makes a manicure feel more expensive. Here, the nails are covered in a dark blue-green shade with an intense metallic chrome finish, creating a jewel-like effect that changes with the light. I love the way the color sits between classic navy and emerald without committing completely to either. Although the length shown is more elongated, I would easily adapt this idea to short coffin nails by keeping the shape compact and allowing the reflective finish to do all the talking.
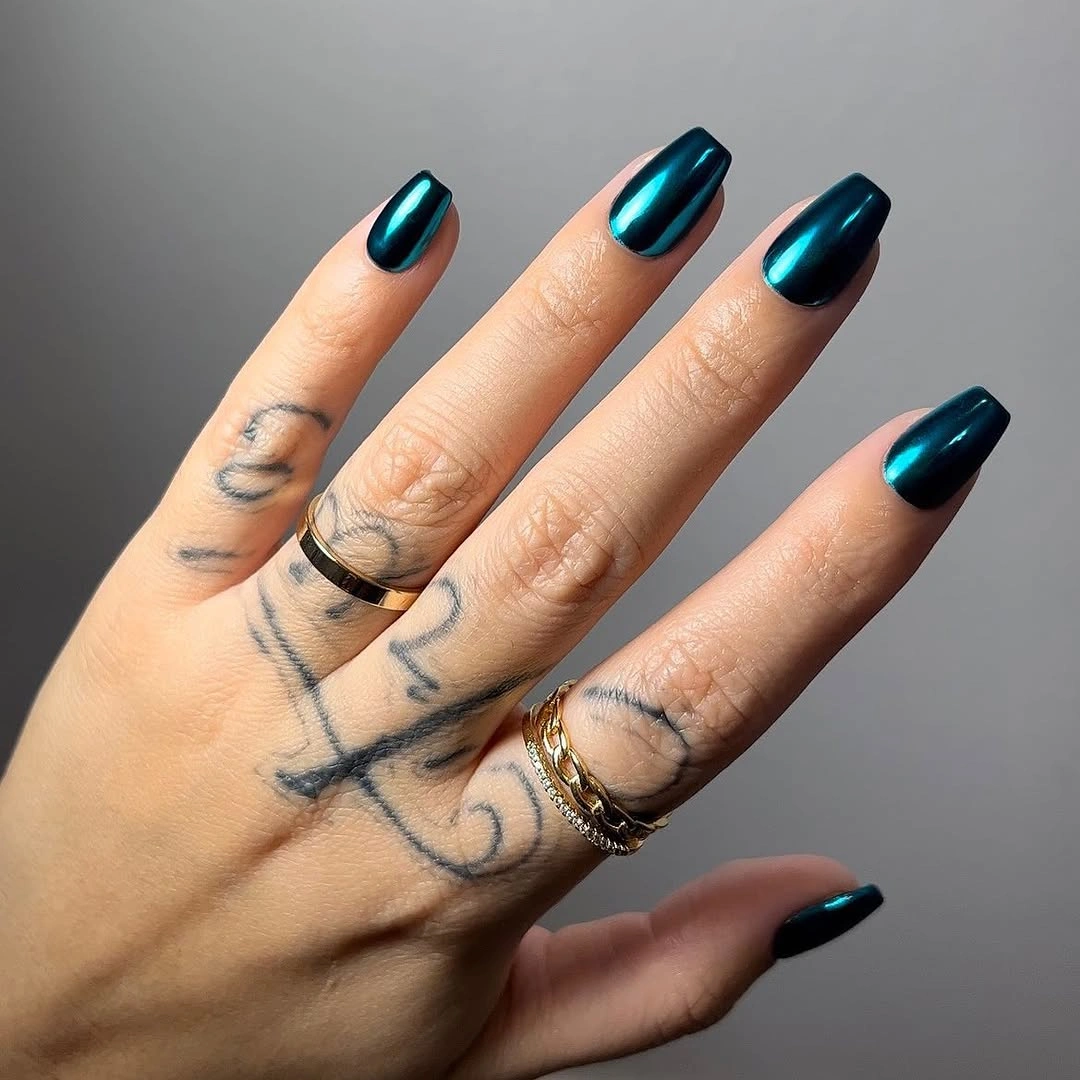
For the closest finish, I would use a black or very dark teal gel base followed by a teal chrome powder. Brands such as OPI, Gelish, and DND offer plenty of deep blue and green gel shades that can create the right foundation. The exact color is less important than the contrast between the dark base and reflective powder. I would also use a no-wipe top coat, since chrome powders generally need a smooth surface to achieve that polished metallic effect.
I would begin with a short coffin shape and buff the surface gently after the base preparation. One or two thin layers of dark teal or black gel will give the chrome more depth. After curing, I would apply the chrome powder evenly, paying special attention to the edges, then seal the surface with top coat. With short nails, I would avoid adding extra art or rhinestones. The finish is already doing enough.
Personally, this is one of my favorite directions for a colder fall evening. It has the drama of black polish but feels more interesting when you move your hands under warm indoor lighting. If your wardrobe is mostly neutrals, deep teal chrome can become that small unexpected detail that makes the whole look feel considered.
Soft Blue French Tips With a Delicate Green Accent
This manicure takes the French tip in a softer direction. The base is a translucent pink nude, while a cool blue French tip gives the nails a clean, slightly icy finish. A very thin green line sits between the pink and blue, adding just enough contrast to keep the design from becoming ordinary. The coffin shape works beautifully here because the straight free edge gives the colored tip a crisp architectural quality. For fall, I would keep the nails short and let the color combination provide the personality.
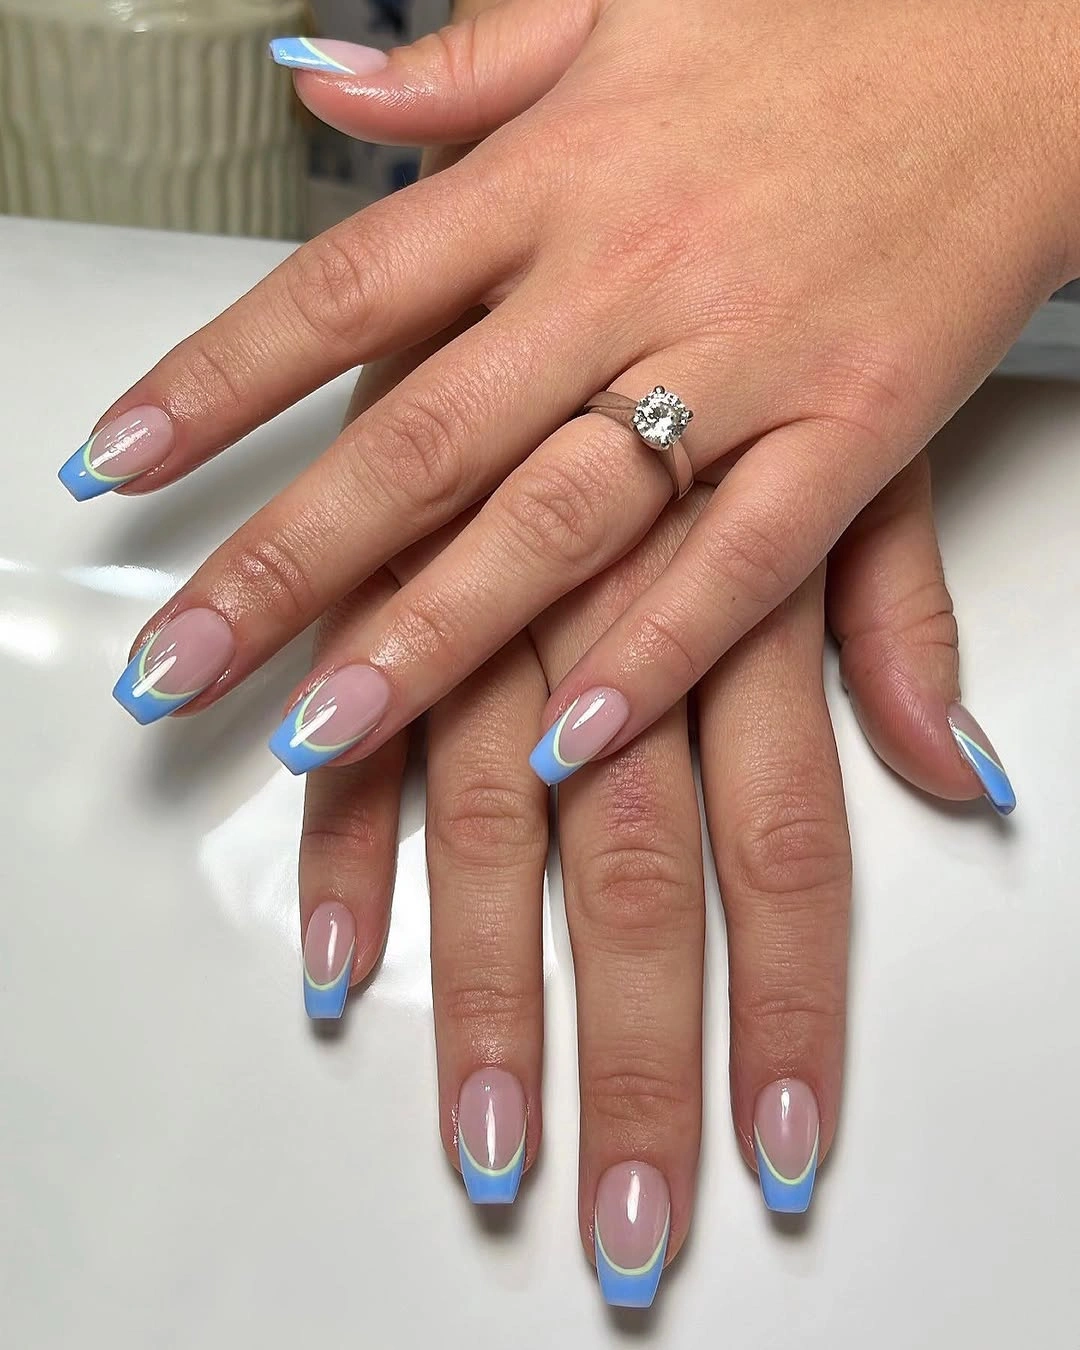
I would reach for a sheer pink gel, a muted or medium powder blue, and a thin green liner. For a softer autumn version, I would choose dusty blue rather than a very bright pastel and a muted sage or olive green for the accent. A fine nail-art brush is essential here because the green line needs to stay delicate. I would also use a glossy top coat to preserve the clean, almost glass-like appearance of the base.
The easiest way I know to keep this type of French manicure neat is to work in thin layers and avoid rushing the tip. After creating the short coffin shape, I would apply the sheer pink base and cure it. Then I would paint the blue edge, keeping the width consistent across each nail. Once that has cured, I would add the narrow green line and seal everything with top coat. If freehand French tips feel intimidating, French-tip guides can make the process much less stressful.
I would pick this one when I want my fall manicure to feel polished without looking too serious. It would work beautifully with a cream knit, gray tailoring, or even a simple black coat. And if you are someone who usually chooses nude nails because bright colors feel like too much, this is a good compromise – just enough color to make you look twice.
Glossy Espresso Chrome for a Darker Fall Mood
Now we are moving into the richer side of fall. This manicure combines very dark brown, black, and reflective chrome tones on long coffin nails, creating a liquid-metal effect that feels dramatic and slightly mysterious. For short coffin nails, I would simplify the same concept rather than trying to reproduce the length. A deep espresso base with a subtle chrome reflection would preserve the mood while making the manicure much more practical for everyday life. Sometimes editing the trend is the best part.
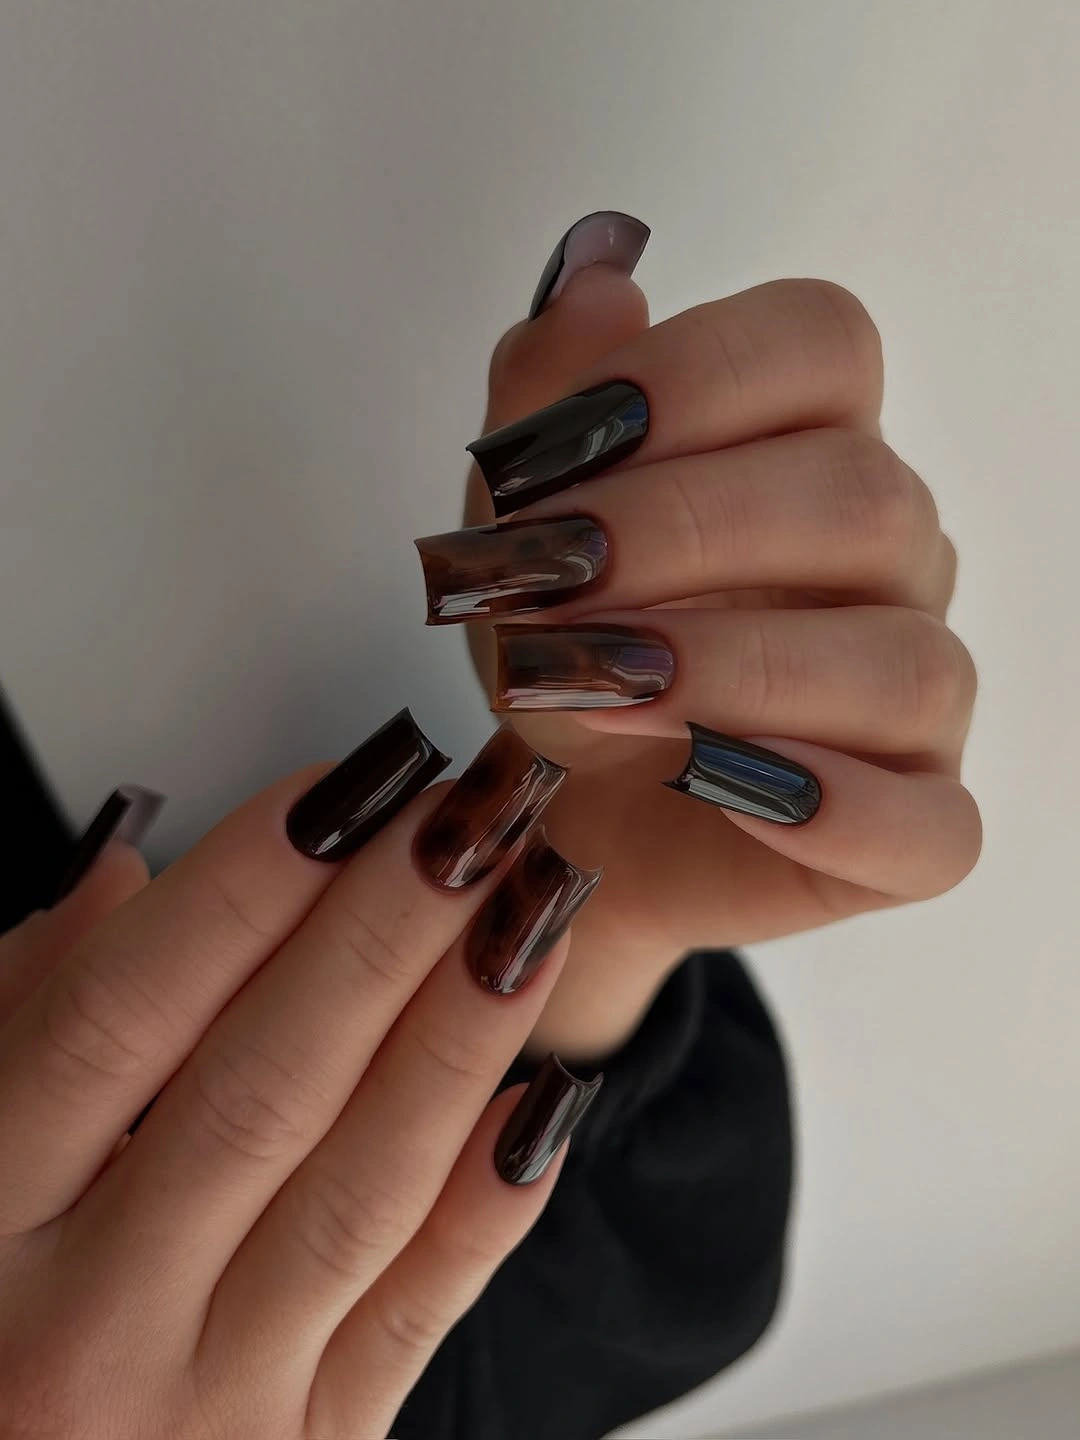
I would use a dark chocolate gel, a black gel for added depth, and a chrome pigment in a smoky silver or brown-toned finish. A highly reflective top coat is important because the entire idea depends on light moving across the surface. If I wanted an easier version, I would skip the separate chrome powder and choose a metallic brown gel polish instead. The result would still feel rich and autumnal without turning the manicure into a major nail-art project.
For a short version, I would shape the nails into a compact coffin and apply the darkest brown shade in thin layers. On one or two nails, I might add a chrome finish, while keeping the others glossy espresso. This variation is easier to wear and also gives the manicure some visual breathing room. I would finish with a generous but controlled layer of top coat, making sure the free edge is sealed.
This is the manicure I would choose after the first truly chilly evening arrives. There is something wonderfully cozy about espresso-colored nails with a reflective finish, especially when paired with leather, wool, or a long dark coat. If black feels too severe but burgundy feels too familiar, brown chrome lands right in that sweet spot.
Black Cat Eye With Cool Blue French Tips
Black nails for fall are hardly a revolutionary idea, but this version gives them a fresh twist. The base is glossy black with a subtle magnetic cat-eye effect, and the short coffin tips are finished with a soft blue French edge. A few nails carry a warm metallic shimmer that breaks up the darkness without competing with it. I like the balance here: the black creates the drama, the blue adds a cool seasonal accent, and the magnetic shine gives the manicure movement every time the light catches it.
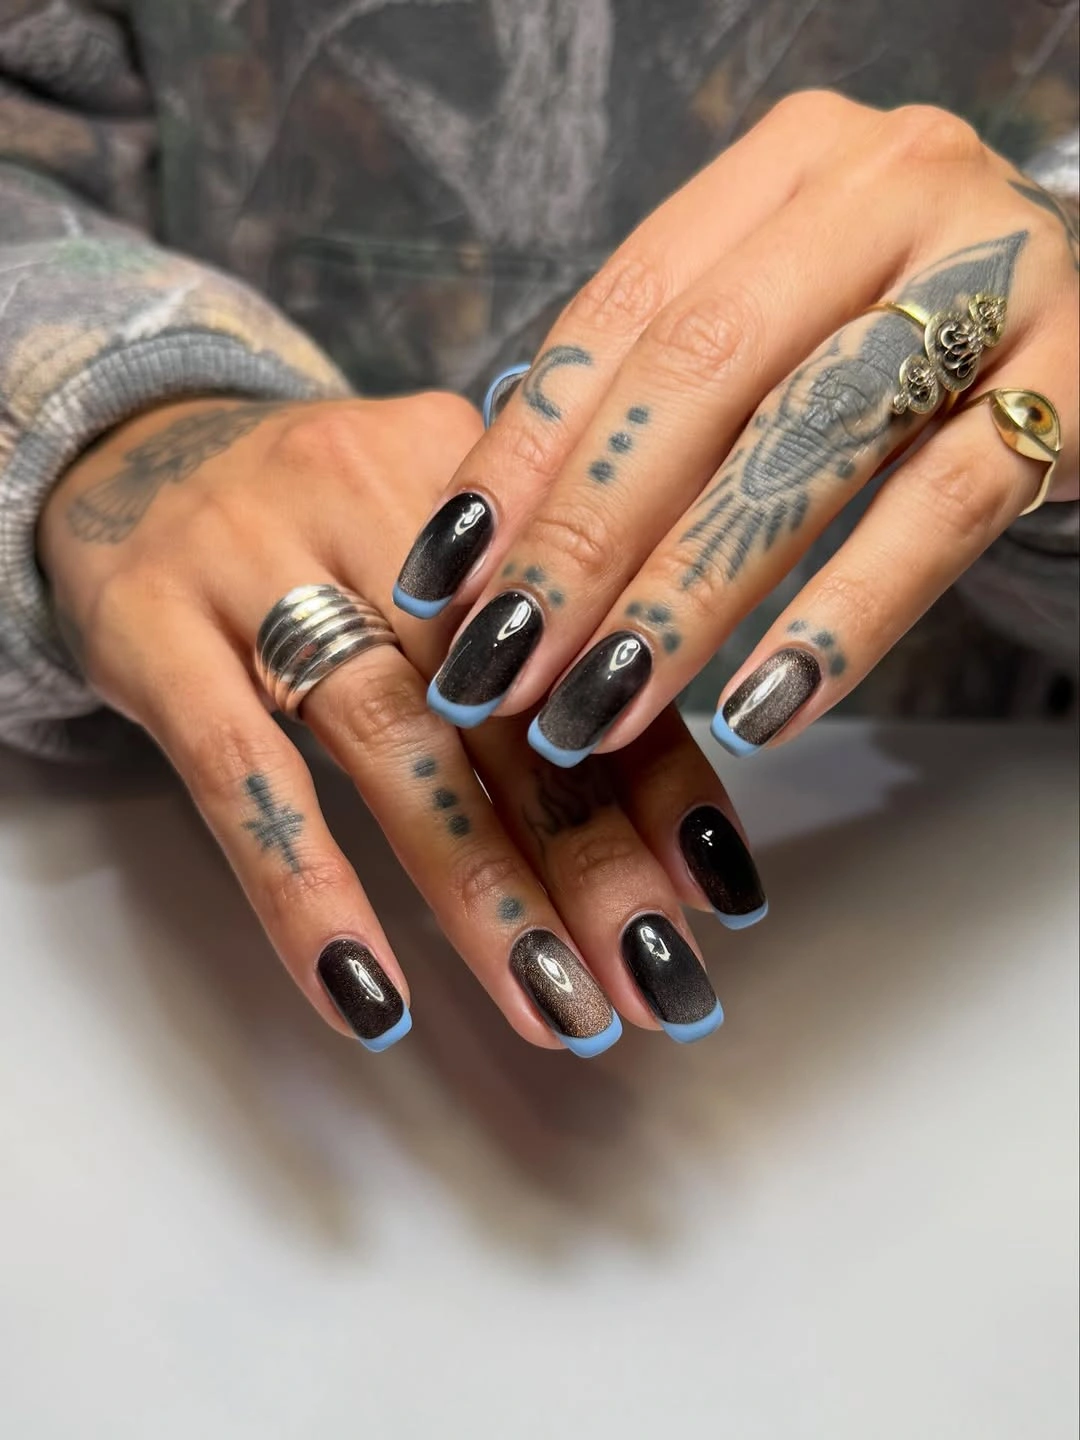
For this design, I would use a black cat-eye or magnetic gel, a pale blue gel for the French tips, and a fine detail brush. A magnetic tool is the key piece because it creates the shifting stripe of light that makes cat-eye polish so distinctive. Brands including Born Pretty, Gelish, and other gel lines offer magnetic shades in different finishes, so I would test the effect before committing to the full manicure.
I would prepare and shape the nails first, then apply the black magnetic polish in thin coats. Before curing the final magnetic layer, I would hold the magnet close to the surface to pull the shimmer into a narrow reflective line. After curing, I would carefully add the blue French tips. One small trick I like is keeping the blue relatively muted – a dusty or powder blue makes the combination feel more autumnal than a very bright sky blue.
This is probably the design I would wear when I want something that feels unmistakably fall without relying on the usual burgundy-and-brown formula. It has a little edge, but the blue keeps it from becoming heavy. And on short coffin nails, that contrast becomes especially wearable. A black blazer, silver rings, cool weather – done. Sometimes the simplest formula has the strongest finish.
Emerald Green Swirls With a Glassy Finish
I love how this manicure turns green into something soft and sophisticated. A translucent nude base is paired with deep emerald-green color concentrated toward the tips, while delicate white and metallic-looking curved lines create a flowing effect across the nails. The long coffin shape makes the design feel elegant, but I would shorten the length slightly for an easier fall version. The result is fresh, polished, and a little unexpected.
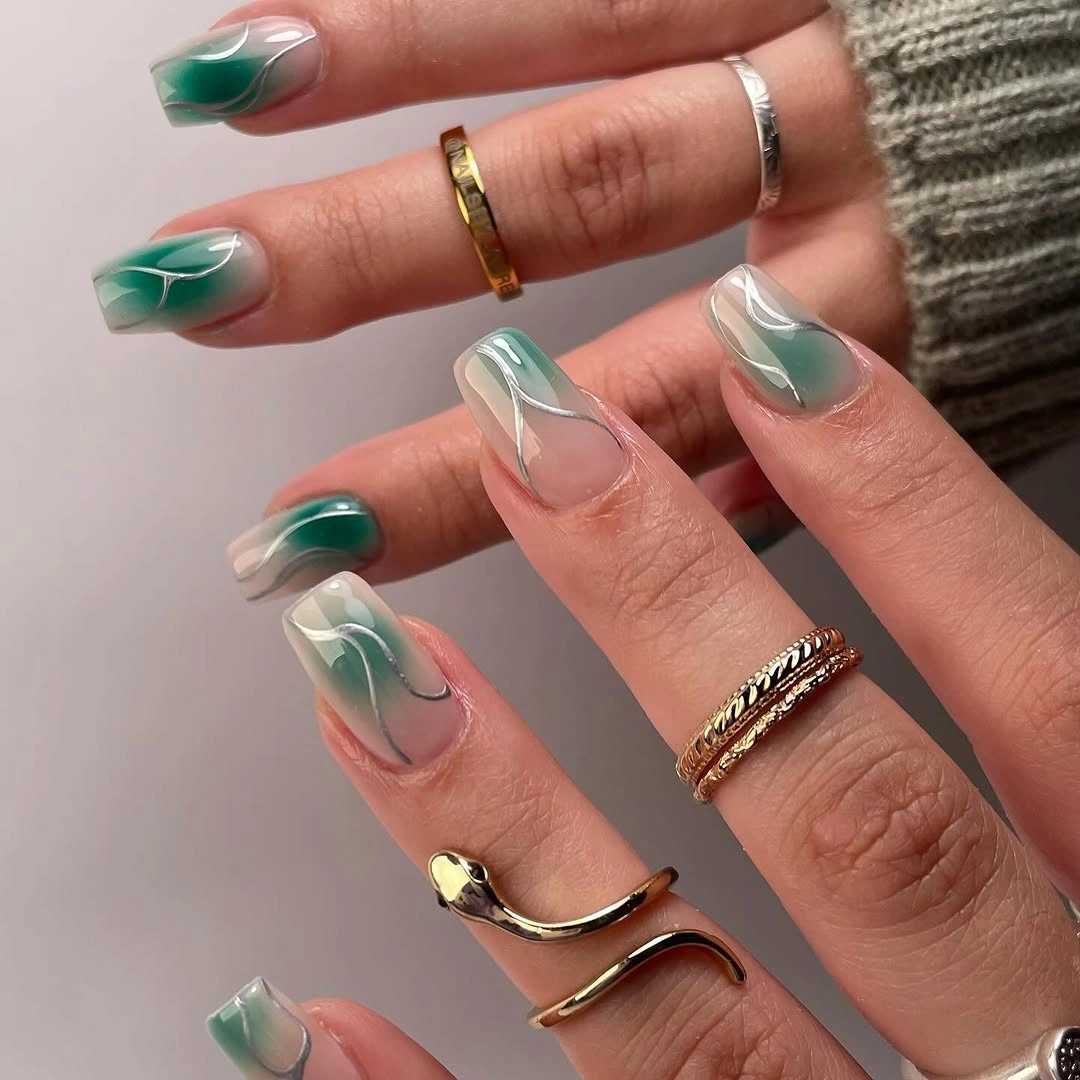
For the color palette, I would use a sheer pink or nude gel, a rich emerald green such as DND Forest Green, and white gel liner for the fine curves. A glossy no-wipe top coat is essential here because the design looks best with that wet, glass-like surface. I would also keep the green slightly transparent in places rather than making it completely opaque.
I would build the manicure with a nude base, then softly place the green toward the tips and blend some of the color inward. After curing, I would draw the thin curved lines with a detail brush, letting them follow the shape of the green rather than making every nail identical. A final glossy layer brings out the depth. I would keep the coffin edges neat and slightly tapered for a cleaner short-nail adaptation.
For me, this is a beautiful early-fall choice when I want color but still want my manicure to feel refined. Emerald works especially well with cream sweaters, gold jewelry, and warm neutrals. It has that little forest-after-rain feeling that makes the season more interesting.
Black Glitter French Tips With a Tiny Heart Detail
This is proof that a simple manicure can still have personality. The nails combine a milky nude base with crisp black French tips, while several tips have a fine glitter finish that catches the light without becoming flashy. Tiny black heart-like details near the cuticle add an understated romantic touch. On short coffin nails, I would keep the French tips relatively thin so the nude space remains visible and the overall effect stays elegant.
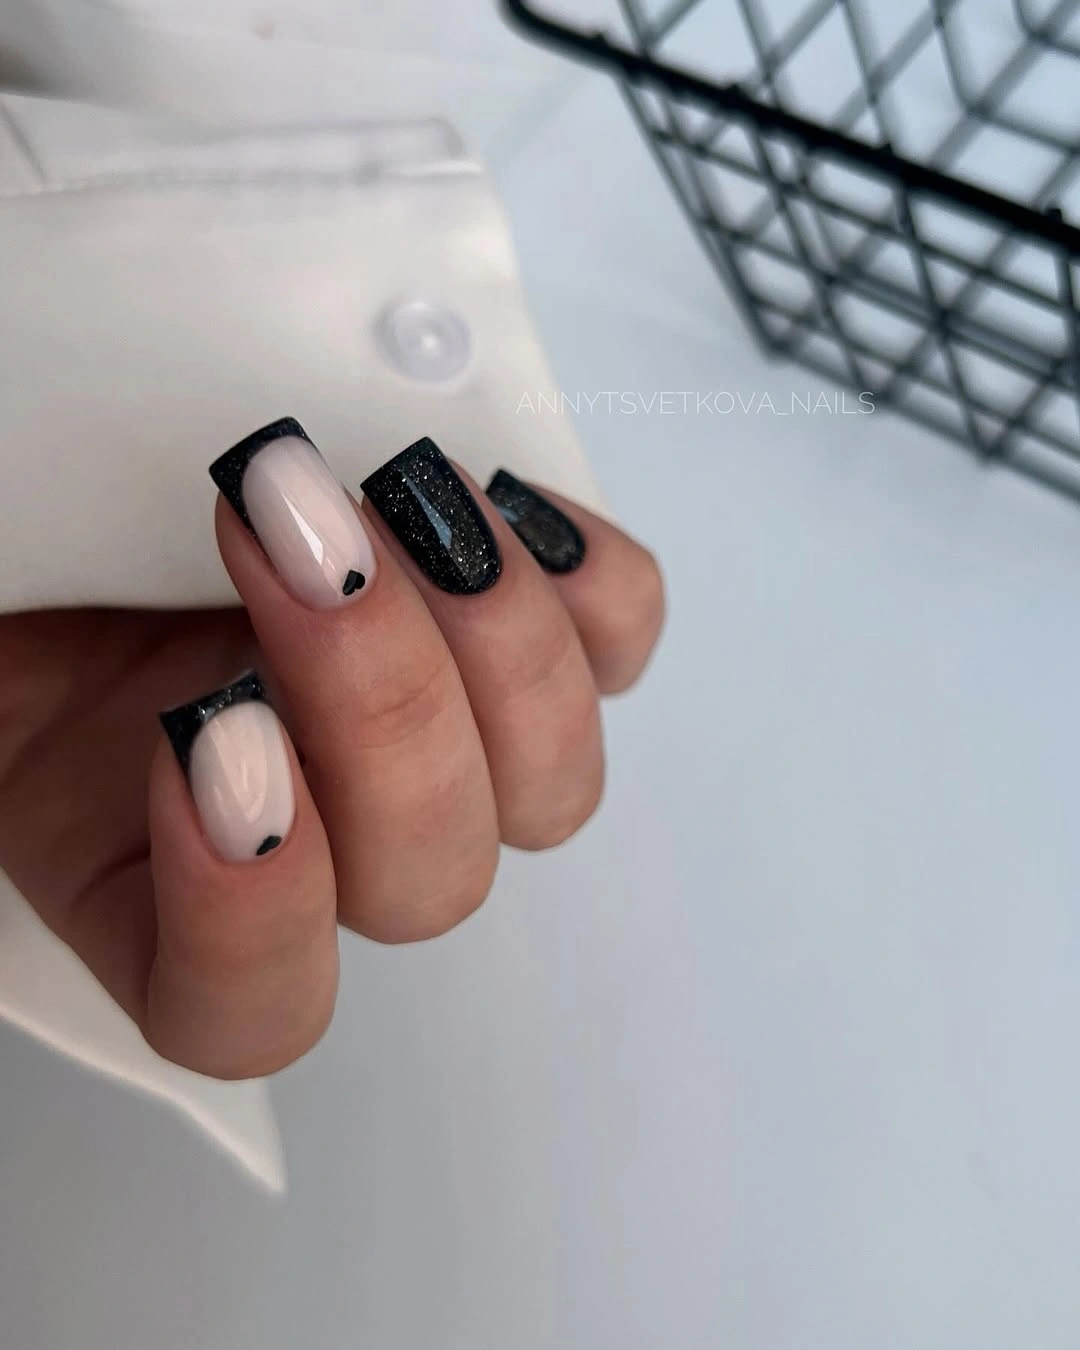
I would use a sheer milky nude, a deep black gel, and a fine black glitter polish for the sparkling tips. OPI Funny Bunny or a similar translucent white-pink shade would work nicely underneath. For the tiny details, I would use a dotting tool or an ultra-fine brush rather than trying to draw them with a regular polish brush.
After shaping the nails into a short coffin, I would apply the sheer base and cure it. Next, I would create the black French tips, keeping the smile line clean and balanced. On selected nails, I would add fine glitter over the black rather than covering every tip. Finally, I would place the tiny black accents near the cuticle and finish with a glossy top coat.
I would wear this one when I want something classy enough for everyday life but not completely predictable. The black makes it feel unmistakably fall, while the glitter and tiny detail keep it from looking too serious. Sometimes that little bit of sparkle is all a manicure needs.