The first crisp mornings, cozy sweaters, and pumpkin-filled weekends are the perfect excuse to refresh your manicure. But should cute fall nails with pumpkins 2026 be sweet and simple, playful with ghosts, or bold with orange and black? From tiny pumpkin accents to detailed seasonal designs, these ideas make it easy to find a look that feels just right for the season.
Playful Pumpkin Pop in Pink and Orange
When I want fall nails to feel festive without looking like a costume, I keep coming back to this kind of playful mix. The manicure combines long almond-shaped nails with a soft pink base, vivid orange, warm yellow, black details, flowers, pumpkins, tiny spiders, a checkerboard accent, and even a little BOO lettering. Nothing feels too coordinated, and that is exactly why it works. In 2026, themed and mismatched manicures are having a real moment because they let one set tell a whole story instead of repeating the same motif on every nail.
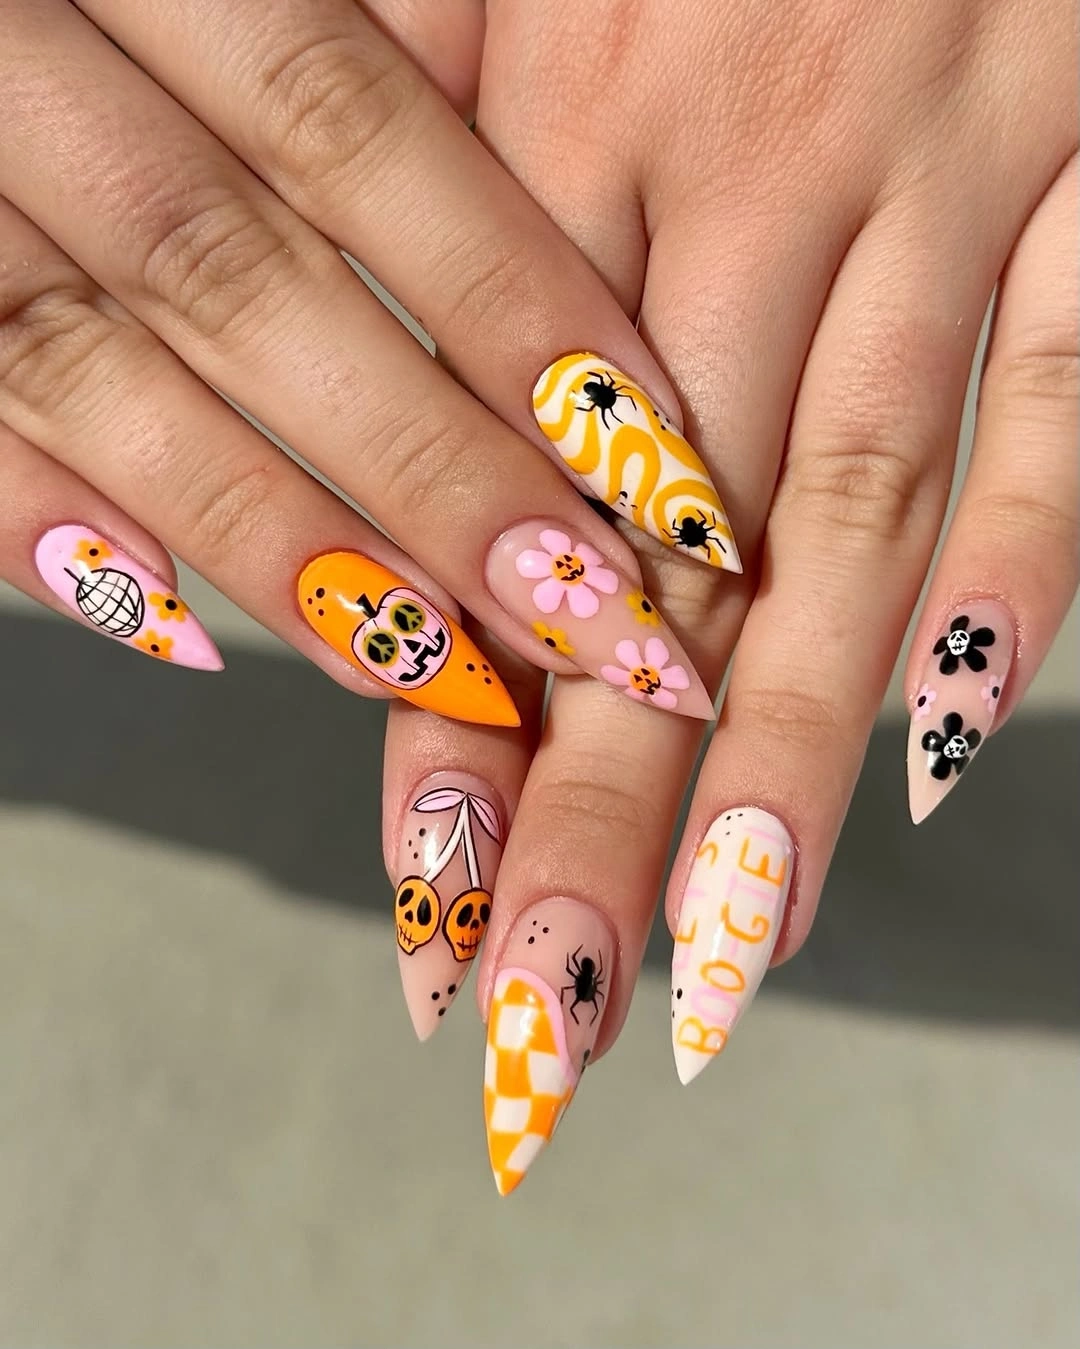
I would build this design around a sheer blush or milky pink polish, then bring in a saturated pumpkin orange, sunny yellow, crisp white, and true black for the artwork. OPI, Essie, and Gelish all have enough warm shades to create a similar palette, while a fine nail-art brush and dotting tool make the flowers, tiny dots, spider legs, and pumpkin faces much easier to control. For the orange accent, I like a creamy finish rather than metallic polish because it keeps the manicure cheerful instead of turning it into full Halloween territory.
At home, I would start with the almond shape and a neat, even base coat before deciding which nails should carry the busiest details. I would leave the blush nails slightly translucent, paint one or two nails orange, then add the flowers, pumpkins, spiders, and checkerboard pattern after the base colors have fully set. The little illustrations do not need to be identical – actually, I think slightly different expressions and shapes make this style feel much more handmade and fun. A glossy top coat over the finished artwork pulls everything together and gives the tiny details that polished salon finish.
Moody Black Pumpkin Nails With Ghosts and Flowers
For a darker interpretation, I would take the pumpkin theme in a completely different direction. Matte black nails create the foundation here, while several accent nails feature white flowers, orange pumpkin details, a friendly little ghost, and delicate black-and-white linework. The contrast is what makes this manicure so striking. Rather than covering every nail in orange, I would let black do most of the visual work and use pumpkin orange almost like a small flash of autumn light.
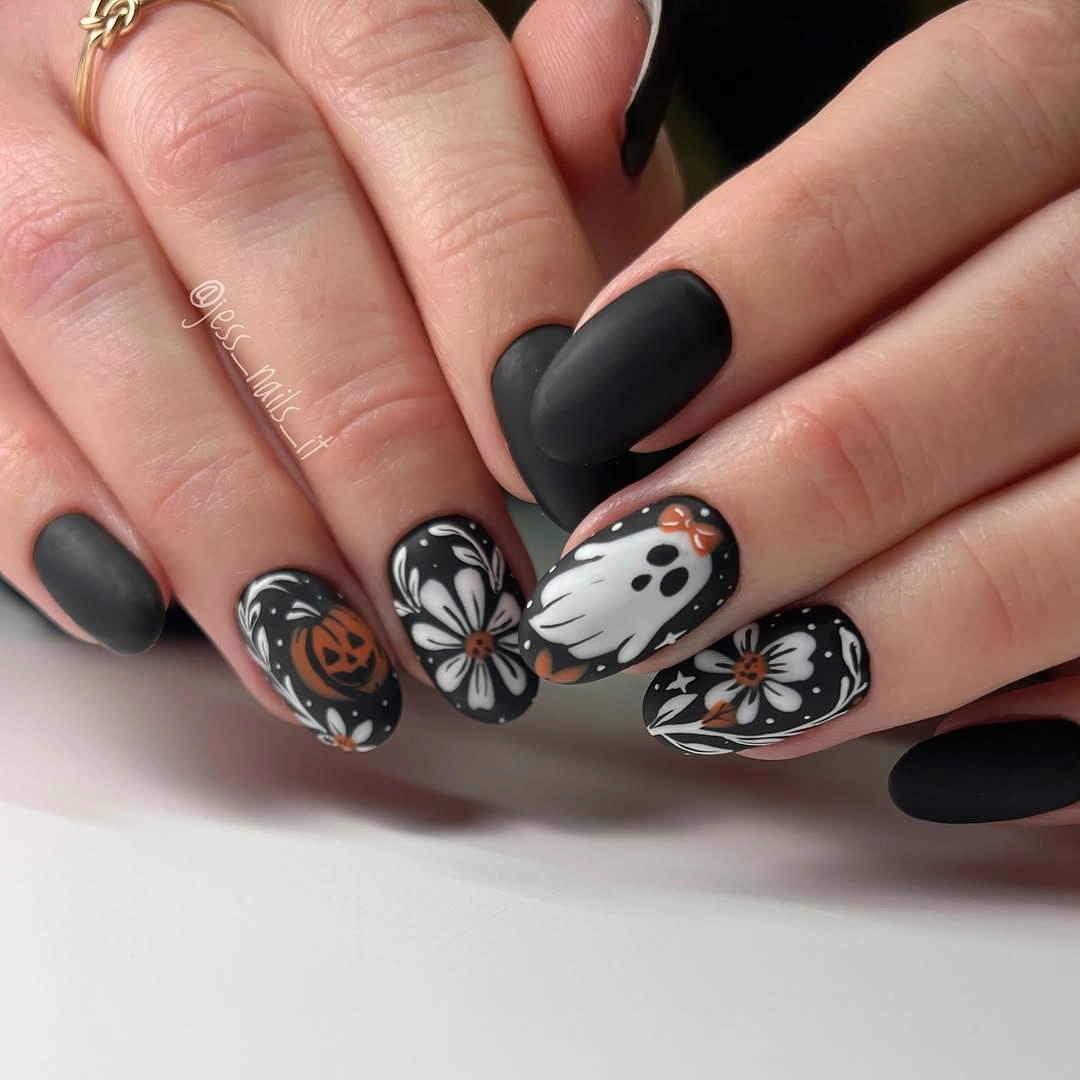
The easiest palette here is surprisingly small: matte black, bright white, pumpkin orange, and a tiny amount of warm brown for the flower centers. I would reach for OPI Nail Lacquer in a deep black or a comparable gel shade, then use a matte top coat on the solid nails. For the artwork, a highly pigmented white liner gel is useful because the floral petals and ghost need clean edges. A small detail brush is more important than owning twenty different colors.
I would shape the nails into a short-to-medium rounded almond or soft oval before applying the base. After curing the black gel, I would choose a few accent nails for the flowers and ghost rather than trying to decorate every surface. The ghost works best when its silhouette stays simple, while the flowers can be built from curved white petals around small orange-brown centers. I would finish the illustrated nails with gloss and keep the solid black nails matte. That difference in texture is subtle, but it gives the manicure much more dimension.
Patchwork Pumpkins, Ghosts and Tiny Autumn Details
I love a manicure that looks as though someone opened a little autumn craft box and decided to put everything good onto the nails. This square manicure does exactly that, combining a sheer pink-nude base with orange French tips, black outlines, white ghost accents, pumpkin motifs, stitched details, and tiny graphic elements. The patchwork effect keeps the manicure playful, but the repeated black outline gives all those different designs a visual connection.
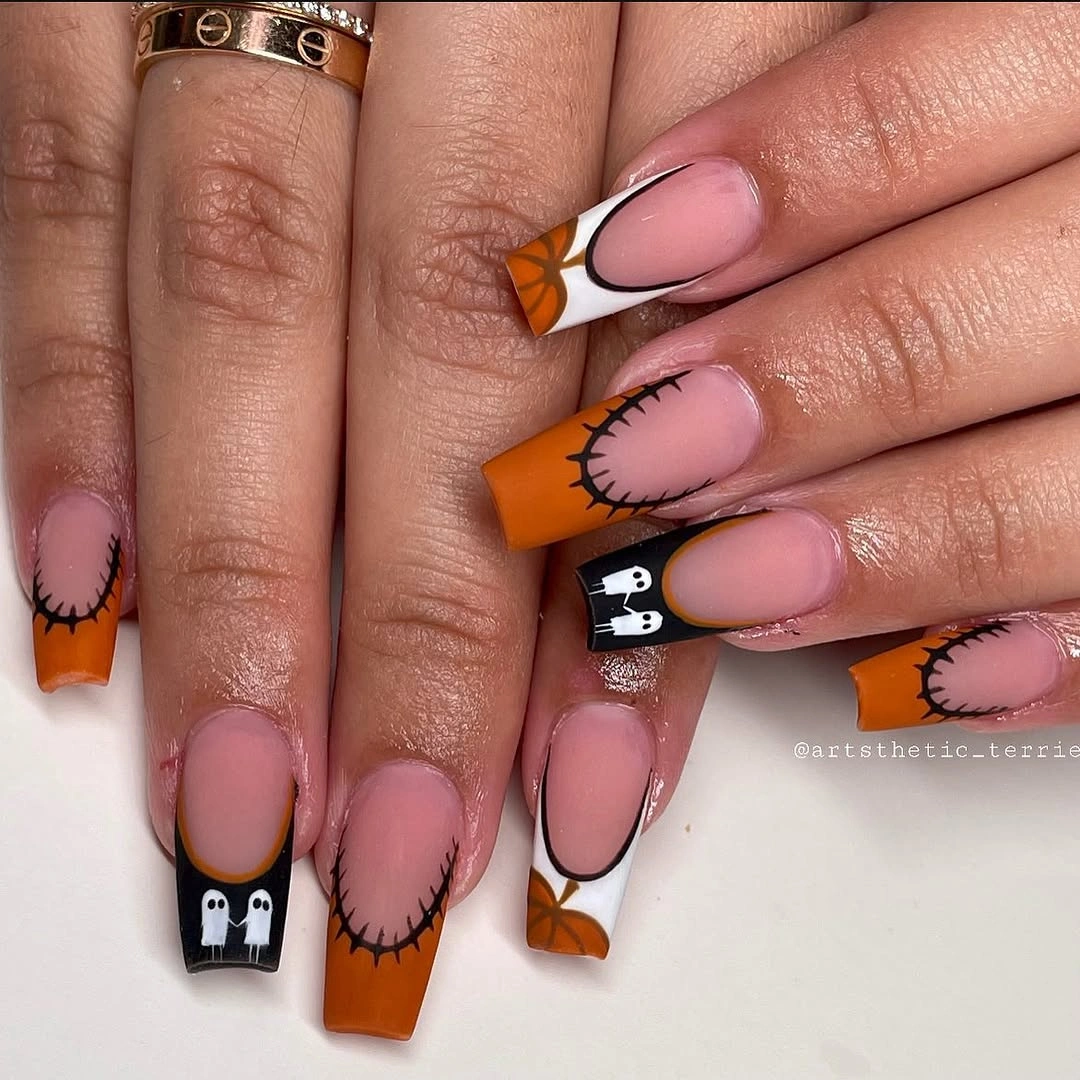
For this design, I would keep the palette deliberately controlled. A sheer pink such as Essie Ballet Slippers or a similar milky nude gives me the clean background, while a burnt orange cream polish handles the tips and pumpkin shapes. I would add opaque black and white for the ghosts, outlines, and stitching. A thin liner brush is essential for the little stitches around the orange shapes, while a small flat brush can help create crisp square French tips without making them look bulky.
I would begin by painting the sheer nude base and mapping out the orange French tips before adding any artwork. Once those are secure, I would alternate the details so that the manicure feels balanced: a pumpkin here, a ghost there, a stitched oval on another nail. I would keep the negative space visible because it gives the busy design room to breathe. For me, that is the trick with maximalist nail art – the manicure can contain plenty of information, but the eye still needs somewhere quiet to land.
3D Pumpkin Nails in Glowing Orange
Sometimes I do not want tiny pumpkin illustrations. I want the pumpkins to practically jump off the nails. This manicure takes the idea literally with raised, sculptural orange pumpkin details over a warm orange base. The dimensional ridges create a velvet-like surface, while the black stems and delicate curling lines add definition. It is bold, but because the color palette stays almost entirely within the orange family, the result feels surprisingly cohesive.
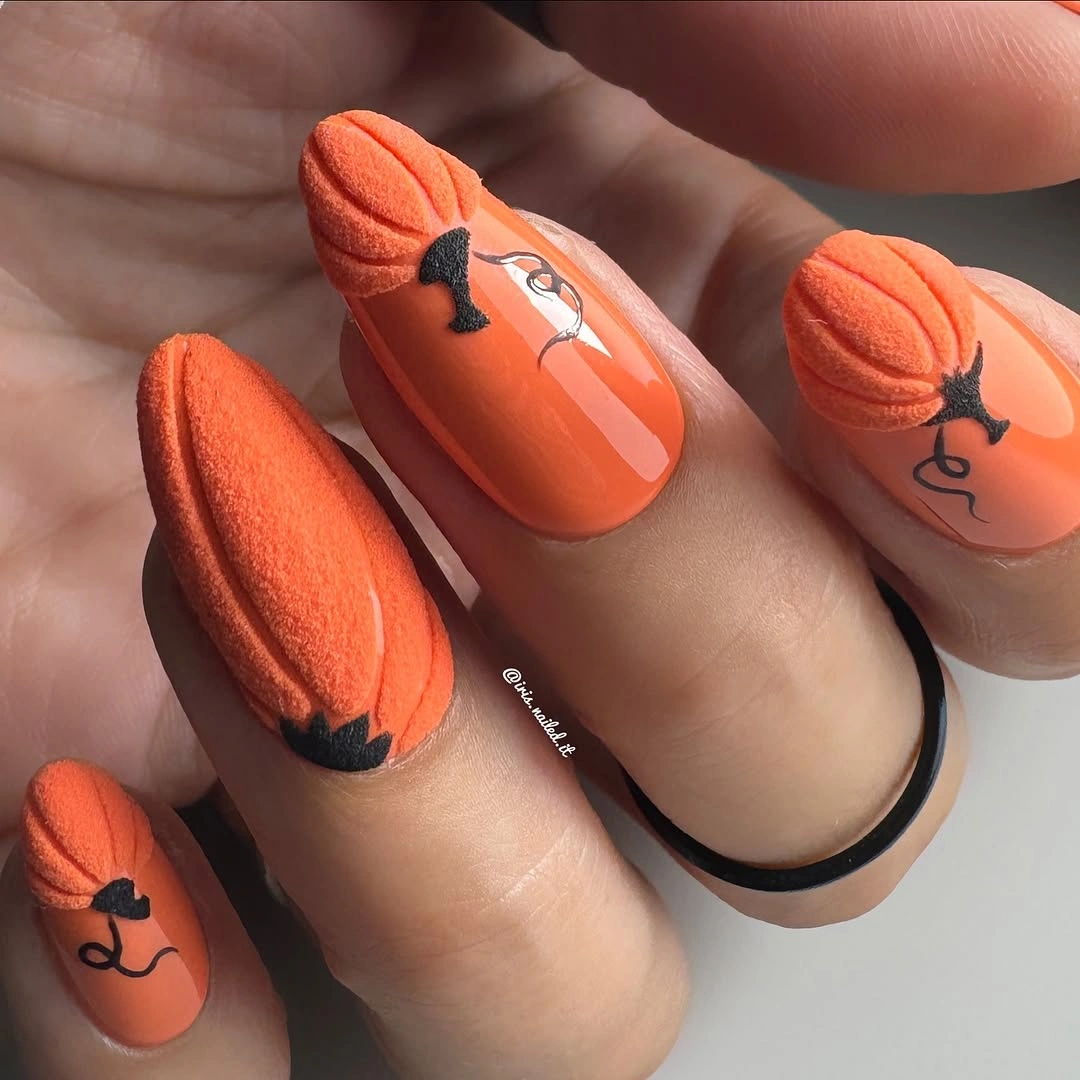
I would use a rich orange gel polish for the base and a thicker 3D sculpting gel or acrylic gel for the raised pumpkins. The sculpting product needs enough structure to hold those ridges without spreading before curing. For the stems, I would use black or very dark brown gel paint, while a glossy top coat can be used selectively on the flatter areas. Brands such as Gelish, OPI, and Aprés offer products that can be combined for this kind of salon-style effect, although the exact 3D product matters more than the brand name.
I would first create the orange base and cure it completely. Then I would place the 3D gel in small pumpkin-like sections, building the ridges gradually instead of trying to create the entire shape in one thick layer. Each section should be cured according to the product instructions before the next one is added. Once the pumpkin texture is secure, I would add the tiny black stems and curves. This is one manicure where patience really pays off – rushing the raised details is the fastest way to lose the crisp sculptural effect.
Mini Pumpkins and Golden Glitter for a Soft Fall Look
If the Halloween manicure feels too dramatic for everyday life, I would go much softer with tiny pumpkins scattered over a sheer neutral base. The manicure combines delicate orange pumpkin illustrations with small white dots and several warm golden glitter nails. The overall effect is feminine, polished, and distinctly autumnal without relying on black, ghosts, or heavy Halloween graphics. This is the version I would save when I want pumpkin nails that can survive a full month of outfits.
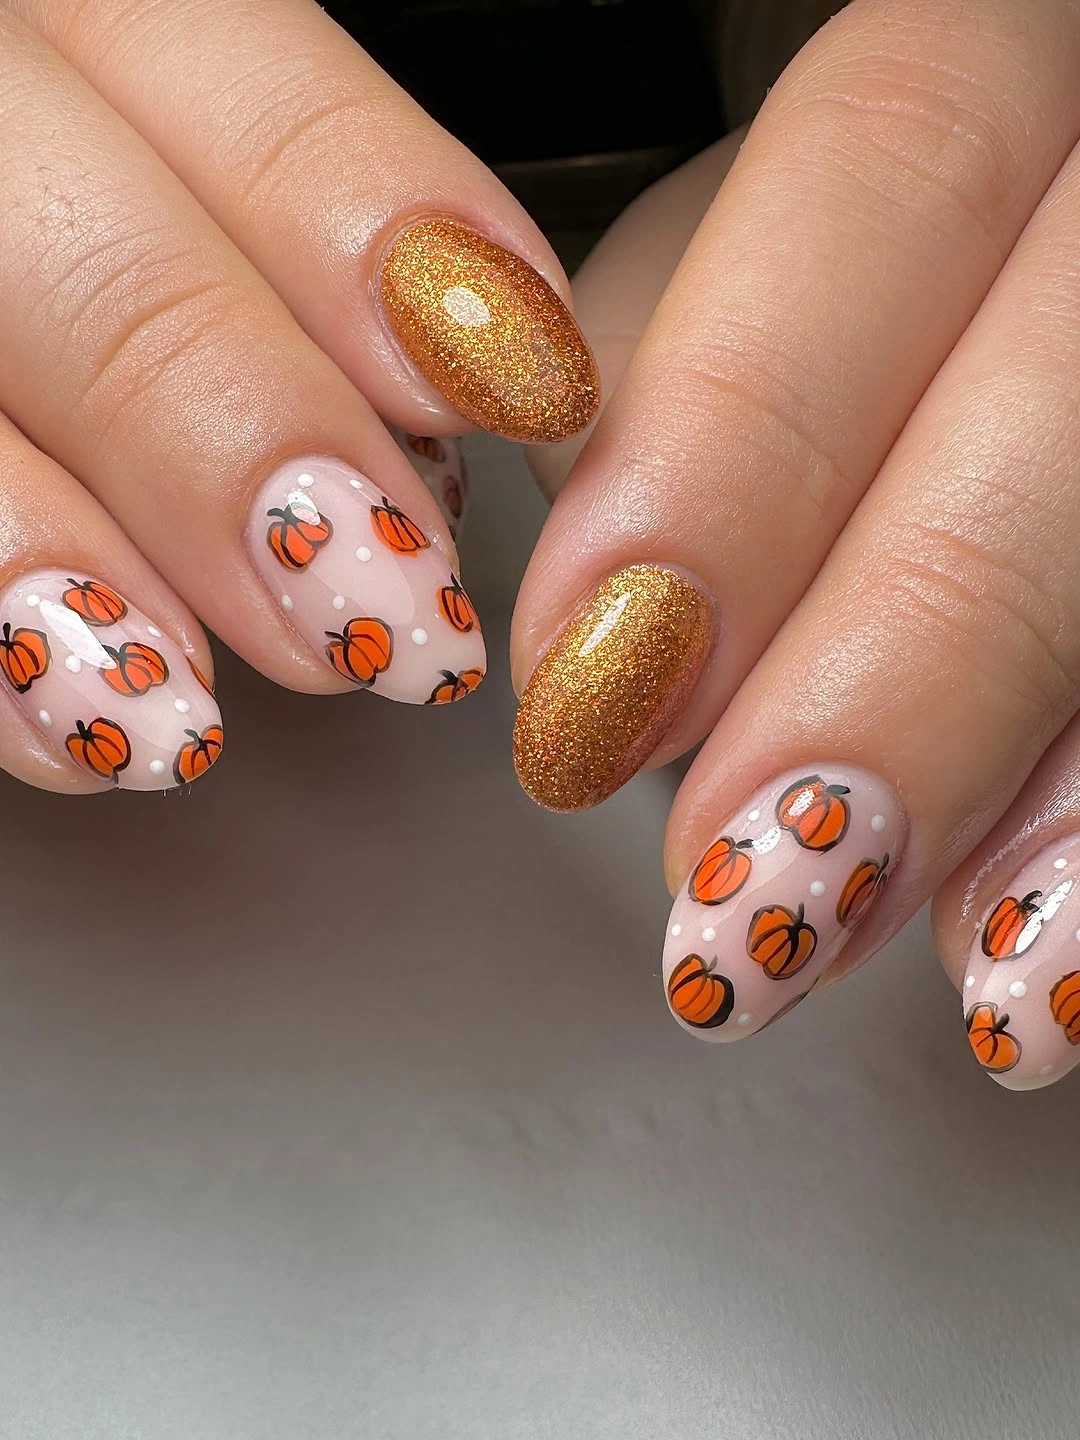
I would start with a translucent milky pink or nude base, then use a bright pumpkin orange and muted green for the tiny stems. The glitter accents need a warm gold rather than a cool silver, because gold connects beautifully with the orange and makes the manicure feel more like autumn sunlight. OPI, Essie, and Olive & June all offer neutral and metallic shades that can create this kind of palette, while a fine dotting tool makes the tiny white accents much easier to repeat.
Playful Ghosts and Pumpkin Patchwork
I love how this manicure makes Halloween feel cute rather than spooky. Short rounded nails carry tiny pumpkins, smiling ghosts, black-and-pink checkerboard accents, and a curved orange design, all over a translucent nude base. The mismatched arrangement keeps the set youthful without becoming chaotic.
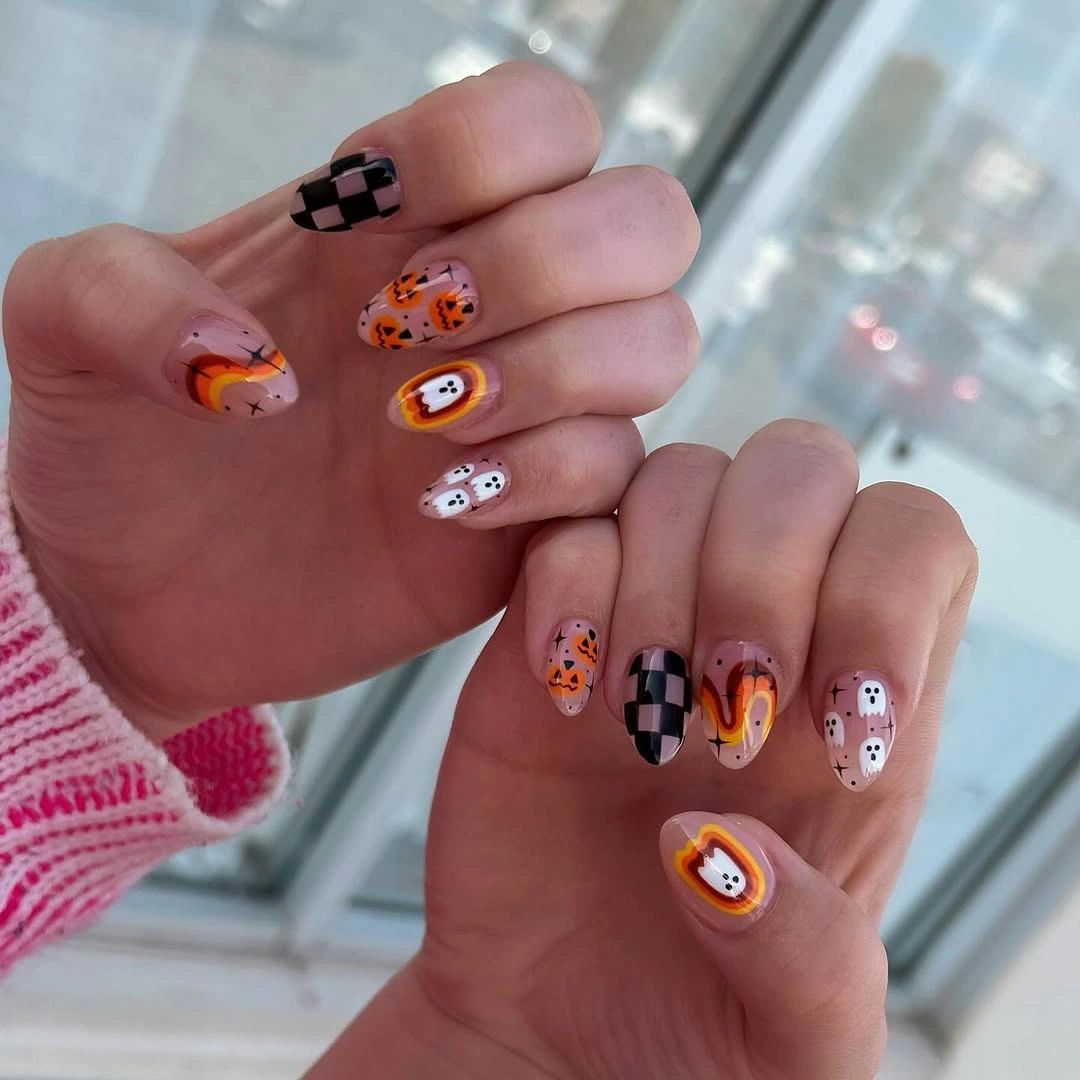
I would use a sheer pink-nude polish, pumpkin orange, soft yellow, black, and white. OPI or Essie can cover the base colors, while a fine liner brush and dotting tool make the tiny ghosts, pumpkins, and checkerboard much easier to create.
I would start with the nude base, then add the checkerboard and orange shapes before painting the miniature pumpkins and ghosts. Tiny black dots and outlines give the artwork definition without making it look heavy.
For me, this is one of the easiest looks to wear through October. It has plenty of personality, but the short length and neutral background keep it practical.
Gothic Pumpkin and Burgundy Elegance
This manicure takes pumpkins somewhere much more sophisticated. Long almond nails combine translucent nude sections with deep burgundy glitter, copper-orange accents, delicate pumpkin illustrations, metallic gold details, and fine ornamental lines. It feels less like a Halloween costume and more like autumn jewelry for the hands.
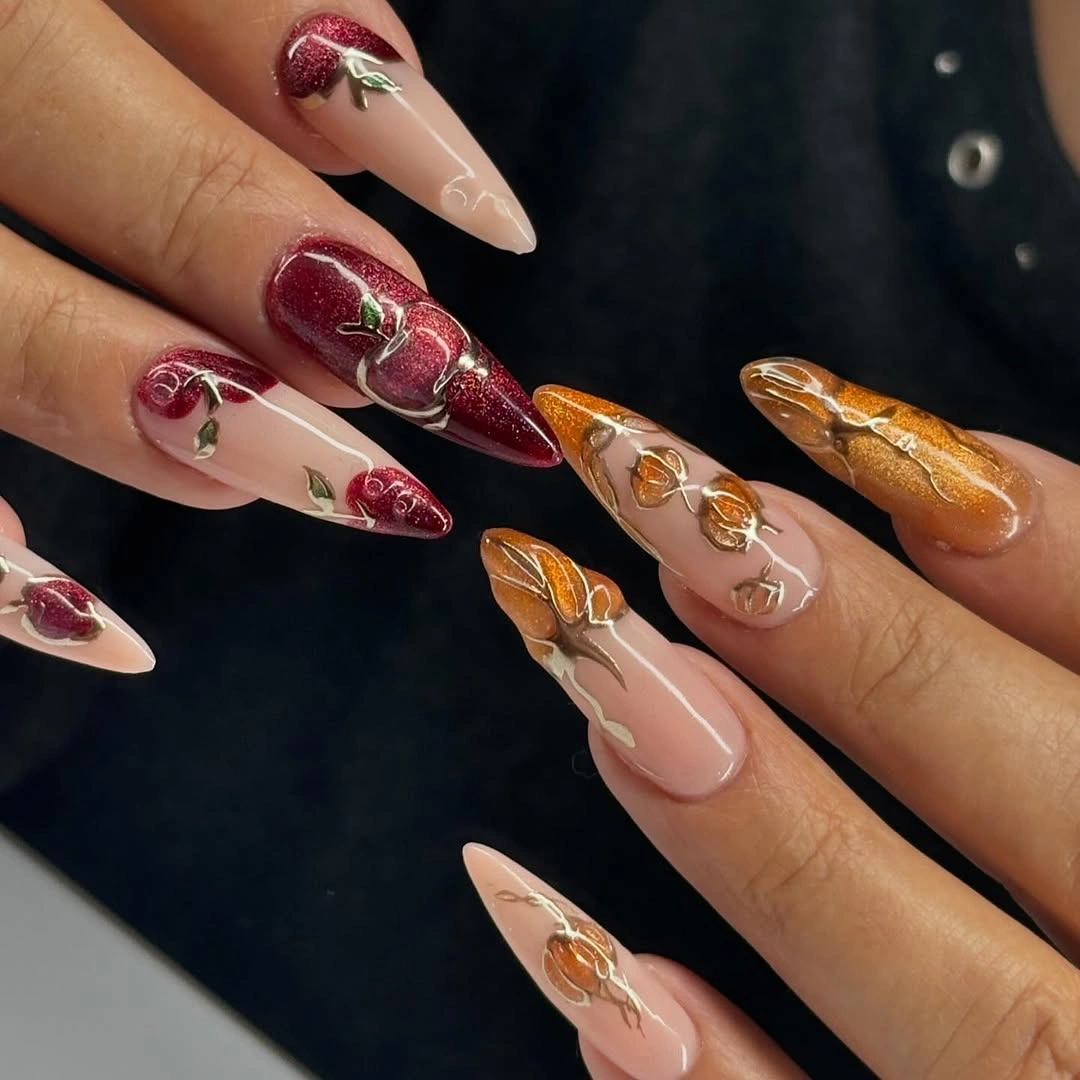
I would reach for a sheer beige-pink base, burgundy shimmer, metallic copper, gold gel paint, and a dark brown or black liner. A chrome or metallic detail gel is especially useful for the fine decorative accents.
I would build the nude base first, then add the burgundy and copper sections. After curing, I would outline the pumpkins and leaves with fine metallic lines, keeping the decoration delicate so the long almond shape remains elegant.
This is my pick when I want pumpkin nails for dinner, a fall wedding guest look, or an evening out. Burgundy instantly gives the seasonal theme a richer, more grown-up mood.
Pink Pumpkin Garden With Tiny Ghosts
Who says pumpkins have to be orange? This playful manicure mixes soft pink, lavender, peach, and bright floral colors with outlined pumpkins, tiny ghosts, stars, and miniature flowers. The result feels like Halloween viewed through a pastel lens – sweet, whimsical, and surprisingly fresh.
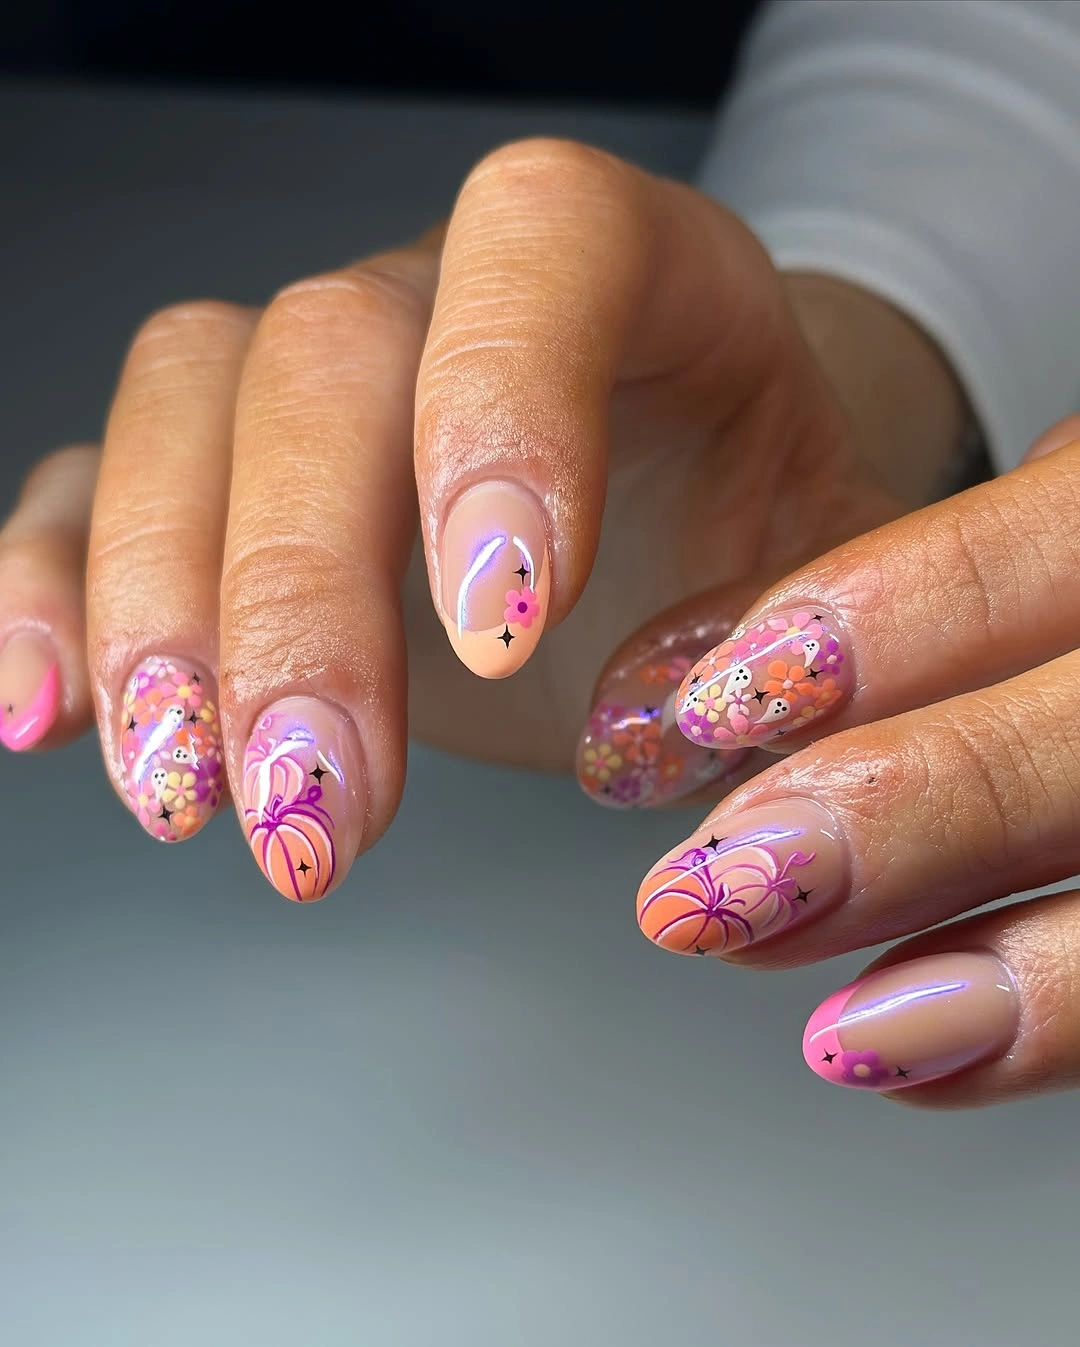
I would use a translucent nude base with pink, peach, lavender, white, and a small amount of black for outlines. A reflective or pearlescent top coat can add the glowing effect seen across the design.
I would keep the artwork tiny and layered, starting with flowers and pumpkins before adding the ghosts and little stars. A dotting tool is perfect for petals, while a liner brush handles the pumpkin grooves and miniature outlines.
I especially like this idea for someone who finds traditional black-and-orange Halloween nails a little too predictable. The pastel palette makes the manicure feel wearable well beyond October 31.
Neutral Leopard Pumpkins for Cozy Fall Days
This design is proof that pumpkin nails can be wonderfully understated. A milky nude base is paired with brown leopard-print French tips, delicate leafy branches, tiny pumpkin motifs, and charming white ghost accents with little bows. The combination feels warm, polished, and very much at home with a chunky sweater.
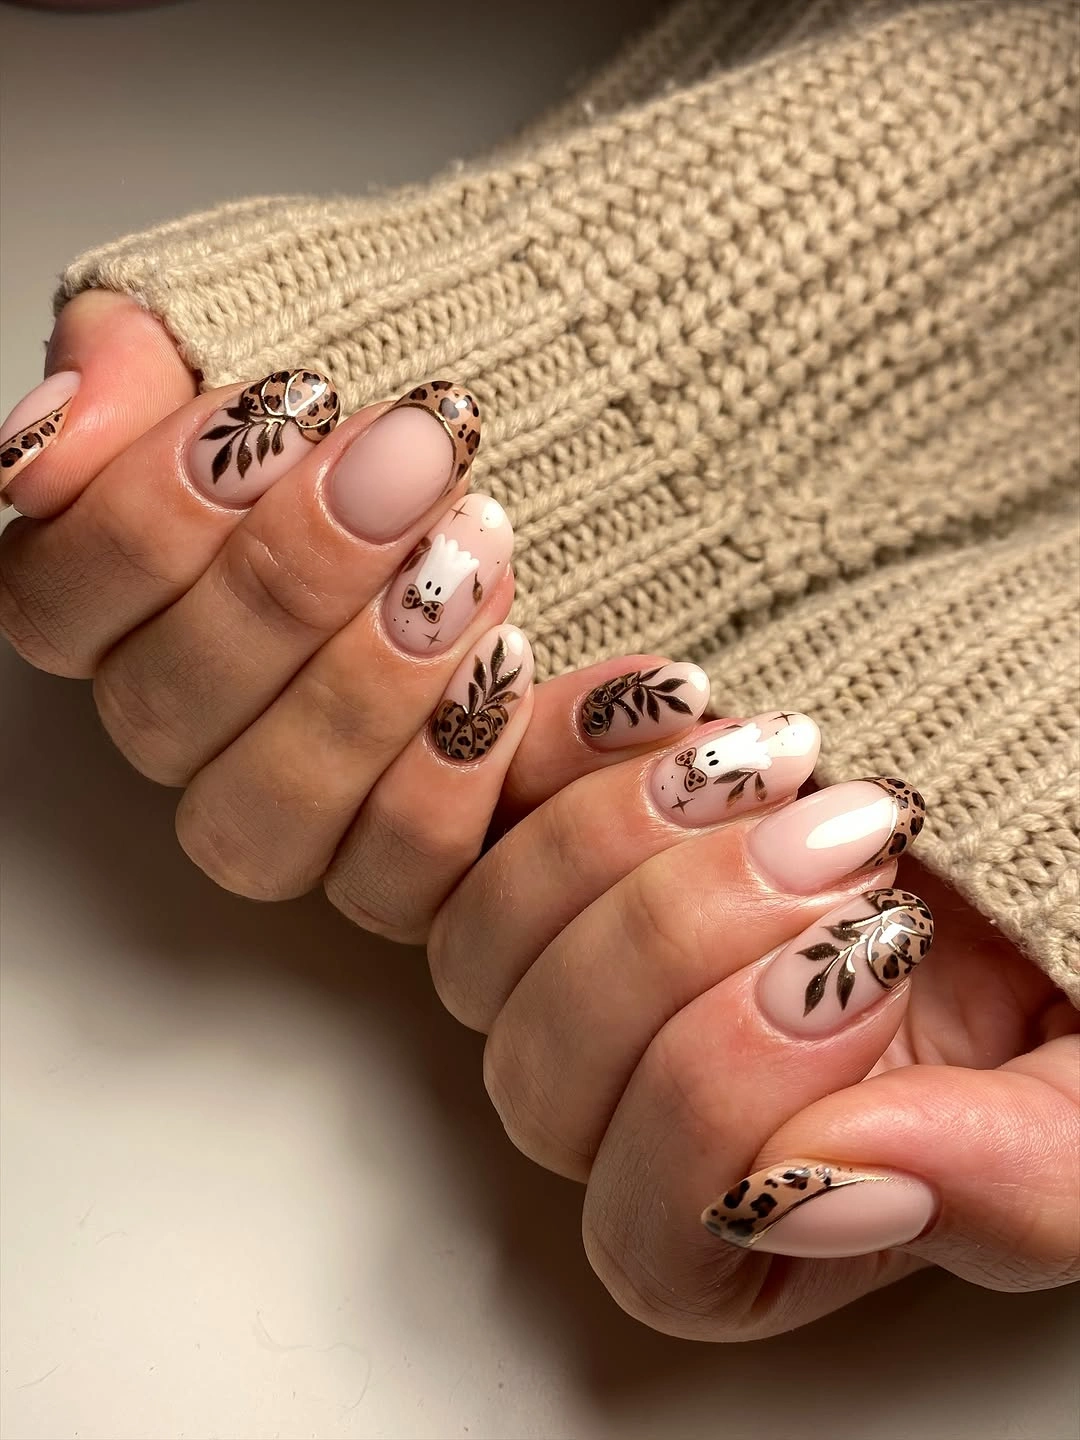
I would choose a milky nude, chocolate brown, soft white, and a warm tan for this palette. A fine brush is enough for the leaves and pumpkin outlines, while a small dotting tool helps create the irregular leopard spots.
I would paint the French tips first and add the brown foliage once the base is completely dry or cured. The tiny pumpkins and ghosts can then be placed selectively, leaving several nails mostly neutral.
This is probably the most versatile design in this set. I can easily see it with cream knits, brown suede, denim, or a camel coat – basically the entire fall wardrobe.
Classic Pumpkin Patchwork in Orange and White
For a cheerful everyday option, I would go with this short square manicure. It combines a clean white base, bright orange French tips, tiny jack-o’-lanterns, miniature flowers, a gray framed accent with an autumn leaf, and orange-and-white checkerboard details. It feels festive without overwhelming shorter nails.
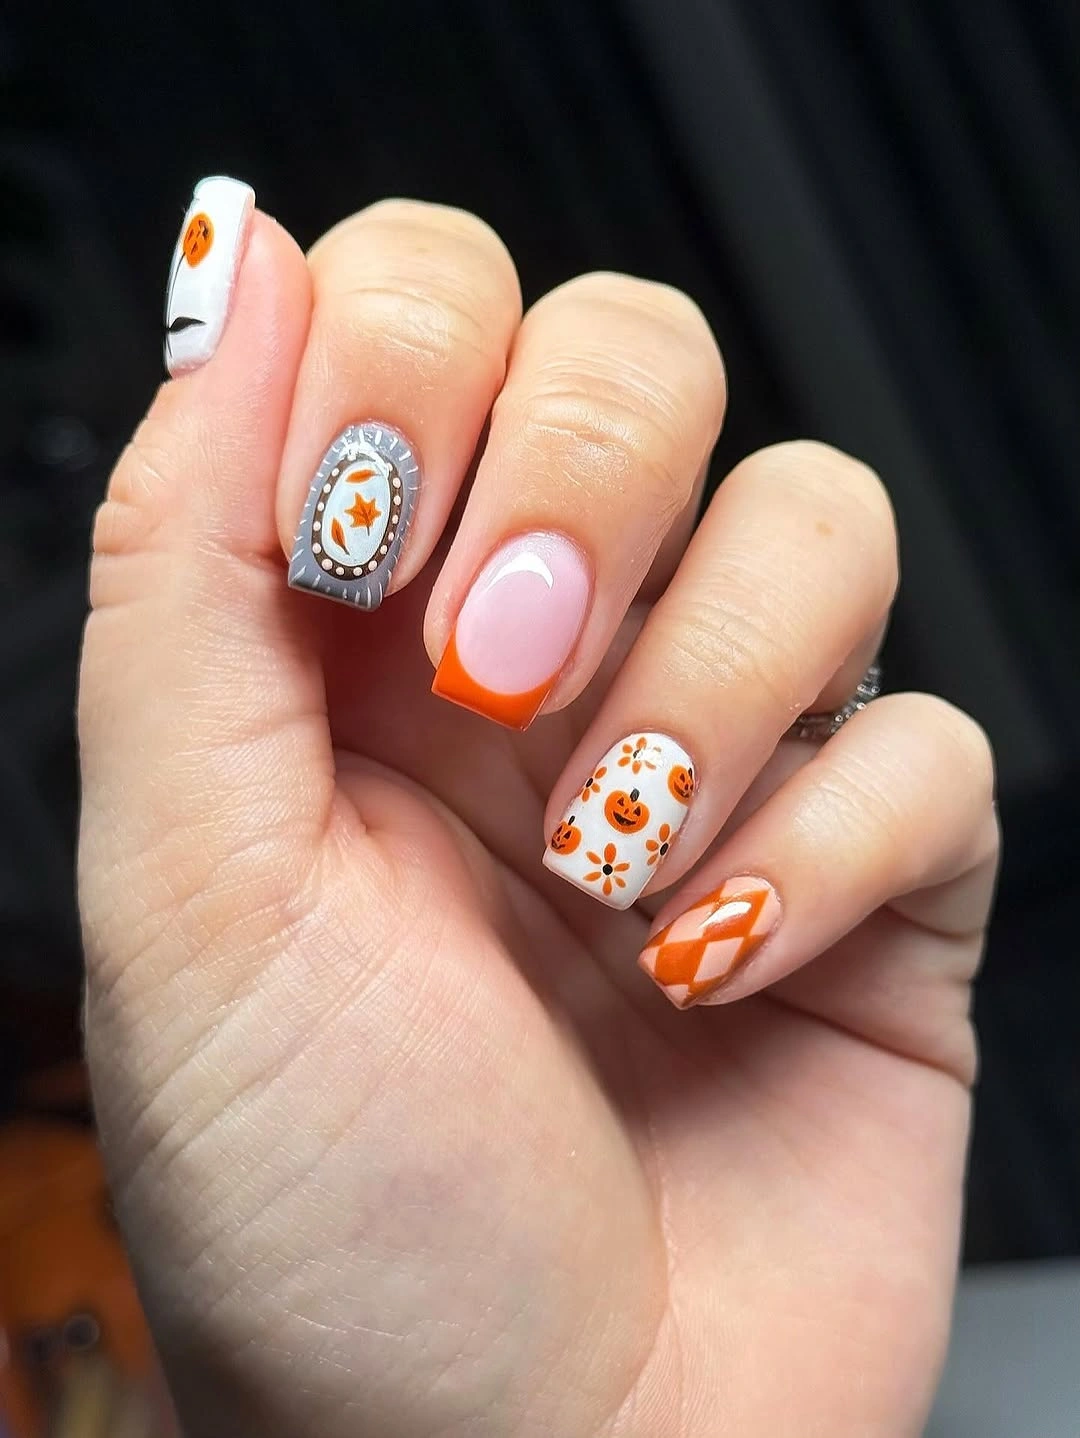
The essentials are a milky white polish, vivid pumpkin orange, soft gray, and black for the tiny faces and outlines. I would use a fine detail brush for the pumpkins and a striping brush for the French tips and checkerboard.
I would begin with the white base, then create the orange French tips and checkerboard accent. Once those are finished, I would add the miniature pumpkins and flowers, keeping their placement slightly irregular for a handmade feel.
If I wanted cute fall nails that were easy to wear every day, this would be near the top of my list. It has the pumpkin-season charm I want, but the short square shape keeps everything neat, practical, and very easy to style.
Black and Amber Halloween Glam
I would call this the moodier side of cute fall nails. Long almond nails mix glossy black, translucent nude, amber cat-eye accents, a sculpted white ghost, a bright jack-o-lantern, and delicate spiderweb details. The orange pumpkin becomes the obvious focal point against the darker palette.
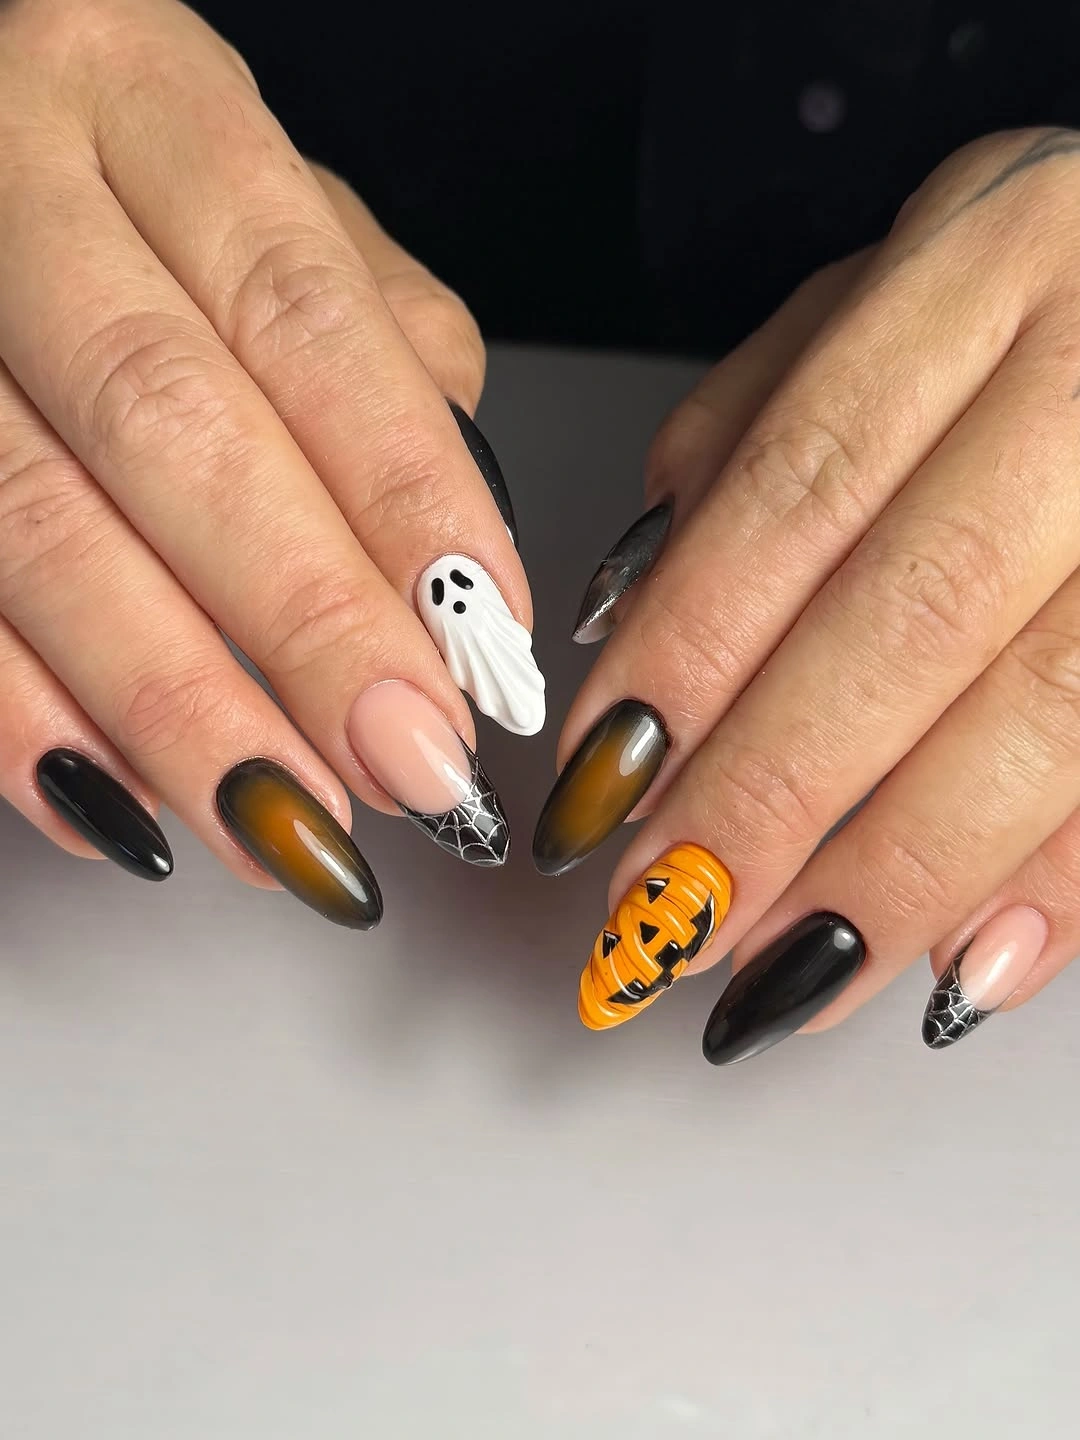
I would use black gel, sheer nude, amber cat-eye polish, white, and pumpkin orange, plus a fine liner brush for the web and pumpkin details. A magnetic cat-eye gel creates that glowing amber center without needing additional decoration.
I would apply the nude and black bases first, then create the amber magnetic effect before adding the ghost and pumpkin artwork. I would keep the spiderweb lines thin and slightly imperfect so they complement rather than compete with the larger details.
This is the manicure I would choose for an evening Halloween event. It has plenty of drama, but the glossy black keeps it polished instead of overly playful.
Mini Pumpkin Garden on Short Nails
Short square nails can absolutely carry a detailed autumn design. Here, a soft nude base is decorated with tiny orange pumpkins, red flowers, delicate leaves, and a little mushroom motif. The warm red accents make the manicure feel more like an autumn garden than a traditional Halloween set.
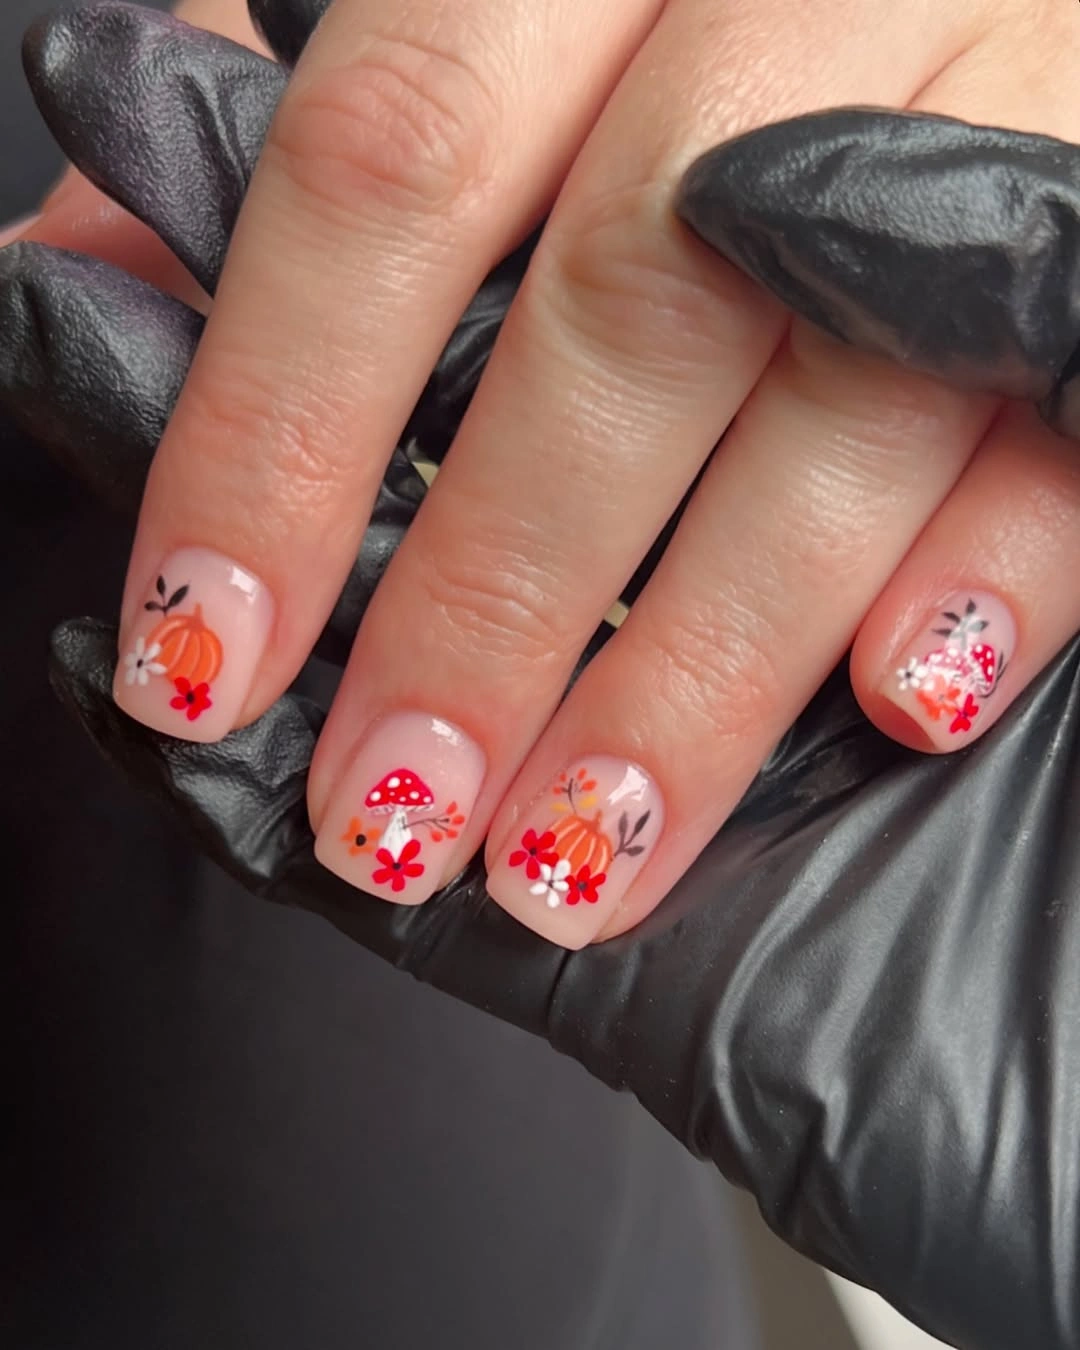
I would keep the palette warm and compact with nude, pumpkin orange, brick red, white, brown, and a touch of green. A small dotting tool and fine brush are enough for the flowers, leaves, mushrooms, and pumpkin outlines.
I would paint the nude base, then build the motifs in tiny clusters rather than spreading individual details randomly across each nail. That keeps the short shape visually clean while still giving every nail something interesting to say.
I especially like this option for everyday fall wear. It is cute, practical, and easy to pair with sweaters, denim, and those first proper autumn boots.
Whimsical Pumpkin Patch With Ghosts
This manicure feels like a tiny illustrated Halloween story. A milky white base carries hand-painted pumpkins, white ghosts, black bats, candy corn, stars, and small curved details. The almond shape gives the artwork enough space while keeping the overall look soft and feminine.
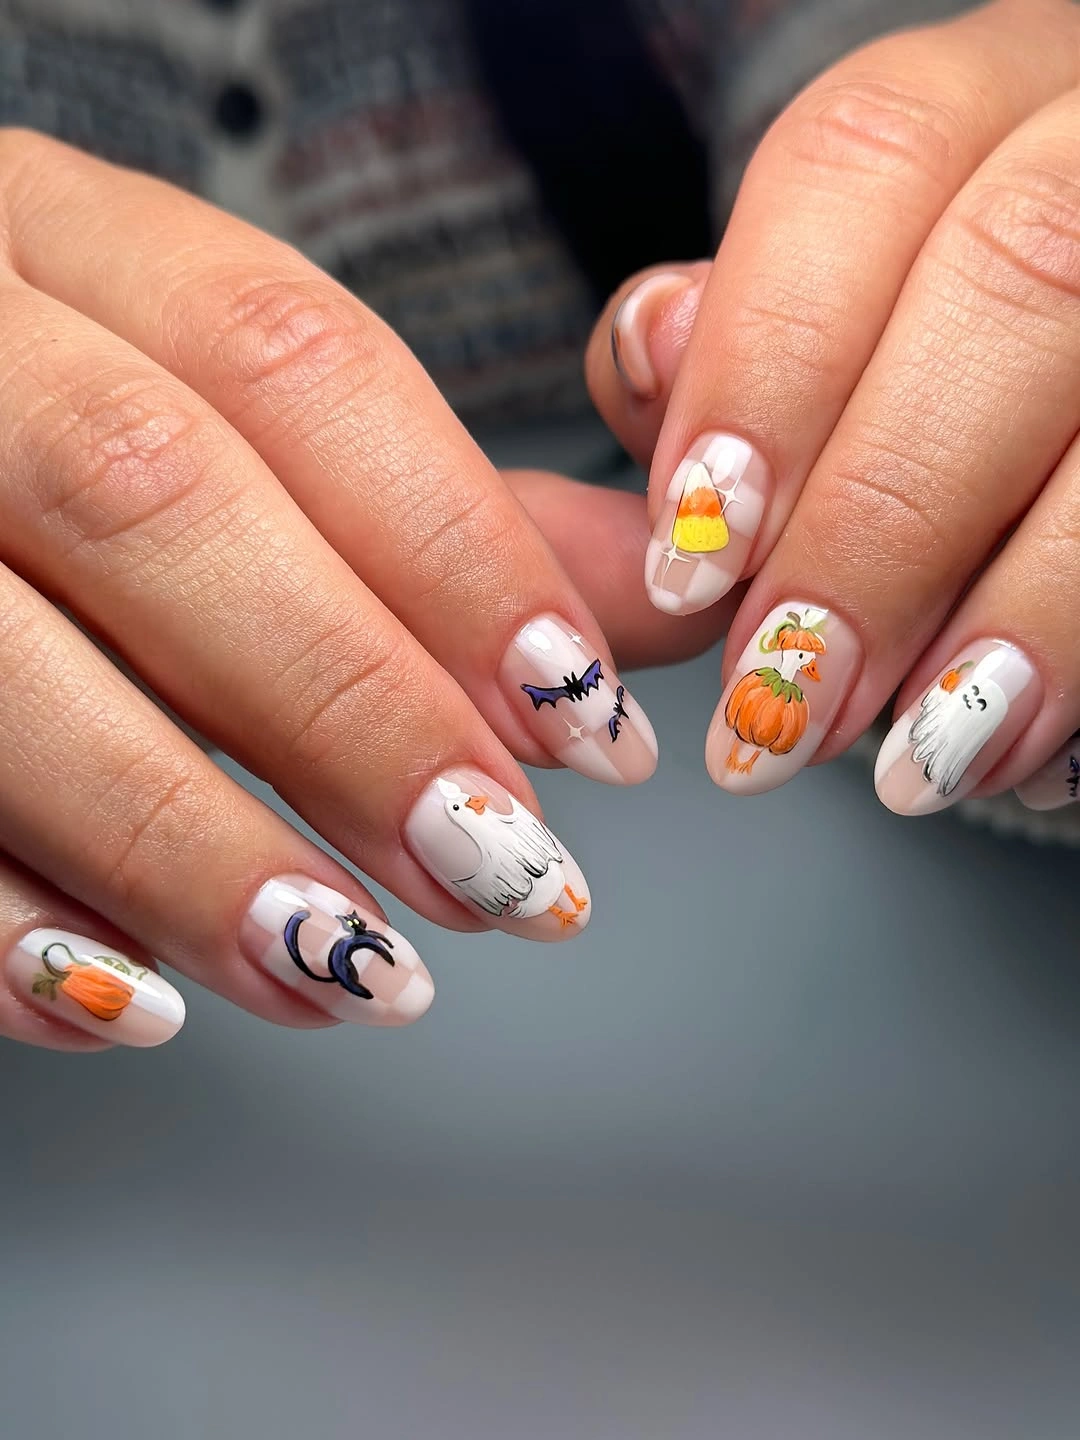
I would use milky white, orange, yellow, green, black, and a tiny amount of lavender or blue for the cooler details. Fine nail-art brushes are essential here because the charm comes from the miniature illustrations.
I would create the white base first, then place the larger pumpkins and ghosts before adding bats, candy corn, stars, and tiny outlines. I would avoid making every nail equally busy – some breathing room makes the artwork much prettier.
This one makes me want to pull out an oversized sweater immediately. It is unmistakably Halloween, but the hand-drawn style keeps it charming rather than scary.
Delicate Pumpkin and Leaf Details
For a softer fall mood, I would choose these almond nails with a translucent nude base and tiny orange pumpkins, green leaves, red berries, and white floral shapes outlined in gold. The delicate placement makes the manicure feel almost botanical, with pumpkins quietly becoming part of the design.
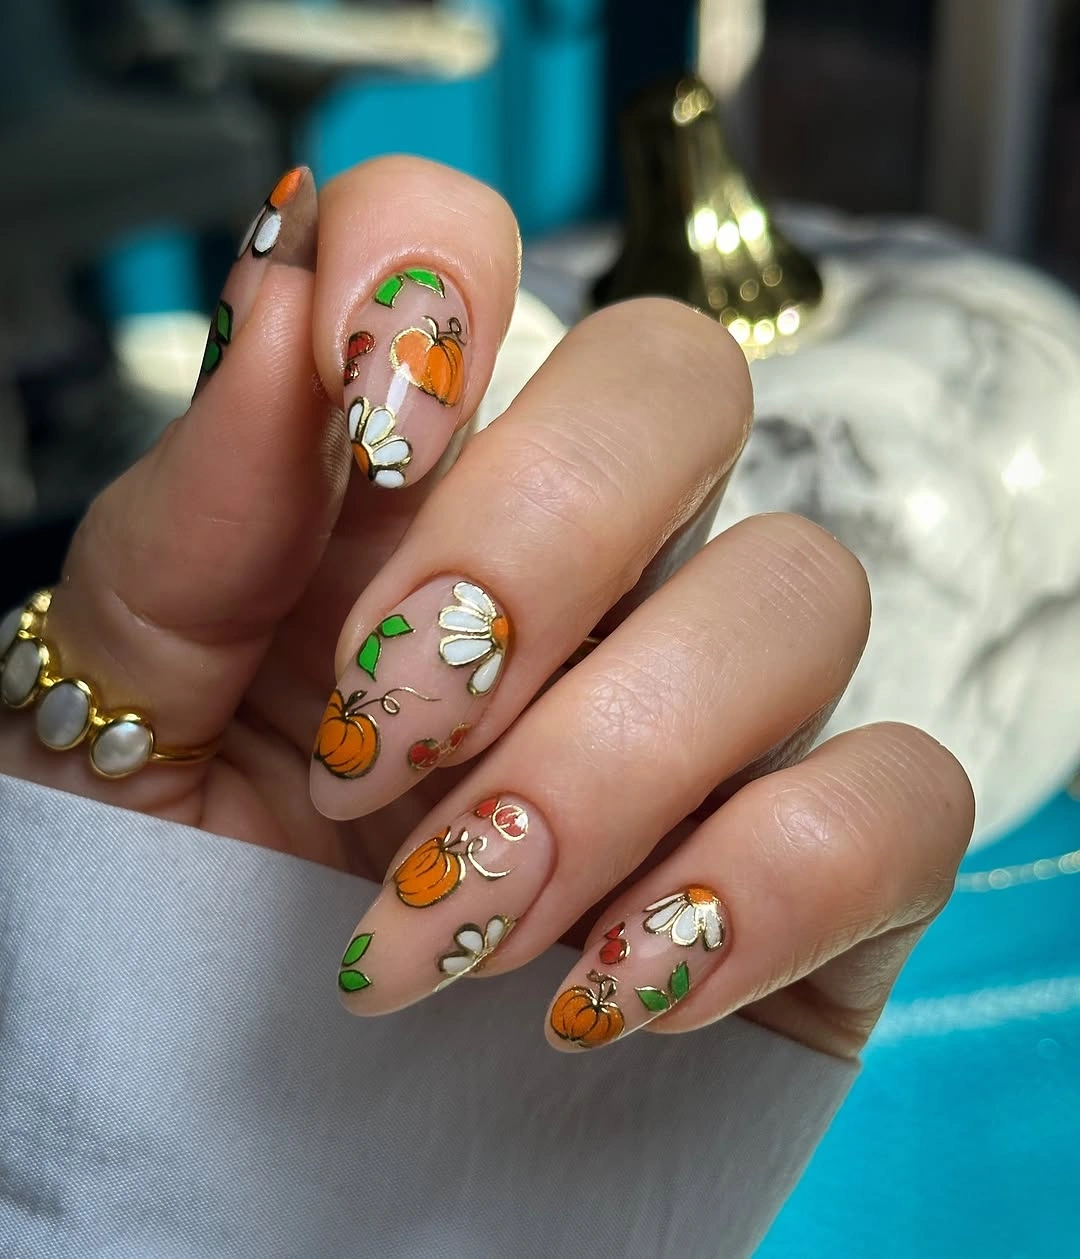
I would use a sheer nude, pumpkin orange, muted green, soft white, berry red, and metallic gold. Gold liner gel is especially useful because it frames the botanical elements without requiring heavy decoration.
I would begin with the nude base and paint the pumpkins and leaves in small clusters. Then I would add the white petals, berries, and fine gold outlines. The key is restraint – tiny details look more luxurious when there is plenty of nude space around them.
This is probably my favorite choice for September and early October. It feels seasonal without screaming Halloween, which means I could comfortably keep it through Thanksgiving.
Retro Halloween Hearts and Pumpkins
This final look turns the whole pumpkin theme playful and graphic. Long almond nails feature black-and-white checkerboard, layered orange heart shapes, tiny ghosts, smiling pumpkins, stars, and a sharp black-and-white web accent. The mix feels a little retro, a little spooky, and very Pinterest-worthy.
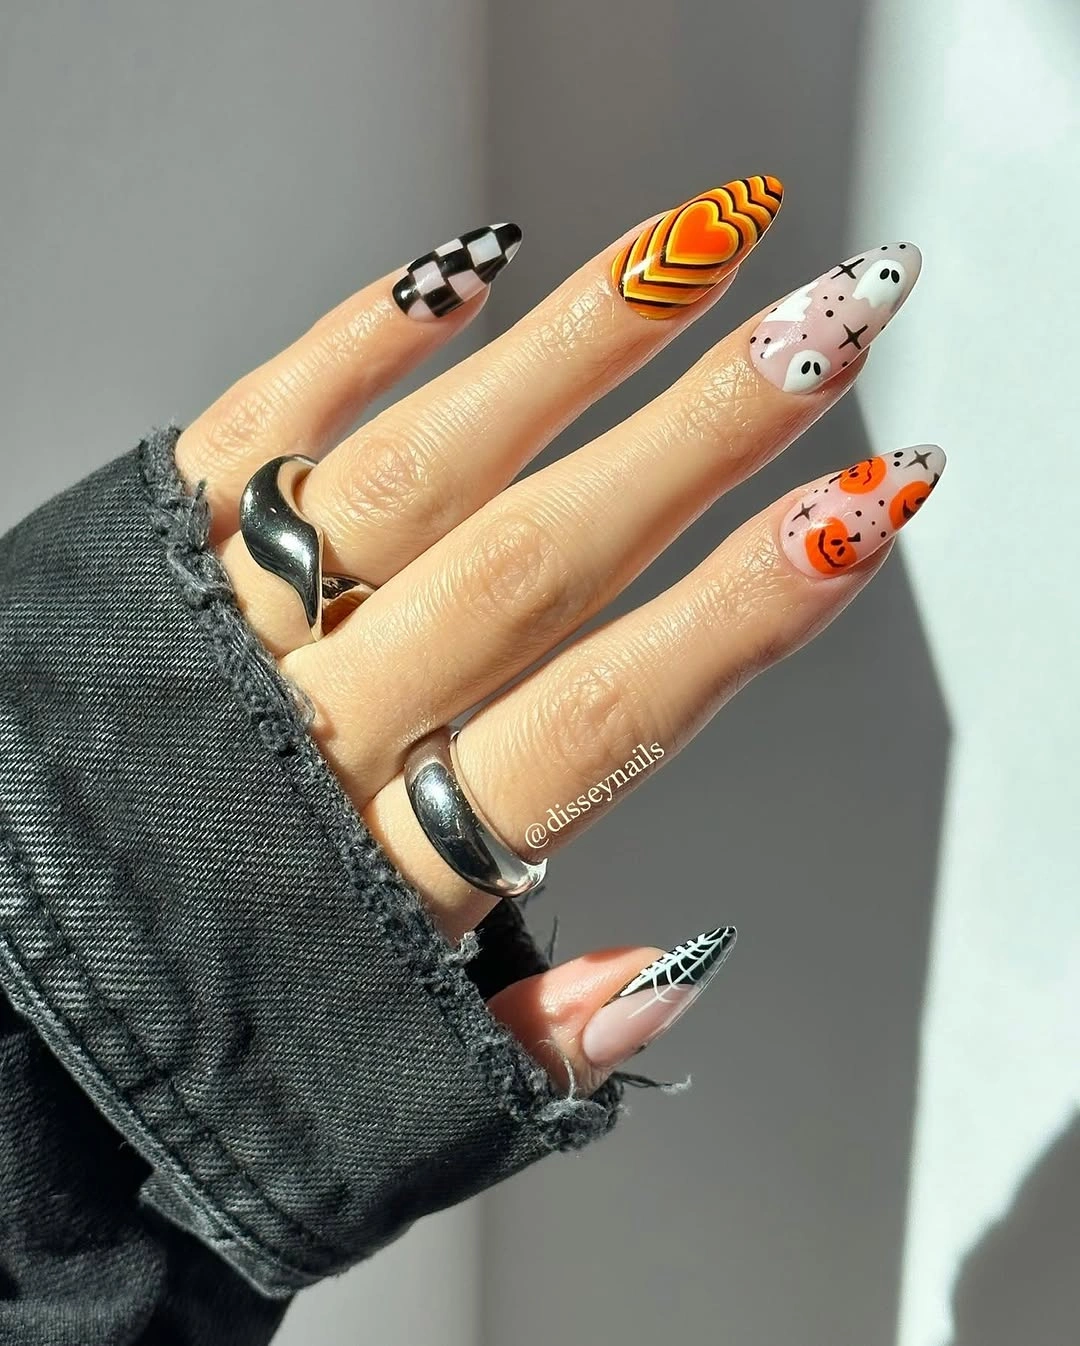
I would reach for black, white, orange, sheer nude, and a warm yellow or amber shade. A striping brush is the most useful tool for the checkerboard and layered heart, while a liner brush handles the ghosts and spiderweb.
I would keep the nude base visible on the illustrated nails and build each motif separately. The checkerboard should stay crisp, while the orange heart can use several nested lines to create that bold retro effect.
I would wear this one when I want my manicure to become part of the outfit rather than simply complement it. It has the playful energy of Halloween, the warmth of pumpkin season, and just enough attitude to make a basic black sweater look considerably less basic.