Fall is when I start wanting my manicure to feel a little richer, moodier, and more intentional. But does that mean every autumn nail has to be brown, burgundy, or forest green? Not at all. In 2026, I am seeing much more room for soft neutrals, cool metallics, delicate nail art, and playful texture – and square nails make all of them feel especially polished. Vogue’s current 2026 nail coverage points toward wearable minimalism with softer shades, while the return of 90s-inspired manicures is bringing stronger, more expressive finishes back into the mix.
For me, the appeal of chic fall square nails is exactly that balance. A clean short square can look incredibly sophisticated with almost no decoration, while a longer square gives intricate details enough space to become the main event. So which autumn manicure would I actually save for my next appointment? These are the styles I would put on the shortlist.
Soft Snowfall Details on Long Square Nails
I love a manicure that feels seasonal without announcing the season too loudly, and this soft blush square set gets that balance exactly right. The nails have a long, straight-edged square silhouette with slightly softened corners, giving the hands a graceful, elongated appearance. A translucent pink-nude base keeps everything delicate, while white ornamental details create the real personality. Fine snowflakes, swirling lines, tiny dots, and lace-like motifs are layered across the nails almost like embroidery on winter fabric. It is technically a fall-to-winter idea, but I would absolutely wear it in late October or November when the first cold evenings arrive.
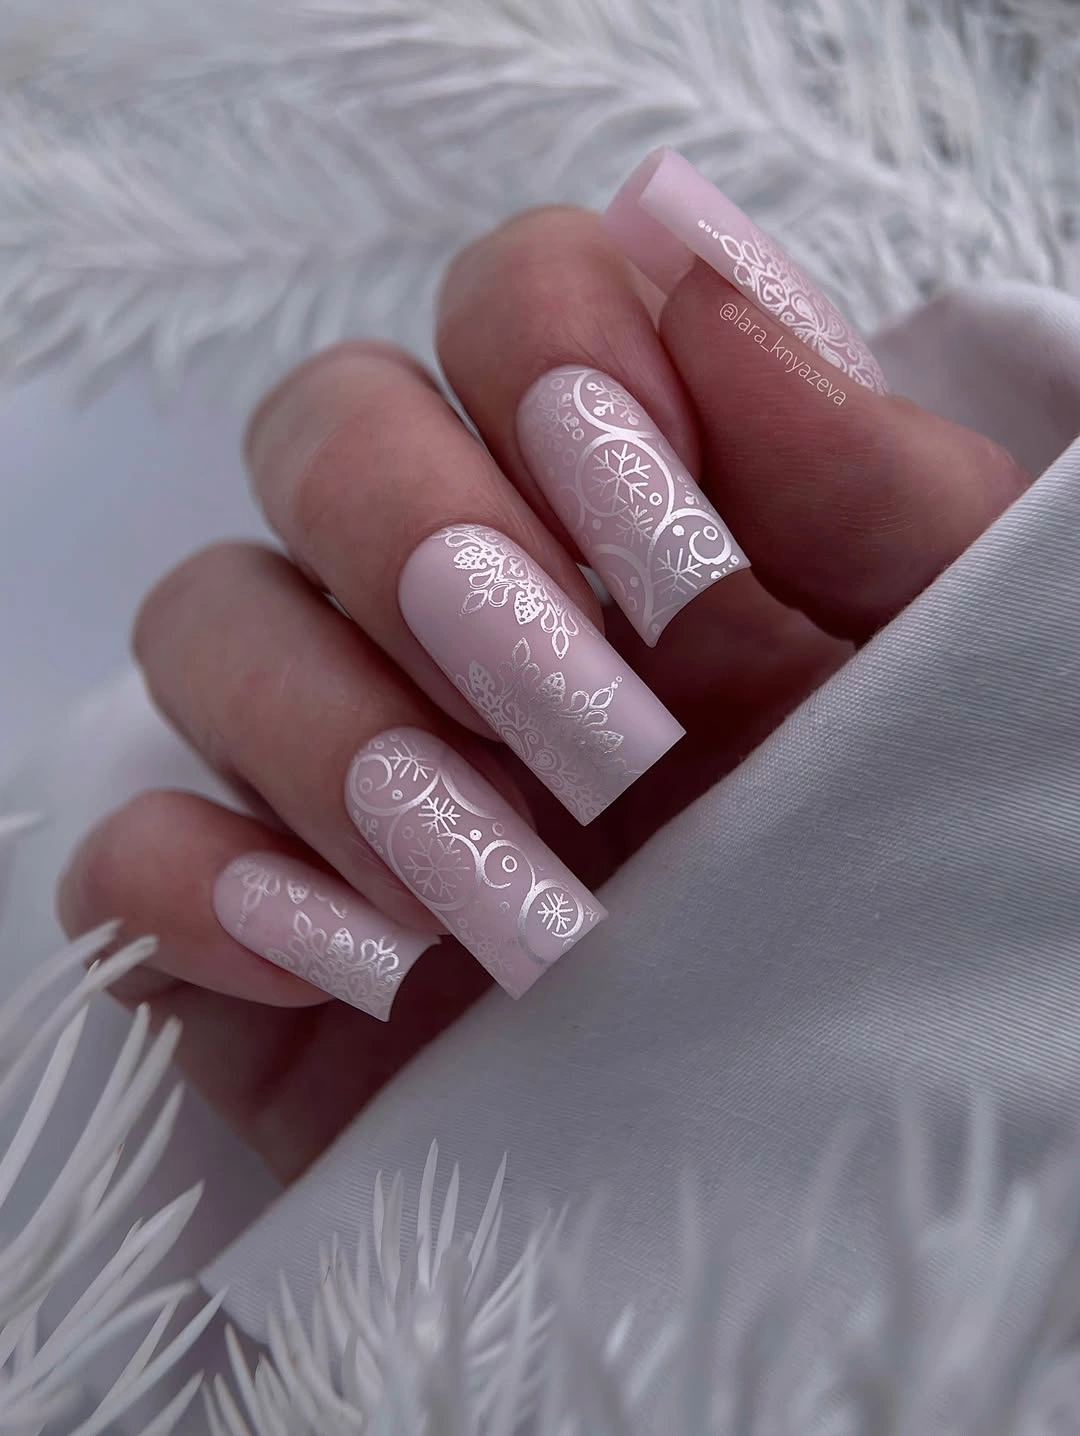
To recreate the palette, I would start with a sheer pink or milky nude gel such as OPI Funny Bunny, CND Romantique, or a similar translucent blush shade. For the decoration, a highly pigmented white gel paint is essential because the lines need to stay crisp rather than disappearing into the base. A fine liner brush, dotting tool, glossy top coat, and a good cuticle oil finish the kit. I would keep the white slightly softer than an opaque paper white if I wanted a more elegant result.
At home, I would shape the nails first, filing the free edge straight across and keeping both sidewalls as even as possible. Celebrity nail artist Tom Bachik has recommended a straight-across filing approach for creating a clean square, and that basic technique makes a noticeable difference here because the geometric silhouette is part of the design itself. After the base color cures, I would add the larger snowflakes and lace motifs first, then fill the empty spaces with tiny dots and curved lines. The trick is knowing when to stop. Too many details can turn delicate nail art into visual noise very quickly.
Milky White Square Nails With Tiny Black Dots
Short square nails have been having a serious comeback, and I think this is one of the easiest ways to understand why. The manicure combines a creamy off-white base with tiny black dots scattered across every nail, creating a simple pattern that looks playful but remarkably neat. The short length keeps the design practical, while the straight edges give it a more structured finish than the same pattern would have on a round nail. Allure recently highlighted short square nails as an increasingly relevant shape, particularly as celebrities move away from the idea that square nails only work at longer lengths.
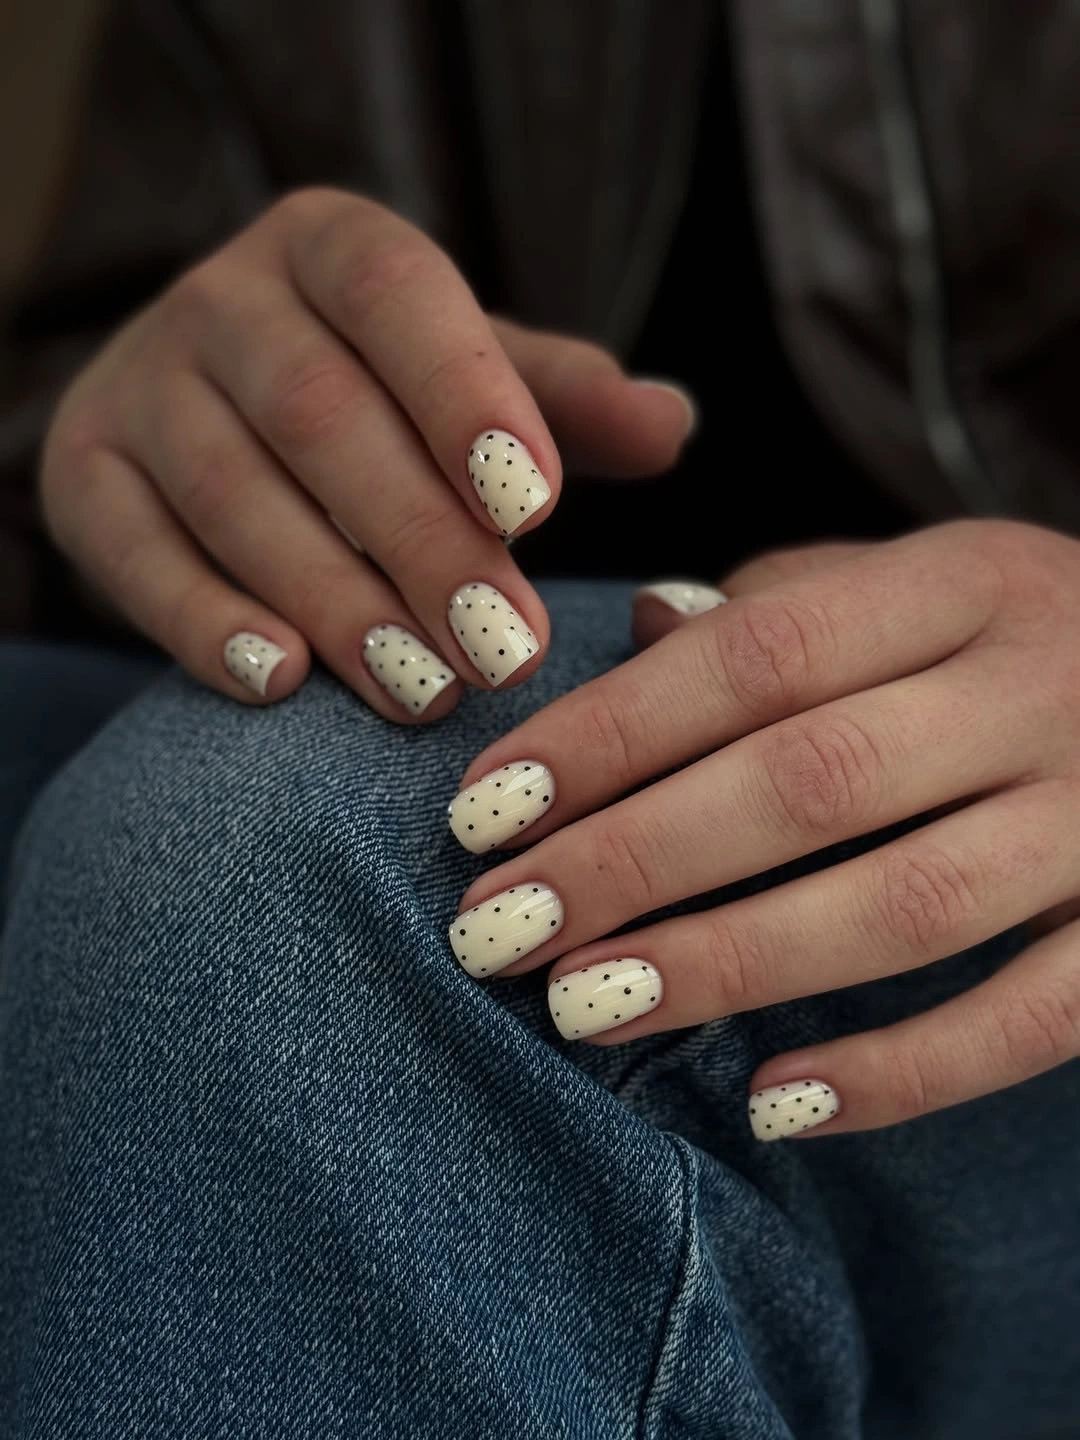
For this version, I would reach for a creamy ivory rather than a stark white. OPI Funny Bunny mixed with a warmer sheer cream can create a similar softness, while Essie Marshmallow or a comparable milky shade works if I want something more opaque. The dots require only black gel polish and a small dotting tool, although the rounded end of a fine nail-art brush can work in a pinch. I would also keep a glossy top coat nearby because the shine makes the little dots look sharper.
The application is almost suspiciously easy. I would prep the nails, apply two thin layers of the milky base, and cure each layer properly if I am using gel. Once the surface is smooth, I would place dots in slightly irregular spacing rather than creating a perfect grid. That tiny bit of imperfection is what makes the manicure feel modern instead of mechanical. Short nails are especially good for this kind of restrained decoration because the pattern adds personality without taking over the entire hand. Allure has similarly noted that small dots work particularly well on shorter nails because they add dimension without overwhelming the shape.
Cool Gray Square Nails With a Silver Edge
Gray nails can sometimes feel a little too serious, but this version has a clever way of keeping the color elegant rather than gloomy. The nails are medium-length with a soft square shape and a smooth cool-gray base. Around the perimeter sits a fine metallic silver outline, almost like jewelry framing each nail. The result is clean, understated, and slightly futuristic. For fall, I especially like this direction because it offers an alternative to the predictable warm palette while still feeling completely seasonal.
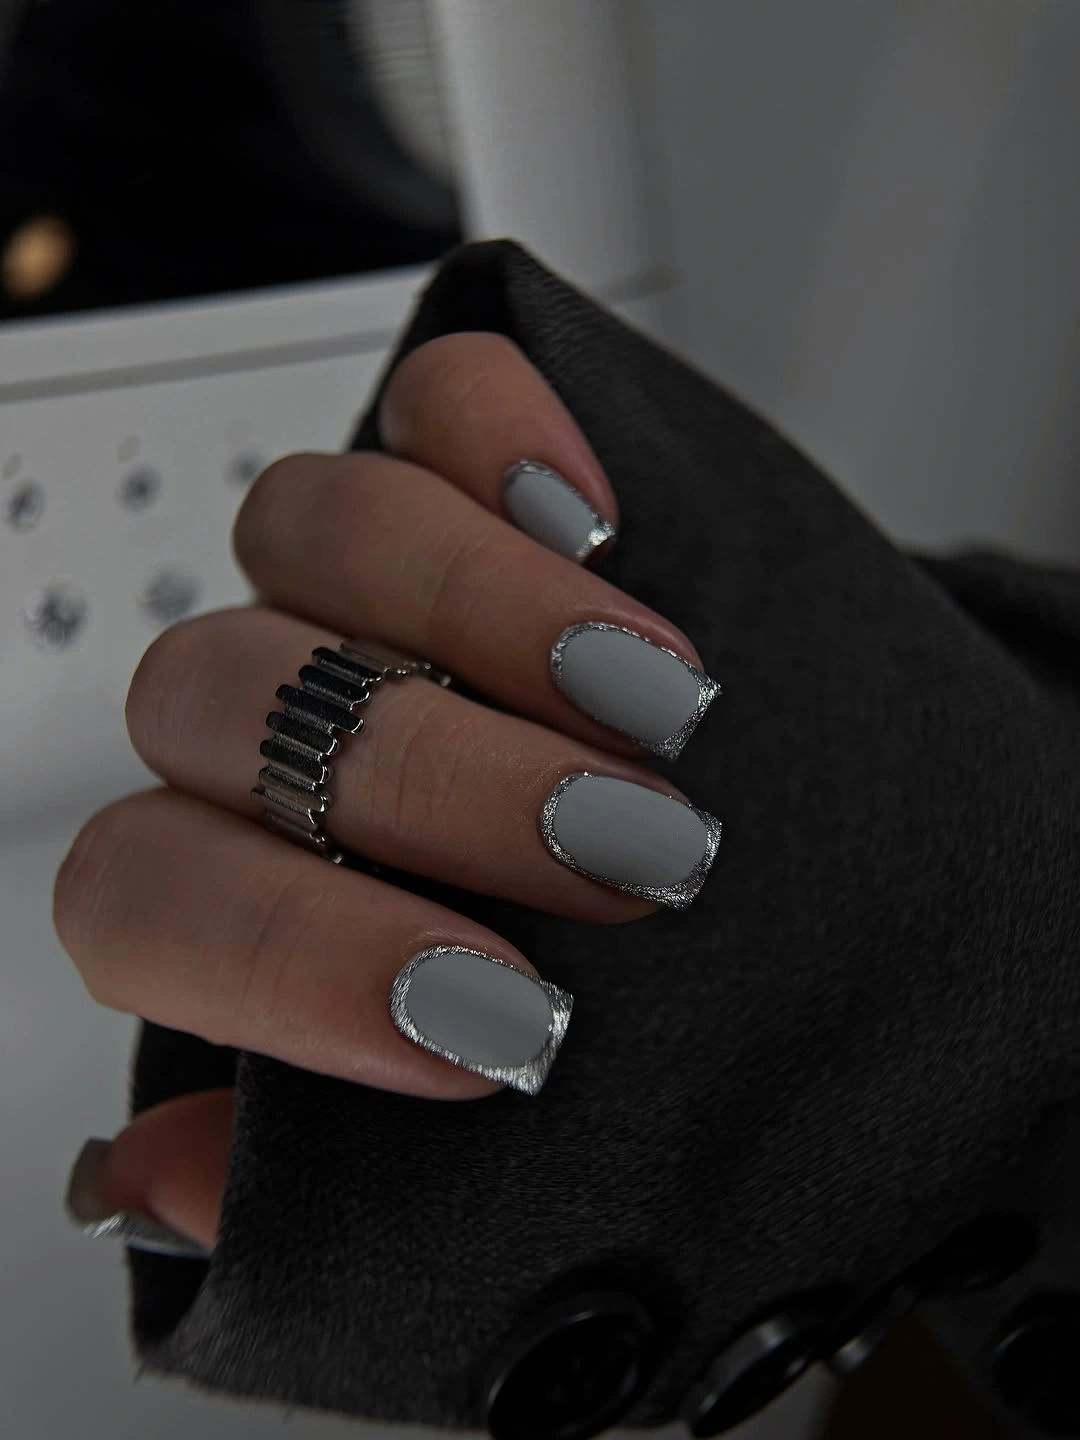
I would choose a medium cool gray gel polish with enough opacity to cover the nail in two thin coats. A shade similar to OPI I Can Never Hut Up or a neutral gray from CND would work, depending on whether I wanted the result slightly warmer or more steel-toned. For the border, silver chrome gel paint is the easiest option because it creates a dense metallic line without requiring loose glitter. I would finish with a high-shine top coat and avoid anything too frosted, since the contrast between the smooth gray and reflective silver is what gives this manicure its character.
The cleanest way to create the border is to work with a very fine liner brush after the gray base has fully cured. I would trace the sidewalls first, then connect the line across the tip, keeping the thickness consistent. There is no need to make the silver border huge – in fact, the narrower it is, the more expensive the manicure tends to look. If my natural nails are prone to cracking at the sides, I would also consider a squoval variation rather than forcing an extremely sharp corner. Square and squoval shapes are often recommended for durability because they preserve more structure around the sides of the nail.
Milky Square Nails With Raised Pink Hearts
Here is where I would allow myself to have a little fun. The base is a glossy milky white, kept deliberately simple so the raised pink hearts become the focus. The hearts vary slightly in size and placement, which gives the manicure a handmade quality rather than a perfectly repeated salon pattern. The short-to-medium square shape keeps everything youthful and tidy, while the three-dimensional details add a tactile element. In a season full of heavy knits and soft textures, that little bit of raised nail art feels surprisingly appropriate.
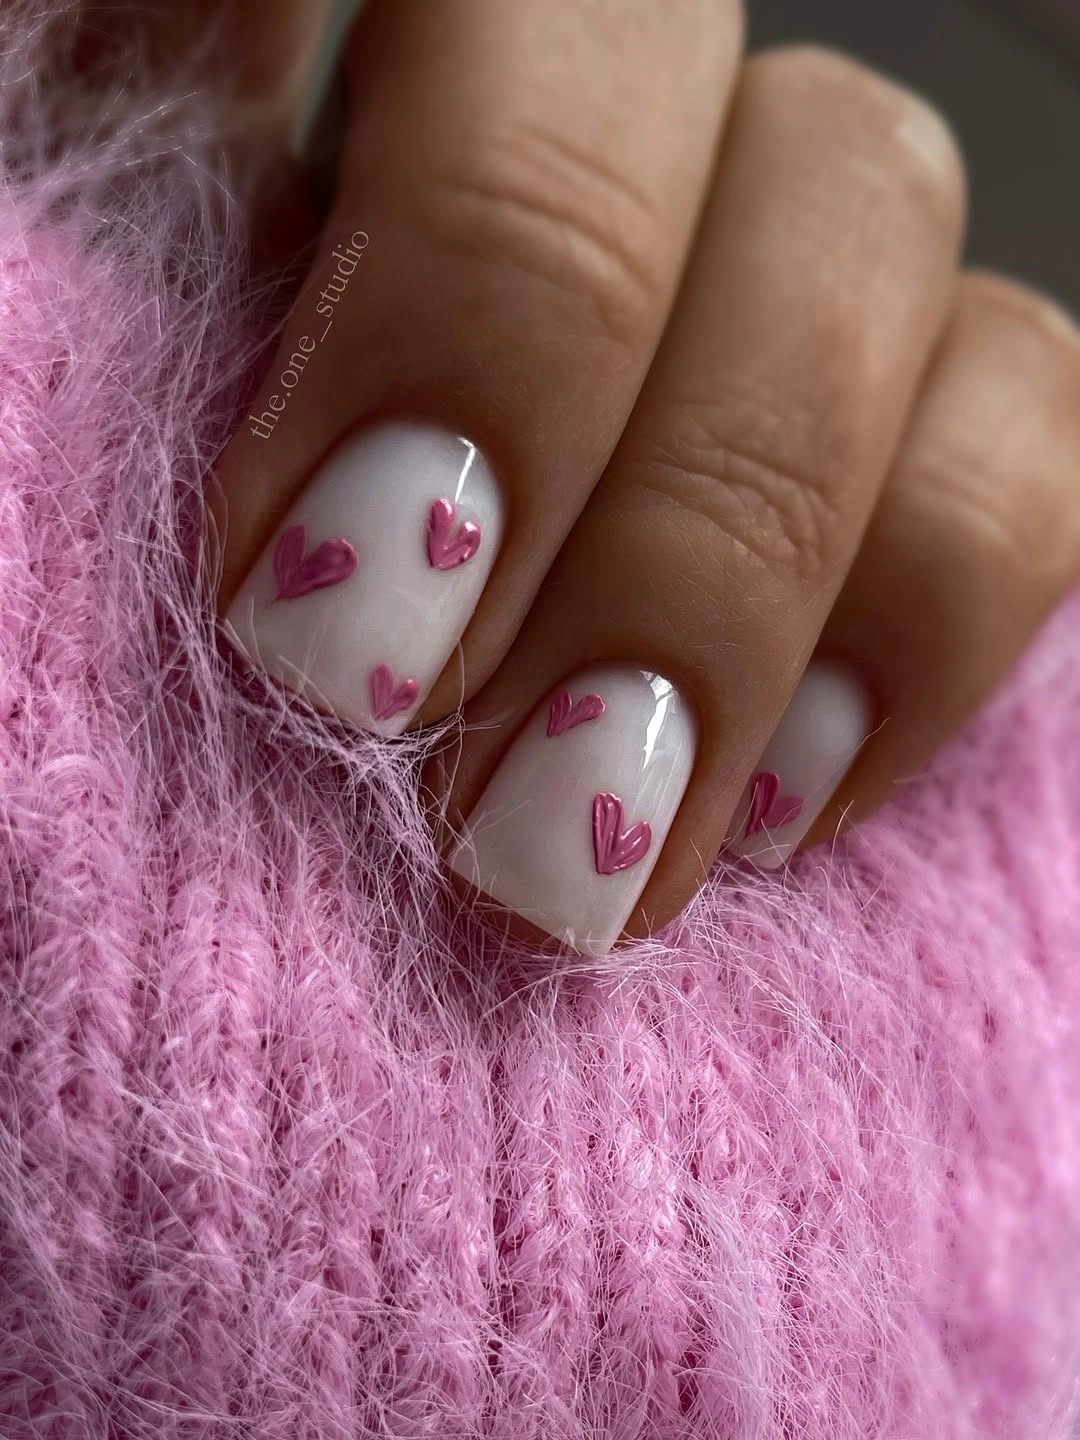
I would use a sheer milky white or very pale cream as the base, then choose a medium pink builder gel or 3D gel for the hearts. A shade close to bubblegum pink gives the strongest contrast, while dusty rose makes the manicure feel more autumnal. A small detail brush and a glossy top coat are enough for the basics. If I were doing this professionally, I would ask for the raised hearts to stay relatively low-profile so they remain cute and wearable rather than becoming bulky.
At home, I would apply the milky base and cure it completely before creating the hearts. For each one, I would place two small rounded dots of pink product close together and gently pull the lower edges into a point, curing each heart separately if the product moves easily. The placement does not have to match from nail to nail. In fact, I prefer a scattered arrangement because it gives the manicure that spontaneous charm. Three-dimensional nail art has been gaining momentum as part of the broader 2026 interest in tactile finishes and raised designs, so this playful approach feels very much in step with the moment.
Glossy Purple Chrome With Sculpted Texture
This is the manicure I would choose when subtlety has officially left the chat. The square nails are medium to long, with a rich purple base that shifts under the light and a reflective metallic finish layered over the surface. Sculpted, raised lines create abstract panels across each nail, almost like liquid metal folded over glass. The combination of deep violet, chrome highlights, and three-dimensional texture gives the manicure a futuristic quality while still fitting beautifully into a fall wardrobe. It is dramatic, but the monochromatic palette keeps it controlled.
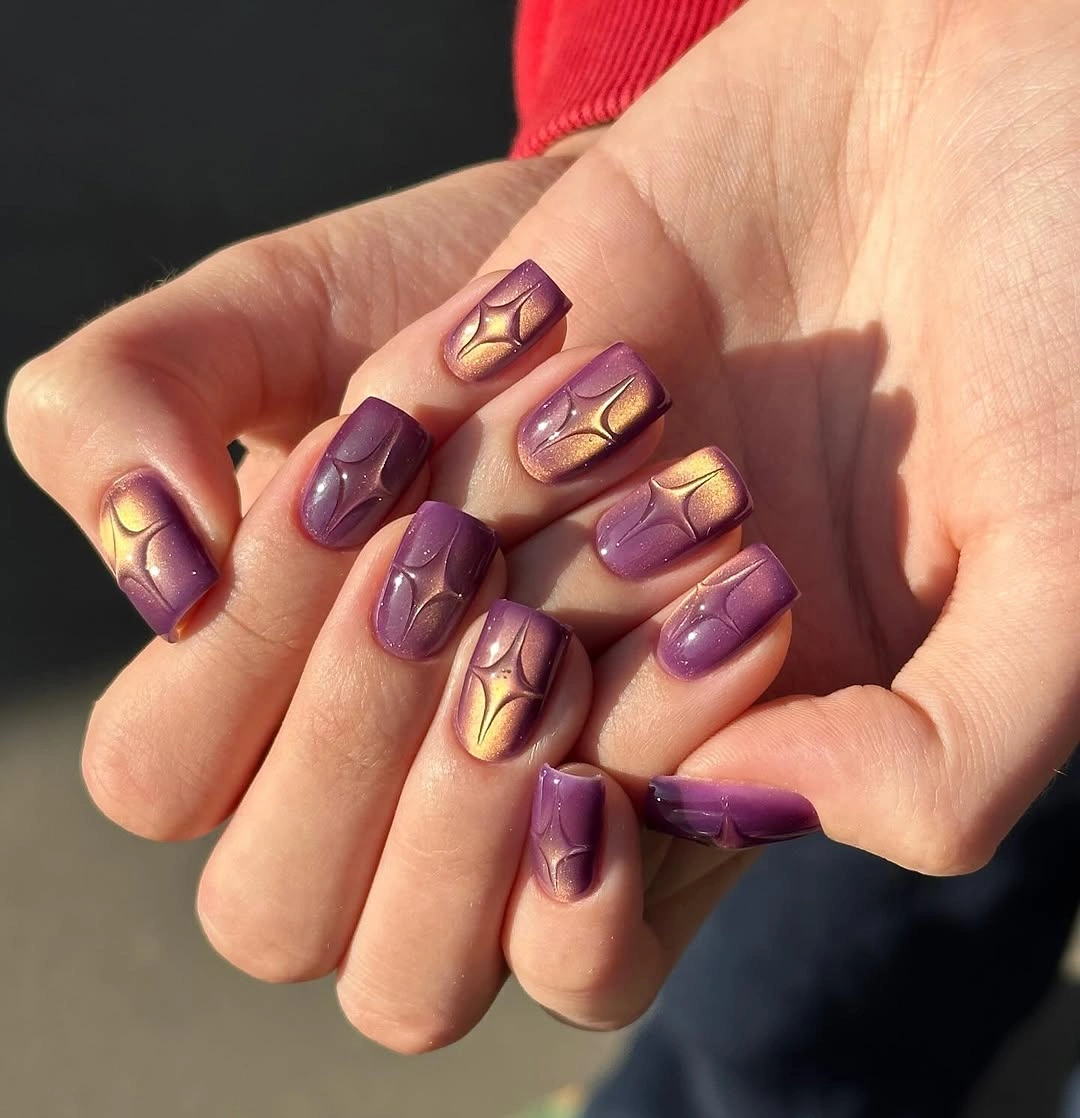
I would build this look with a deep plum or muted violet gel polish, followed by a chrome powder in silver, rose, or violet depending on the effect I want. The raised design can be created with a thick sculpting gel or 3D art gel, applied with a small detail brush. A no-wipe top coat is useful before chrome application, while another carefully applied top layer can seal the finished design. The important thing is not to overload the manicure with several unrelated colors. The dimensional effect is already doing plenty.
For a home version, I would keep the base perfectly smooth before touching the 3D work. After curing the purple polish, I would create curved raised sections with a small amount of thick gel, cure them, and then apply chrome selectively rather than covering everything indiscriminately. This creates the difference between a flat metallic manicure and one that seems to shift as the hands move. Texture has become an important part of contemporary nail art, with 2026 designs increasingly exploring raised shapes, abstract forms, and finishes that invite a second look.
Sunny Yellow and Black Graphic Square Nails
I like this manicure for early fall, when I still want a little brightness before the deeper autumn shades take over. The nails are short square with softly rounded corners, combining a milky nude base with vivid lemon yellow sections and thin black curved lines. The black strokes overlap the yellow like loose ribbons, giving the manicure a modern graphic quality without making it feel too busy.
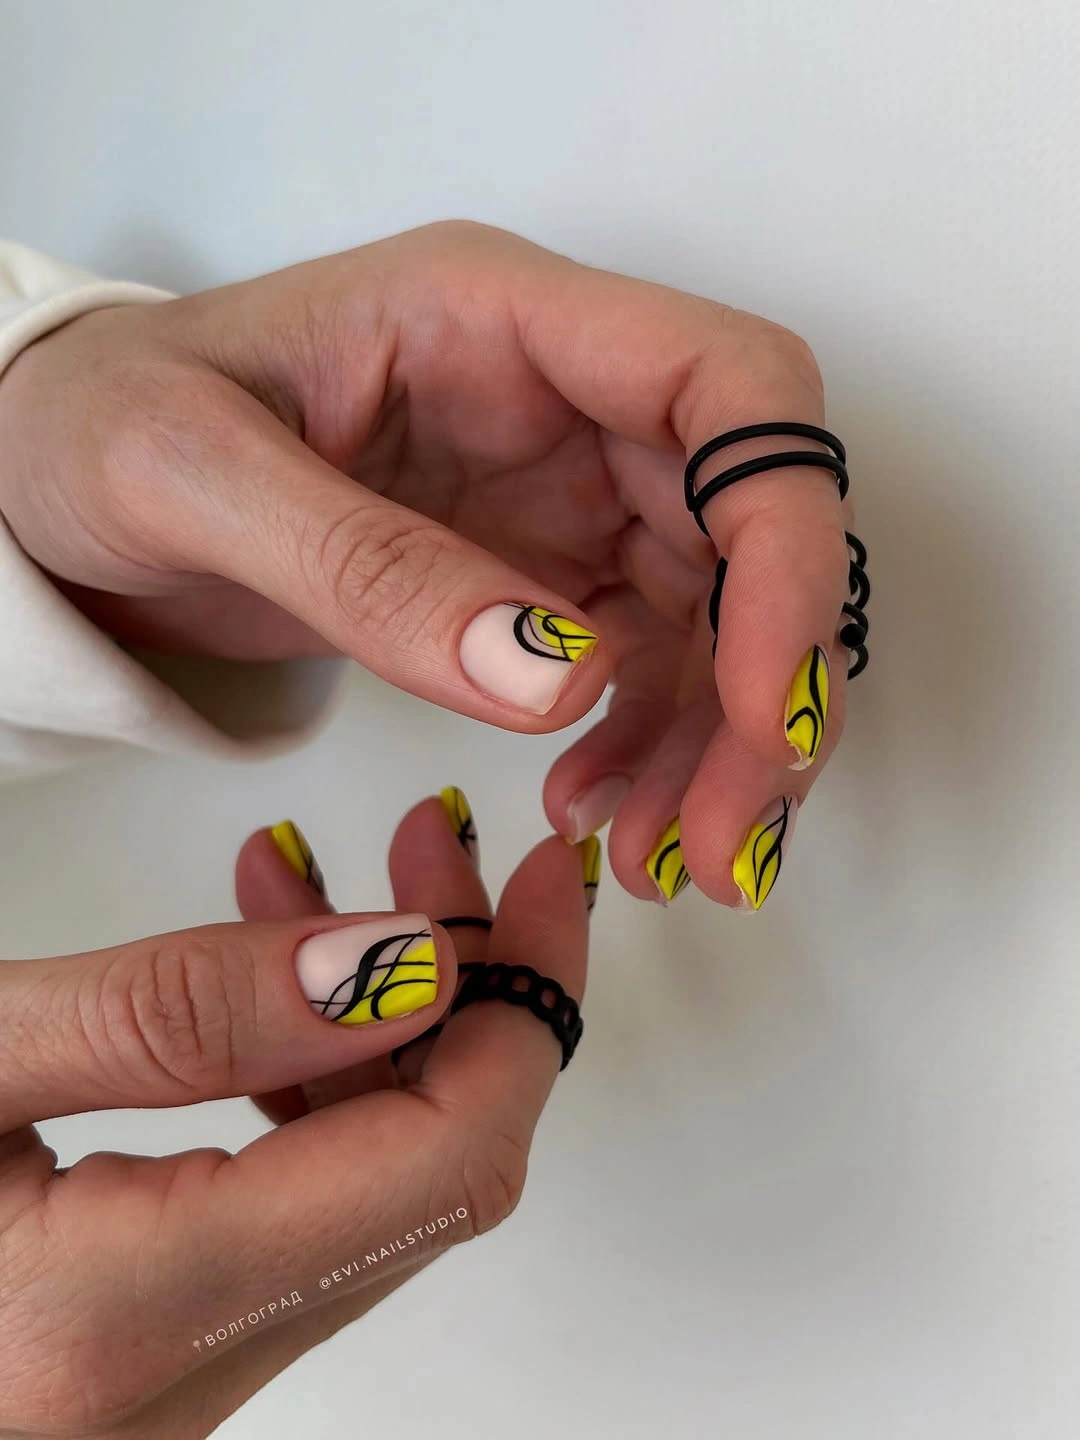
For me, the easiest way to recreate it is with a sheer nude base, bright yellow gel, black nail-art paint, a very fine liner brush, and a glossy top coat. I would keep the yellow concentrated toward one side or corner of each nail rather than covering the entire surface. The contrast is what makes this simple design feel fresh.
I would file the nails into a neat short square first, then apply the nude base and cure it. Next, I would add the yellow blocks and finish with thin black curves, allowing the lines to overlap naturally. This is one of those fall designs I would choose when my wardrobe is mostly denim, cream, gray, and black and I want one cheerful detail to wake everything up.
Delicate Gold Flake Square Nails
There is something wonderfully effortless about translucent nails with scattered flakes, especially in autumn. This manicure uses a soft milky nude base on medium square nails, with fine gold shimmer and irregular pieces of gold, pink, and warm metallic foil concentrated across parts of the nail. The uneven placement makes every nail slightly different, which keeps the finish relaxed rather than overly polished.
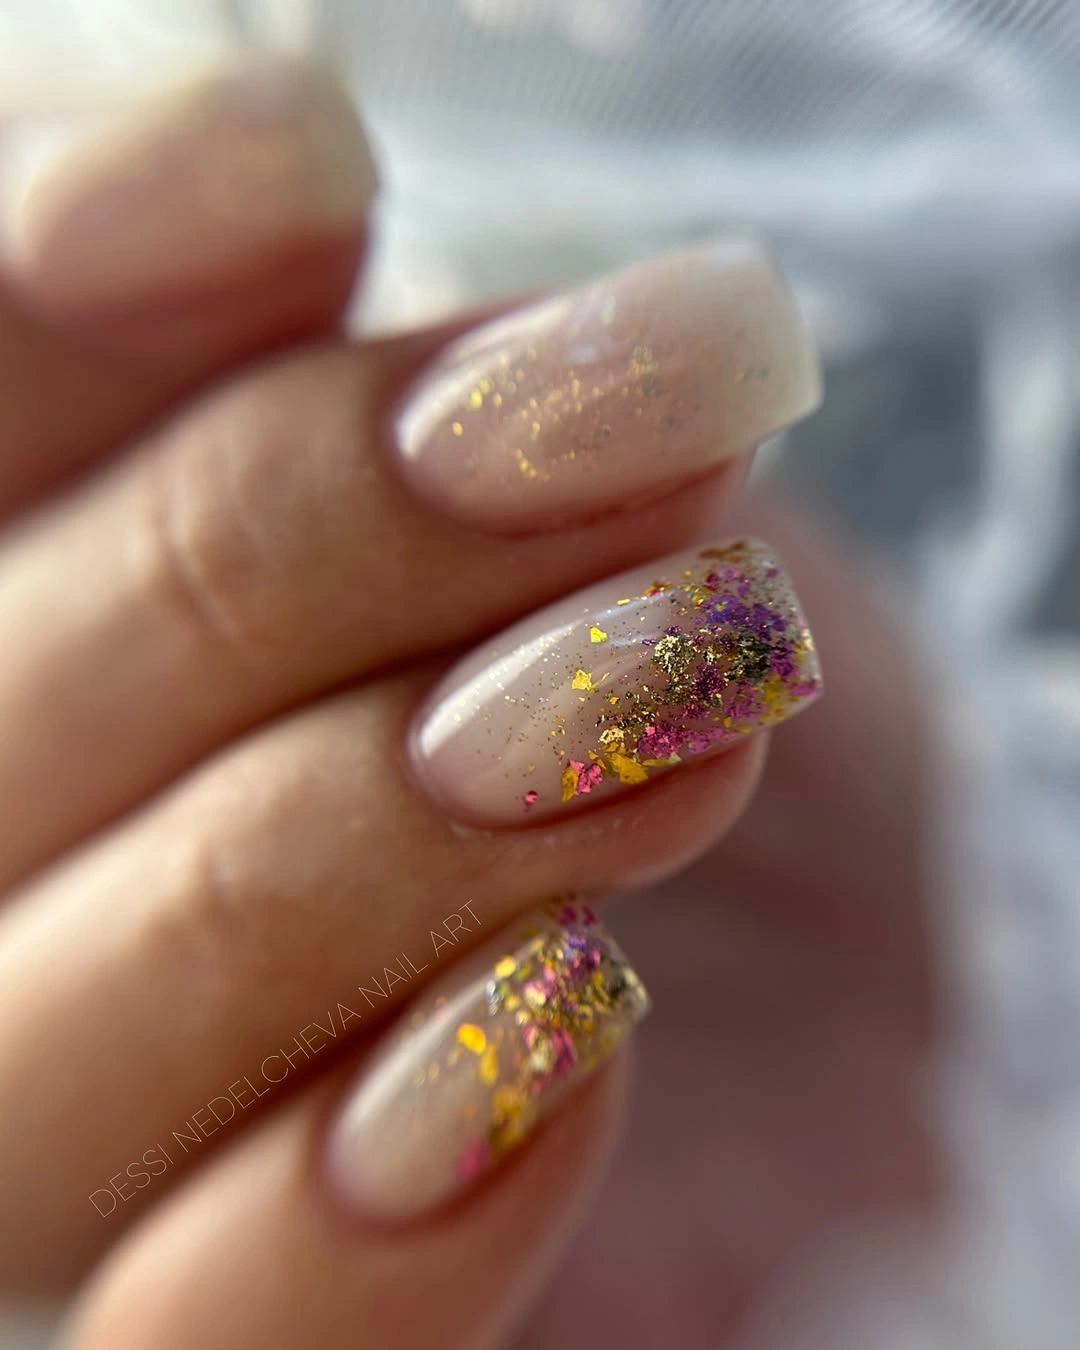
I would use a translucent nude gel, loose nail-art foil in gold and muted pink, fine glitter, and a clear builder or glossy top coat. I prefer very thin flakes here because chunky pieces can quickly make a delicate manicure look heavy. A warm champagne shimmer would also work beautifully if I wanted the result to lean more autumnal.
After preparing and shaping the square nails, I would apply the nude base and place the foil while the surface is slightly tacky or use a small amount of clear gel to position each piece. I would concentrate the decoration toward the center and free edge, then encapsulate everything with top coat. Personally, this is the kind of manicure I would wear with a camel sweater and gold jewelry – understated, but catching the light every time I reach for my coffee.
Olive and Butter Yellow Geometric Squares
This is a much more graphic interpretation of fall color. Long square nails are covered in a soft butter-yellow base, while olive-green shapes sit along the edges and thin silver-gray curved lines divide the sections. The combination feels unexpected but surprisingly wearable. Yellow brings warmth, olive adds that unmistakable autumn mood, and the cool curved lines keep the design from becoming too rustic.
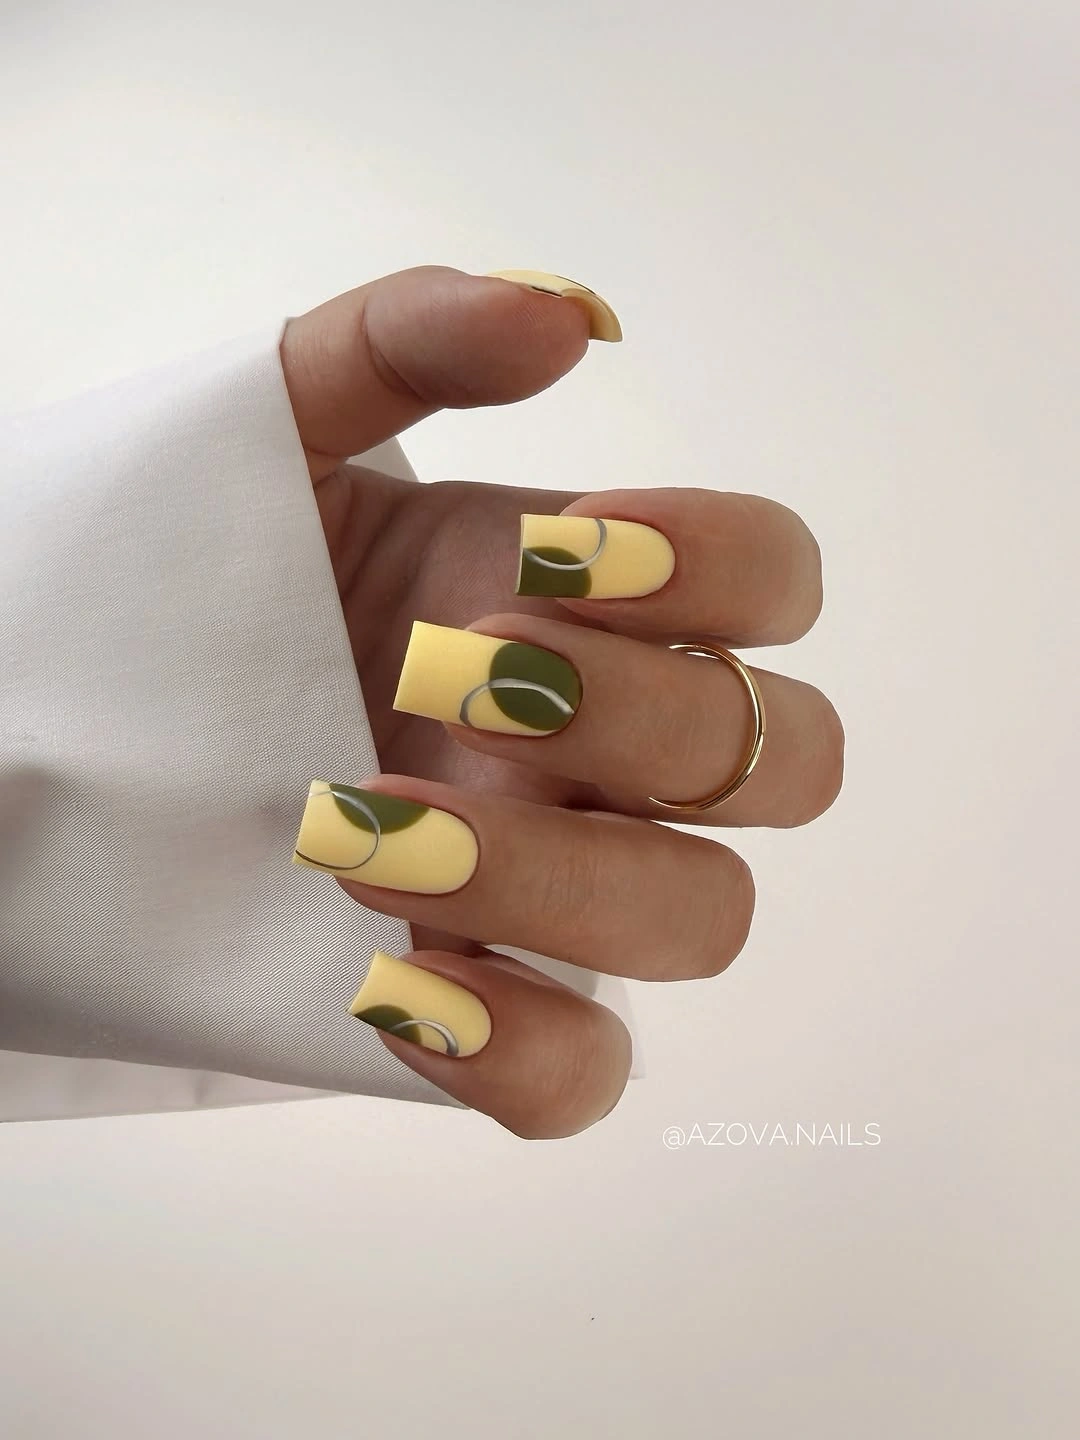
I would reach for a pastel butter-yellow polish, muted olive gel, silver-gray nail-art paint, a fine liner brush, and a glossy finish. The colors should stay slightly dusty rather than neon because that makes the manicure much easier to style for fall. I also like the idea of using the olive only in small sections so the yellow remains the dominant shade.
I would create the yellow base first and cure it completely, then add the olive shapes with a small detail brush. The curved gray lines come last and should be kept delicate. I would not worry about making every nail identical – slight differences make geometric nail art feel more artistic. This one would be high on my list for September and October, especially with chocolate brown, olive, cream, or dark denim.
Glossy Dark Burgundy Short Square Nails
Sometimes the best fall manicure is the one that needs almost no explanation. These short nails are coated in an intensely dark burgundy polish with a glossy, almost lacquered finish. The shape is compact and softly squared, which keeps the deep color looking sophisticated rather than severe. In warm autumn light, the burgundy reveals a subtle red-wine quality that black polish simply cannot give.
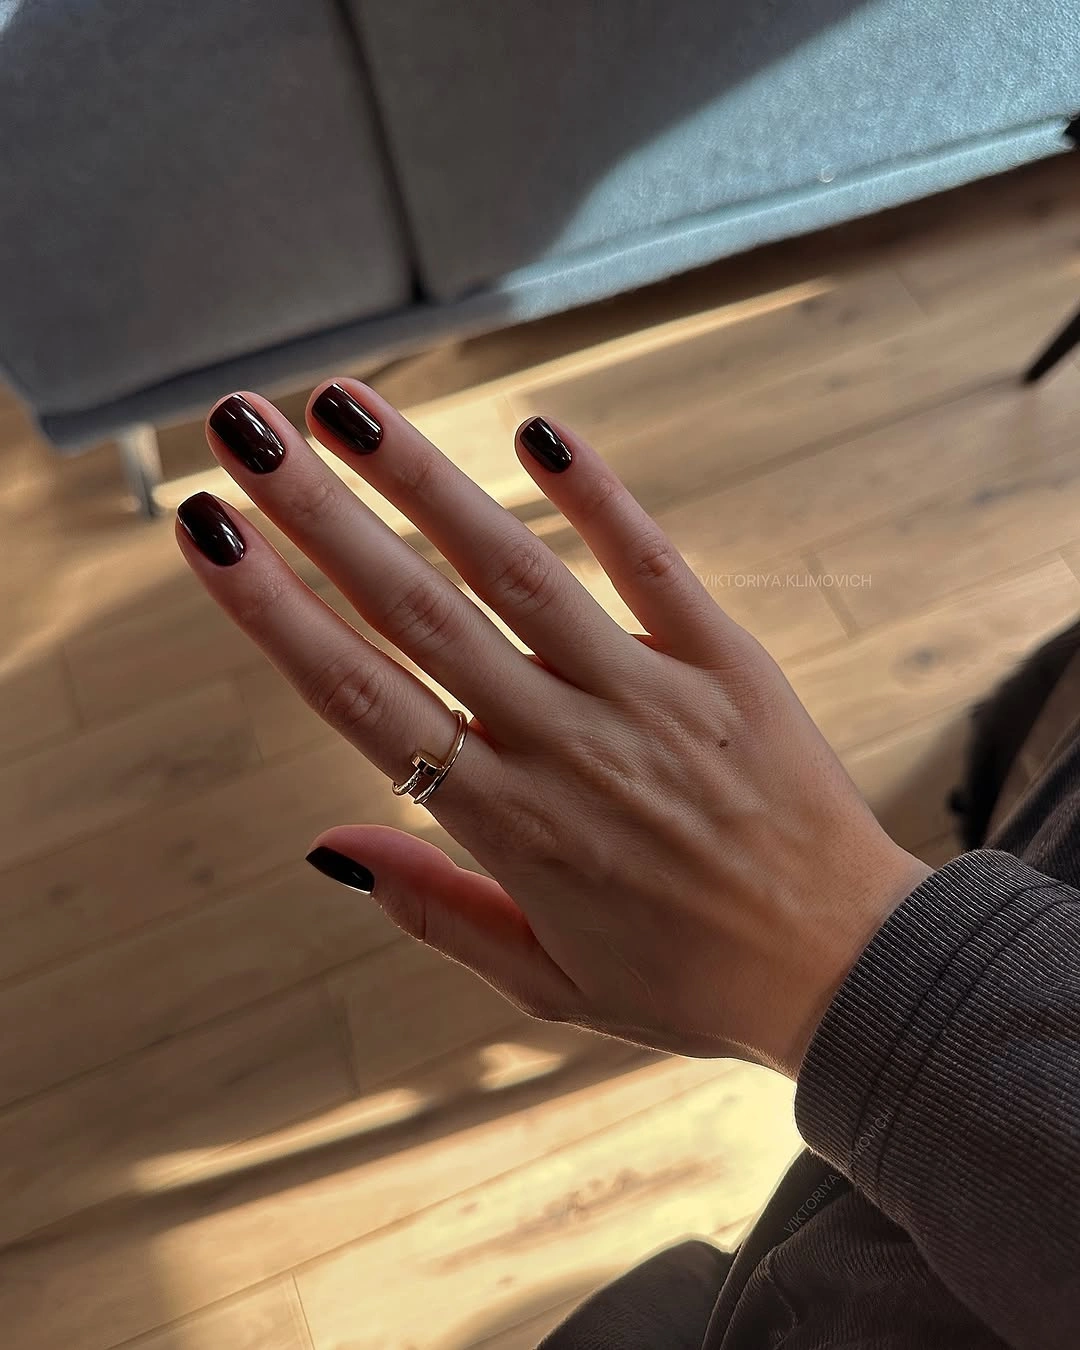
For this look, I would keep the product list wonderfully short – a deep burgundy gel polish, base coat, glossy top coat, and cuticle oil. Shades close to OPI Malaga Wine or Essie Bordeaux would give me the same rich direction. I would choose two thin color coats instead of one thick coat because that usually creates a smoother, cleaner finish.
I love this manicure when I want my nails to look polished without doing actual nail art. I would shape the free edge evenly, apply the burgundy carefully around the cuticle, and finish with a high-shine top coat. It works with practically every fall staple in my closet, from a black knit dress to a chunky gray sweater, which is probably why dark red keeps finding its way back onto my own seasonal shortlist.
Soft Green Square Nails With Abstract Art
This manicure takes a softer approach to green, using a muted mint-sage shade across short square nails and reserving a few nails for abstract painted details. Those accent nails combine pale green with loose shapes in blue, lavender, white, and small touches of yellow and pink. The artwork feels almost like tiny watercolor petals, giving the manicure a creative finish without losing its clean autumn character.
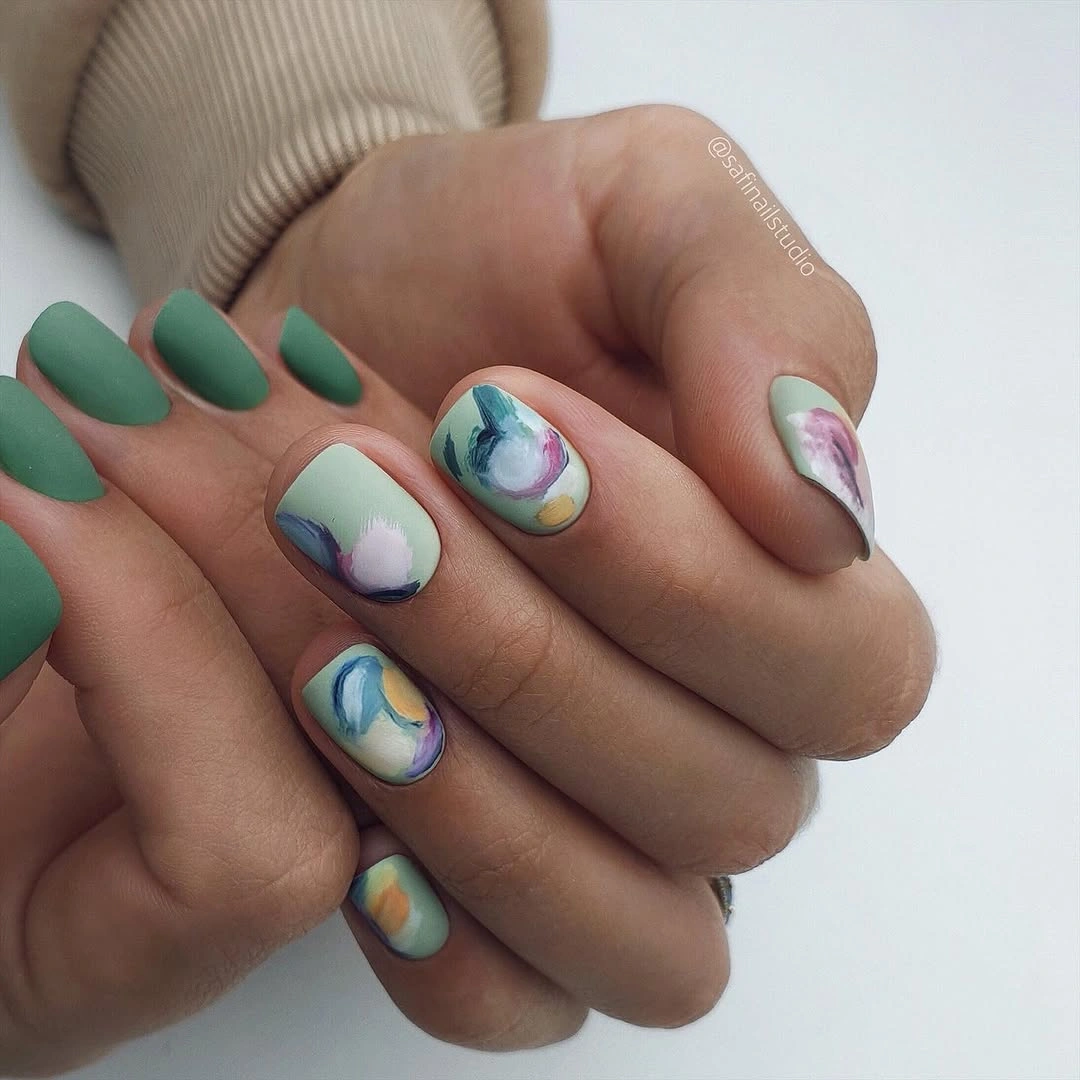
I would use a muted sage or eucalyptus gel as the main shade, then add pastel blue, lavender, cream, soft pink, and mustard-yellow gel paints for the accents. A small detail brush is enough because the artwork is intentionally loose. I would also choose a matte top coat for the solid green nails if I wanted to emphasize the velvety finish, while keeping the artwork glossy for contrast.
I would apply the green base first, then build the abstract accents with small irregular strokes rather than trying to draw perfect flowers. That is the charm of this design. For me, it feels especially right at the beginning of fall, when the leaves have not completely changed yet and the wardrobe is still somewhere between summer softness and autumn layers. It is playful, elegant, and just unusual enough to make me stop scrolling.
White Crocodile Texture Square Nails
I love how this white manicure turns a classic neutral into something much more interesting. The nails have a short-to-medium square shape with softly softened corners, finished in a crisp white base and covered with a delicate crocodile-inspired texture. The pale gray pattern keeps the effect subtle, while the raised-looking print gives the surface a fashionable, almost leather-like character.
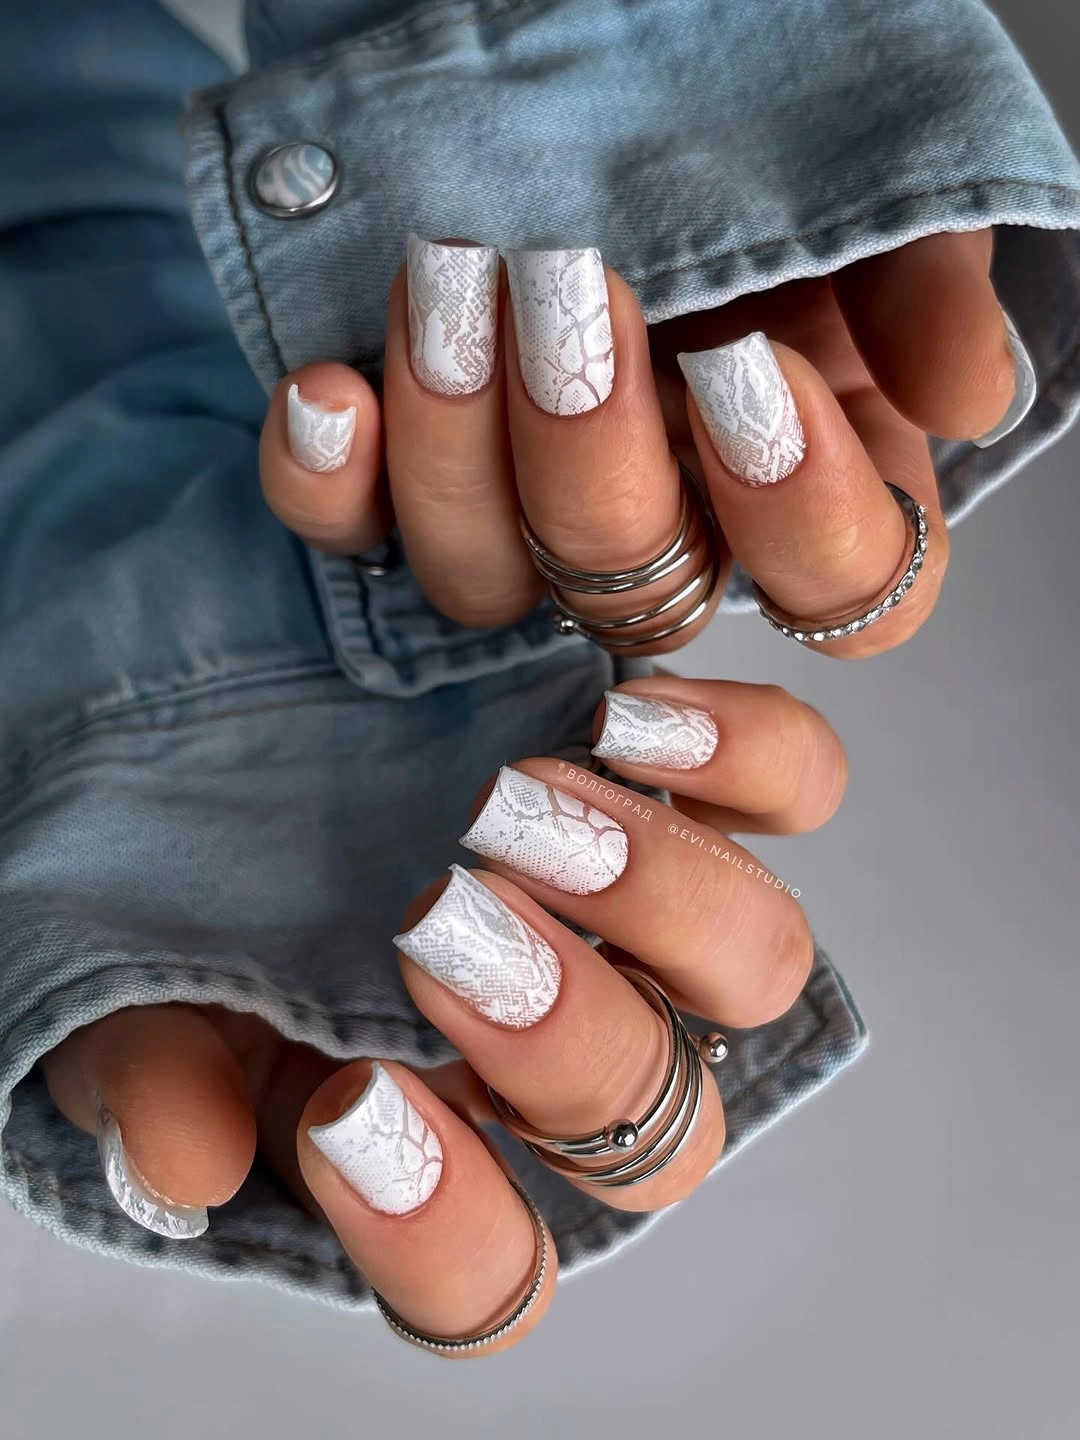
I would use an opaque white gel, a pale gray stamping polish or nail-art paint, a crocodile or reptile stamping plate, and a glossy top coat. For a softer finish, a sheer white layer over the pattern would slightly blur the contrast. I would keep the texture fine because the beauty of this manicure is its restraint.
I would shape the nails evenly, apply the white base, and add the reptile pattern with stamping or a very fine brush. Once sealed, the design becomes surprisingly wearable. For fall, I would pair it with denim, silver jewelry, and oversized knits – clean, cool, and just a little rebellious.
Lime Green French Tip Square Nails
This manicure gives the classic French tip a bright fall twist. Short square nails have a natural nude base, while soft lime-green color curves across the tips in clean, rounded sections. The result feels fresh and youthful without requiring a complicated design. I especially like the tiny amount of exposed natural-looking nail because it keeps the vivid green from overwhelming the hands.
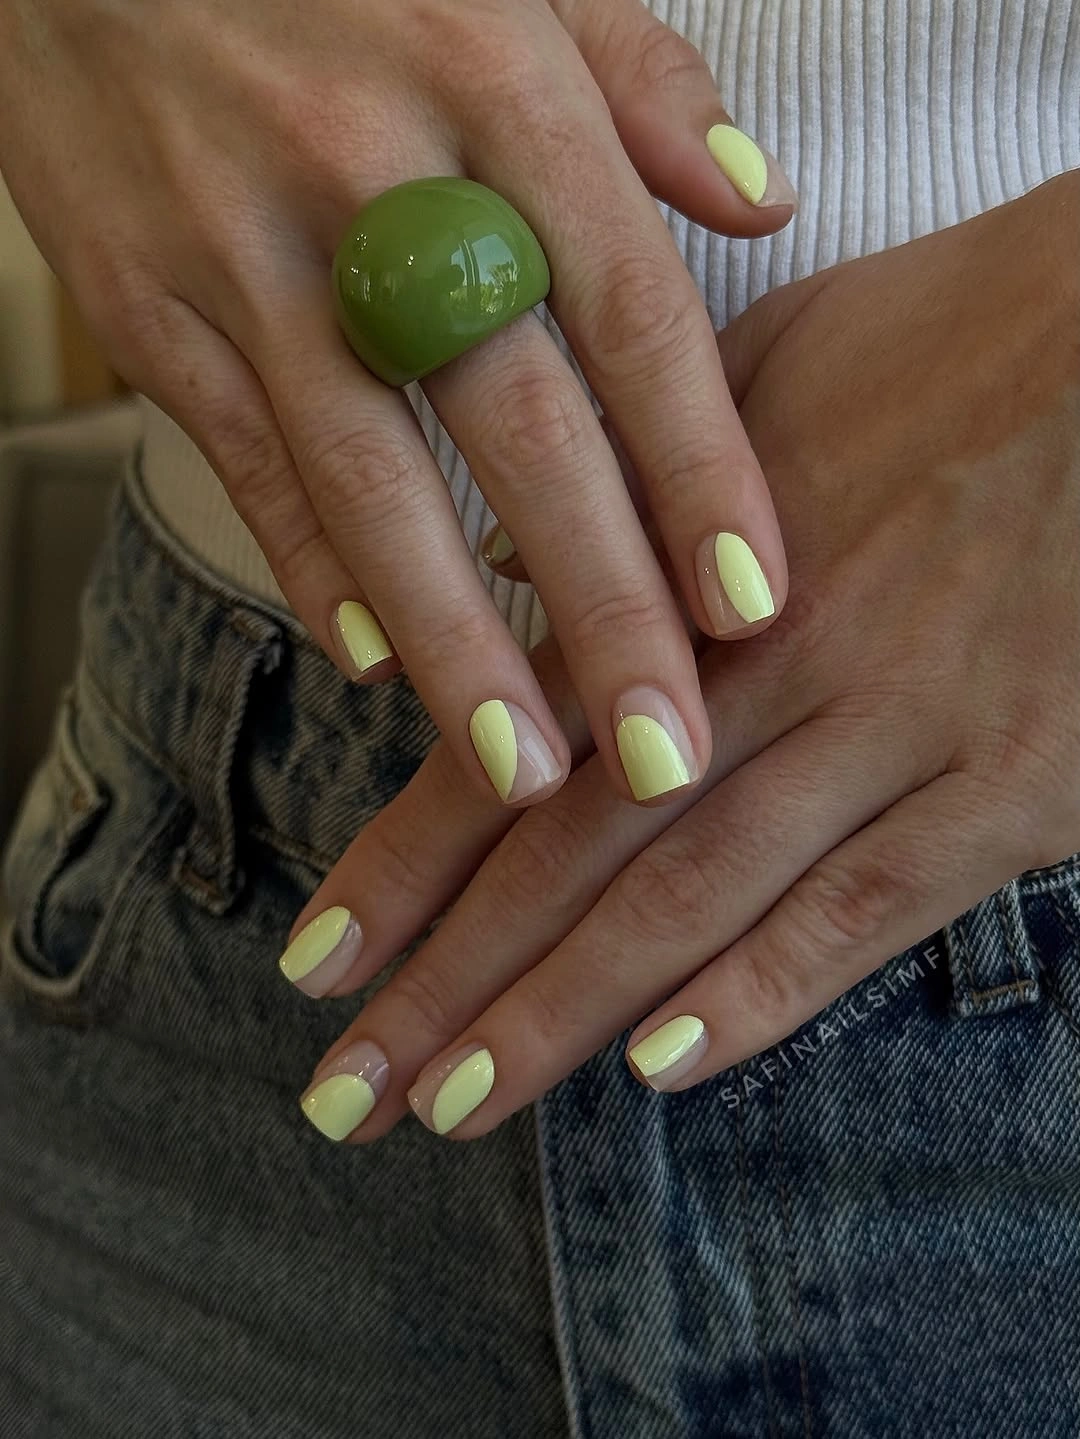
For this look, I would use a sheer nude base, a creamy lime or pistachio-green gel, a fine French-tip brush, and a glossy top coat. A slightly muted green would make the manicure more autumn-friendly, while a brighter lime works beautifully in early fall when summer color is still lingering.
I would apply the nude base first, then paint the green tips with a curved brush or French-tip guide. The line does not need to be extremely thin – the wider color block gives this version its modern feel. I would wear it with denim and neutral clothing when I want one cheerful detail to carry the whole look.
Gold Foil Square Nails With Dark Edges
This is where I would bring out the jewelry. The short square nails have a translucent nude-pink base, framed by very fine dark outlines and decorated with irregular pieces of gold foil. A soft milky accent near the tips adds another layer, making the manicure look almost like tiny pieces of antique jewelry. It is elegant without feeling overly formal.
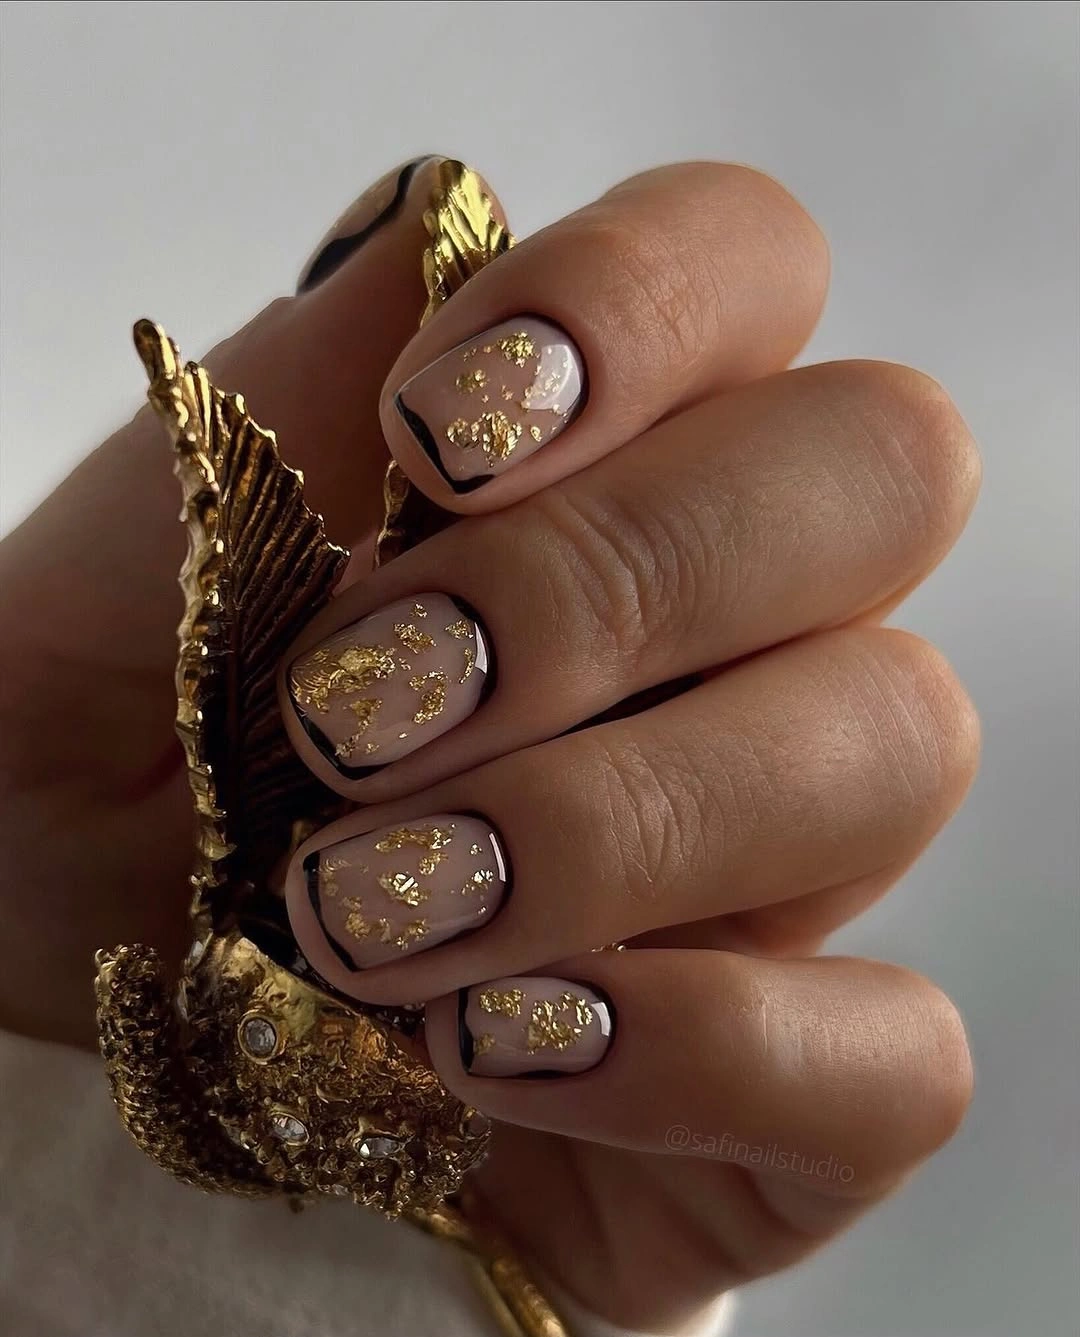
I would need a sheer nude gel, gold foil flakes, a deep brown or black nail-art gel, a fine liner brush, and a glossy top coat. I prefer warm gold rather than bright yellow gold here because it blends beautifully with fall shades such as espresso, camel, burgundy, and olive.
After applying the nude base, I would place the foil in small uneven pieces and seal it before outlining the edges. The dark border should remain extremely fine so it frames the manicure rather than dominates it. This is one of my favorite choices for a dinner or event because it looks particularly beautiful beside gold rings and warm autumn fabrics.
Delicate Red Flower Square Nails
Red florals usually make me think of summer, but this petite version feels perfectly suited to fall. The nails are short and square with a soft nude-pink base, decorated with tiny red flowers and occasional dark centers. Some blooms are larger and more defined, while others appear as little scattered petals, giving the manicure a charming hand-painted quality.
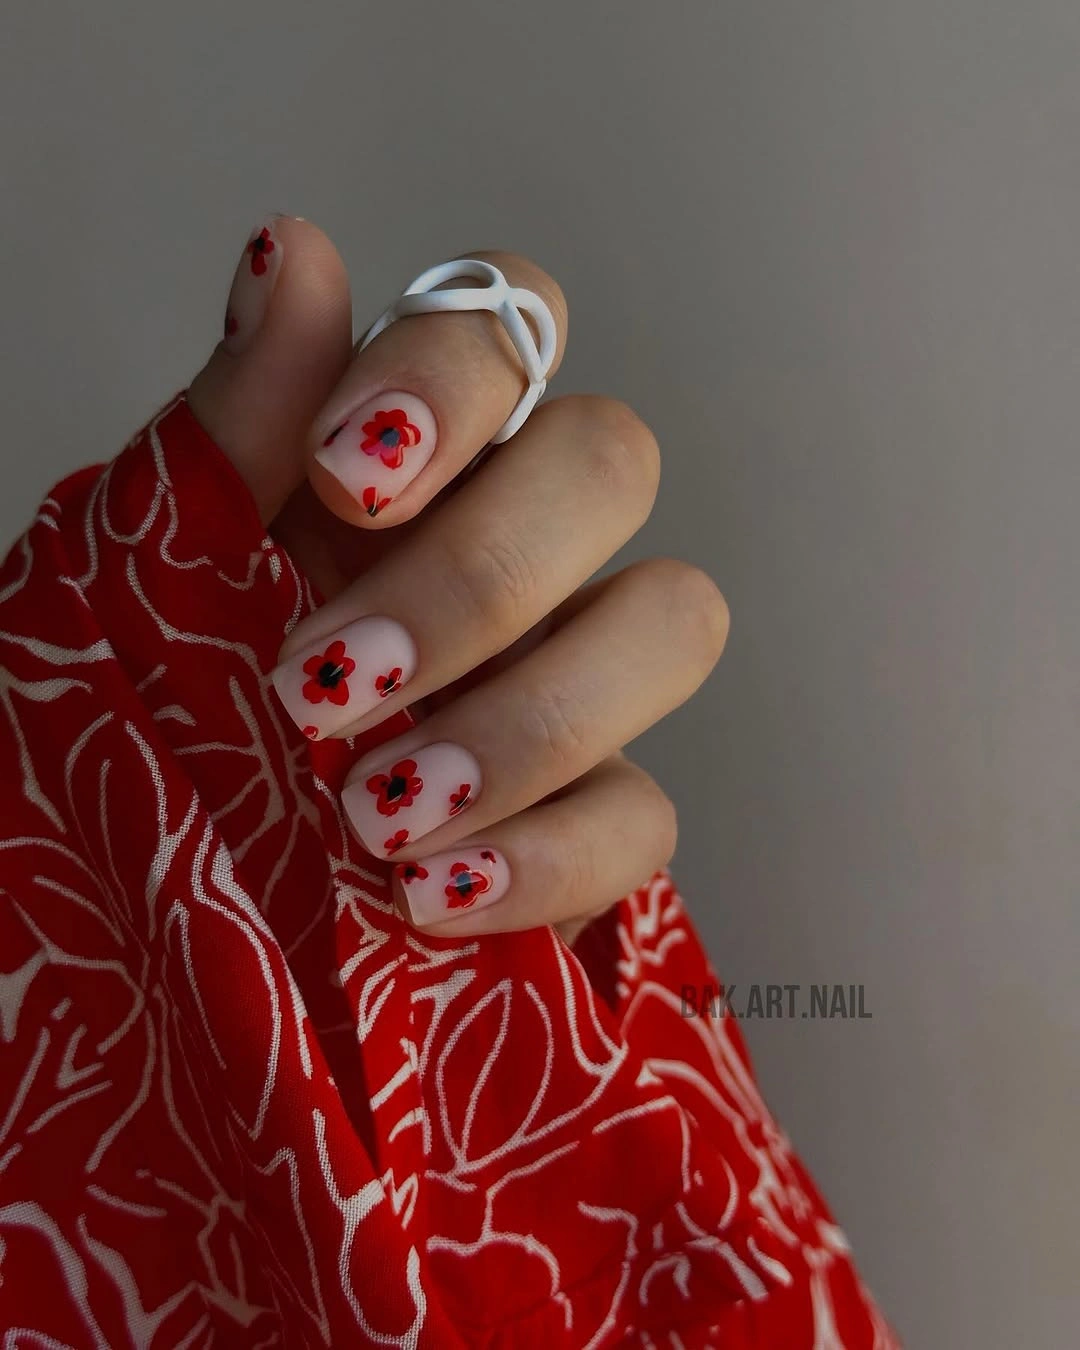
I would use a translucent blush base, cherry-red gel, a small black or deep burgundy detail color, and a fine dotting tool. A glossy top coat keeps the flowers looking crisp. If I wanted a more autumnal version, I would replace the bright red with brick or cranberry.
I would place the flower centers first, then build each bloom with tiny rounded strokes around them. The flowers do not need to be identical – actually, I think the slightly irregular placement is what makes this manicure feel personal. With a red cardigan or printed fall dress, these little blooms suddenly make perfect sense.
Glossy Cherry Red Long Square Nails
And then there is the manicure that needs absolutely no decoration. These long square nails are coated in a saturated cherry-red polish with an ultra-glossy finish. The straight sides and crisp tips make the color look even more dramatic, while the rich red has enough depth to transition effortlessly from early autumn into the holiday season. Sometimes simple really does win.
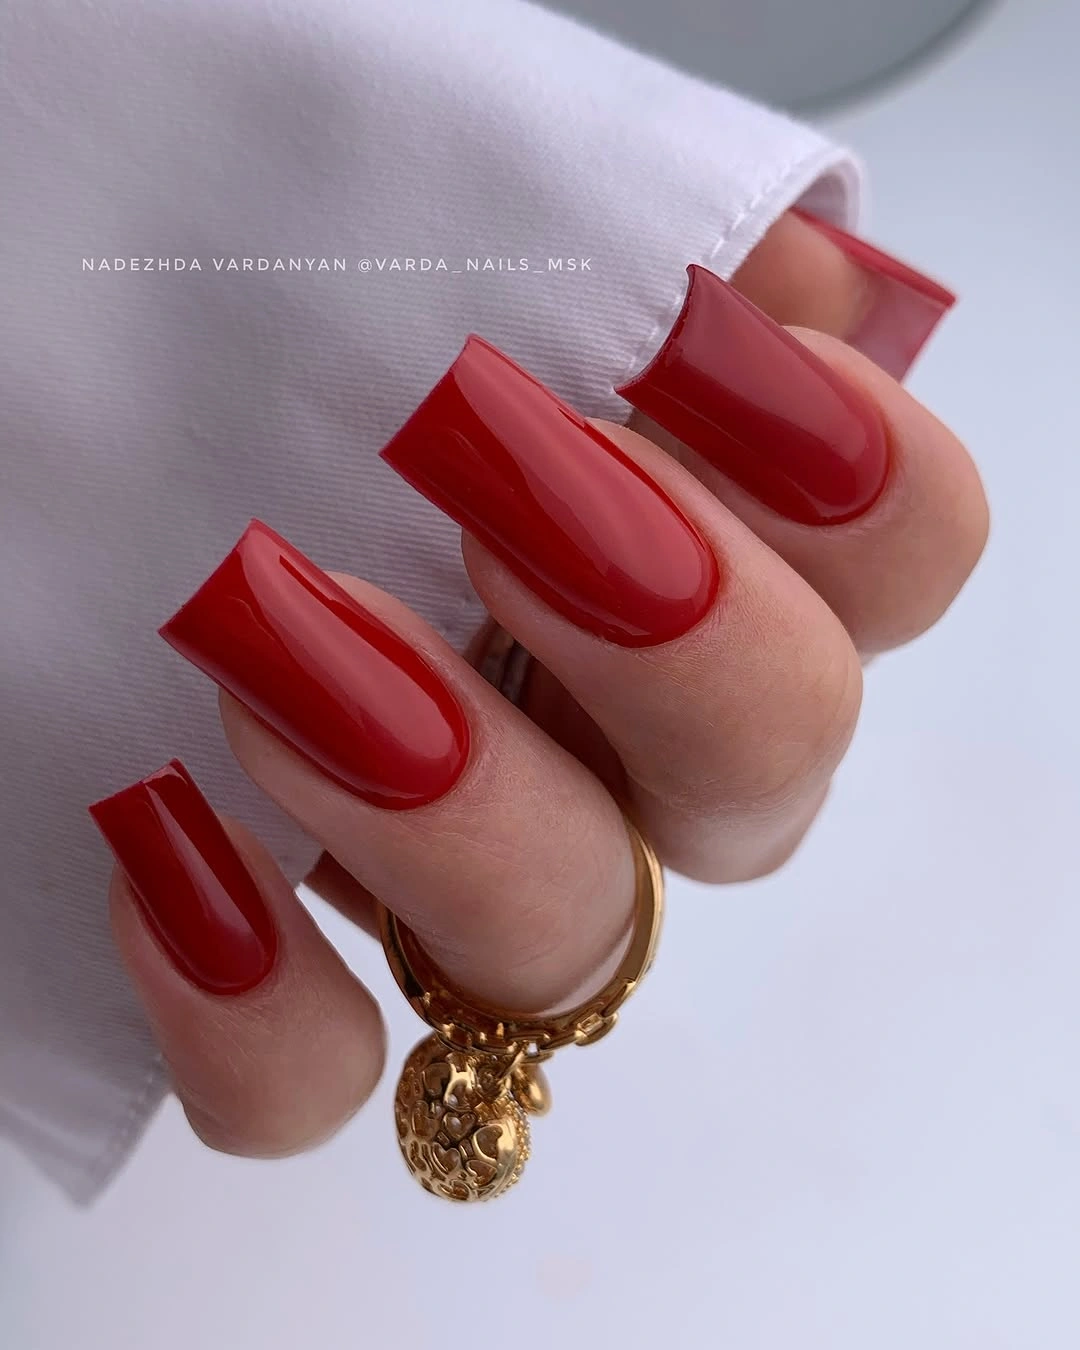
I would choose a classic deep cherry or true red gel, a strengthening base, and an exceptionally glossy top coat. OPI Big Apple Red or a deeper wine-red alternative can create this same polished direction. The color should be completely opaque and evenly applied because there is nowhere for imperfections to hide on such a clean design.
I would file the nails into a precise long square, paying particular attention to keeping the tips symmetrical, then apply two thin layers of red. A final glossy coat gives that almost glass-like reflection. This is the fall manicure I would save for when I want maximum impact with minimum effort – throw on a black coat, add gold jewelry, and let the red nails do the talking.
Moody Celestial Square Nails
I would wear these short square nails when fall calls for something a little mysterious. A warm taupe nude base is covered with intricate black celestial artwork featuring suns, moons, stars, and swirling ornamental lines. The design feels slightly gothic but still polished, and the compact square shape keeps all that detail looking neat rather than overwhelming.
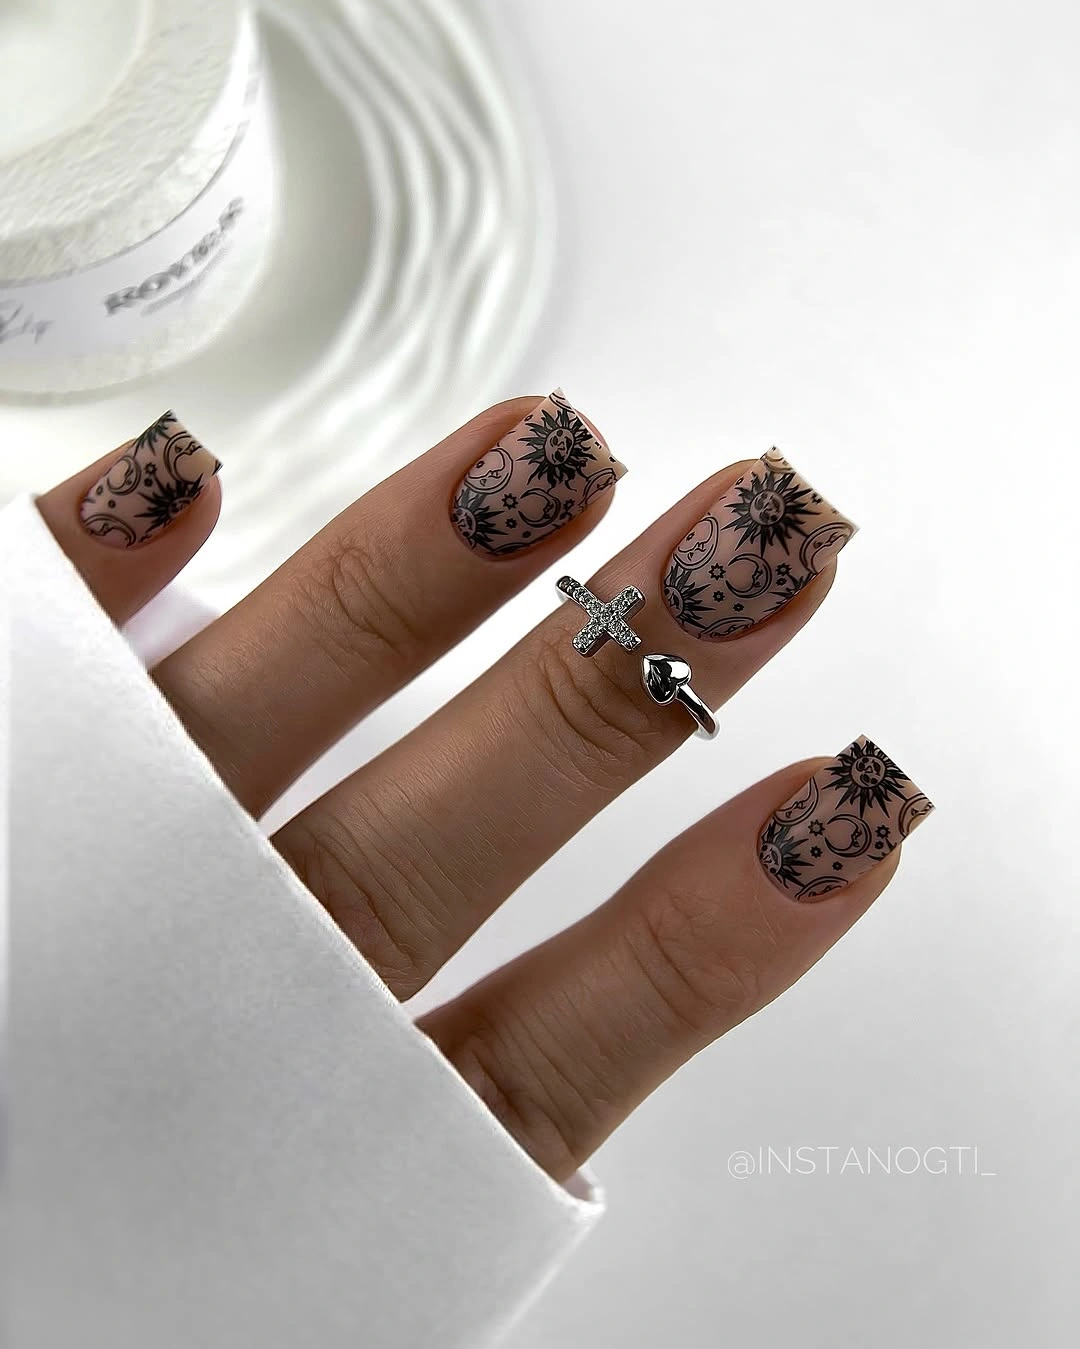
I would use a beige-nude gel, black stamping polish or highly pigmented nail-art gel, a fine liner brush, and a glossy top coat. A stamping plate with celestial motifs would make the intricate details much easier to reproduce at home.
I would keep the base smooth and completely dry before adding the black artwork, then cure and seal everything carefully. For me, this is an especially good late-fall manicure with black knits, silver jewelry, and dark denim. It has that little witchy-season energy without going full costume.
Autumn Abstract Art on Short Square Nails
This manicure takes a much softer route, using a creamy white base as a canvas for tiny abstract fall-inspired illustrations. I see warm rust, muted blue, green, and peach tones, with each nail carrying a different motif – a loose botanical shape, a rounded pumpkin-like form, or a geometric rainbow detail. The short square shape makes the colorful artwork feel charming rather than complicated.
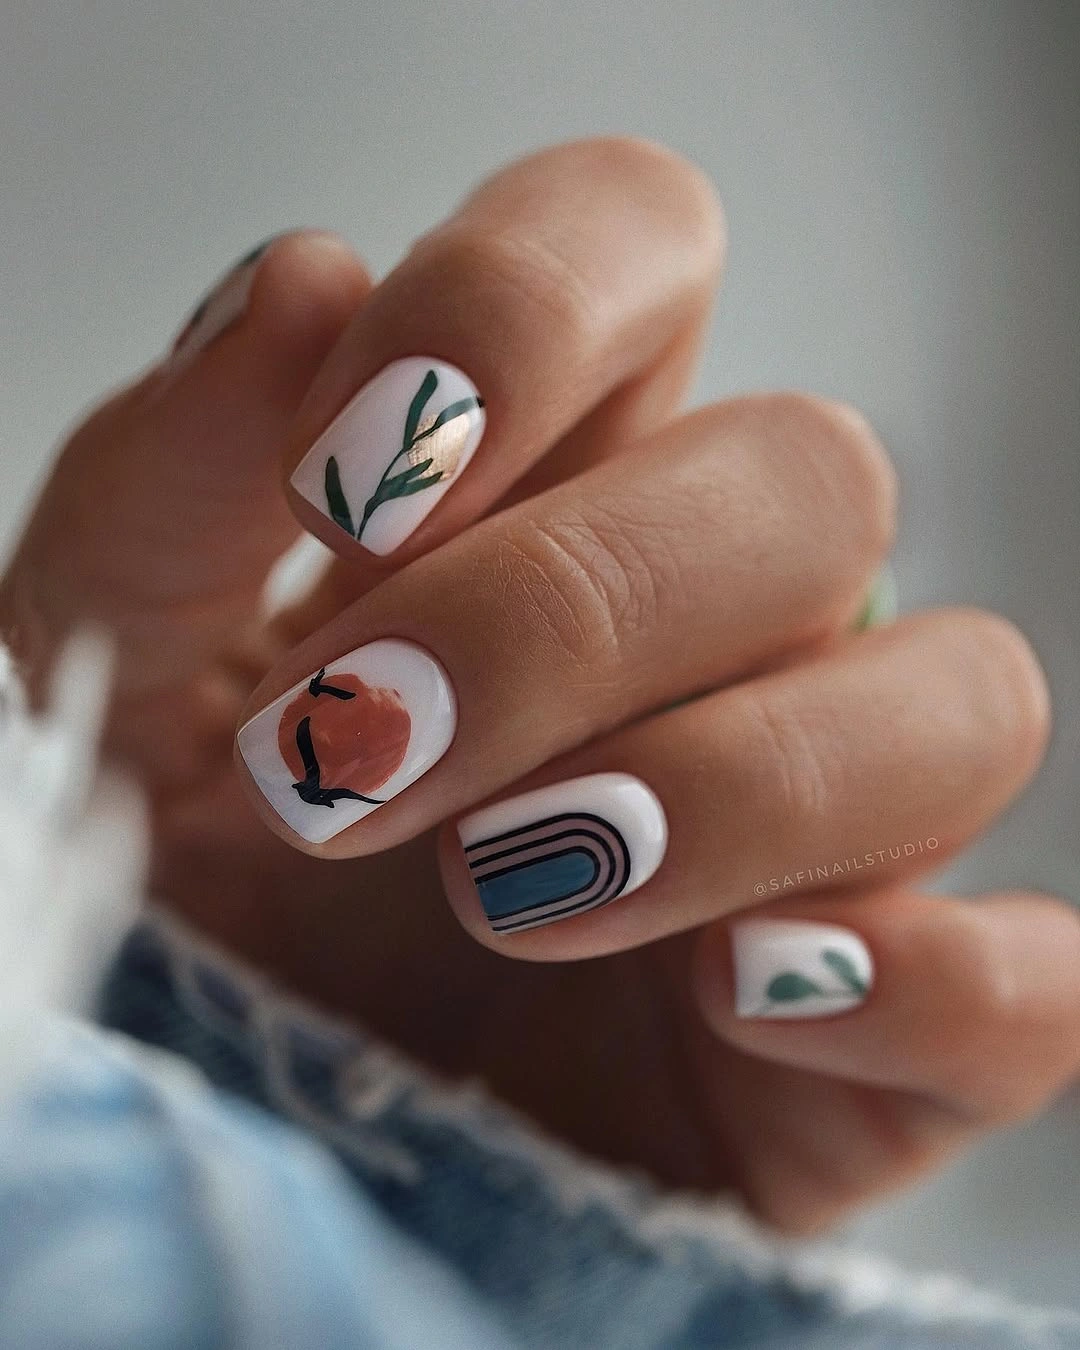
I would reach for an opaque ivory polish plus rust, dusty blue, olive green, terracotta, and muted peach gel paints. A tiny detail brush is enough for the small illustrations, while a glossy top coat pulls the different colors together.
I would paint each accent individually instead of trying to make the nails identical. That is what makes this design feel artistic. I would choose it for September and October when I want autumn colors but do not want the usual leaves and pumpkins everywhere.
Black Floral Square Nails With Pressed Flowers
For a moodier fall manicure, this glossy black set is hard to beat. The short square nails alternate between solid black and transparent-looking black bases decorated with tiny pressed-flower details in pink, blue, cream, and gold. The little flowers almost look suspended beneath glass, giving the manicure a romantic vintage quality.
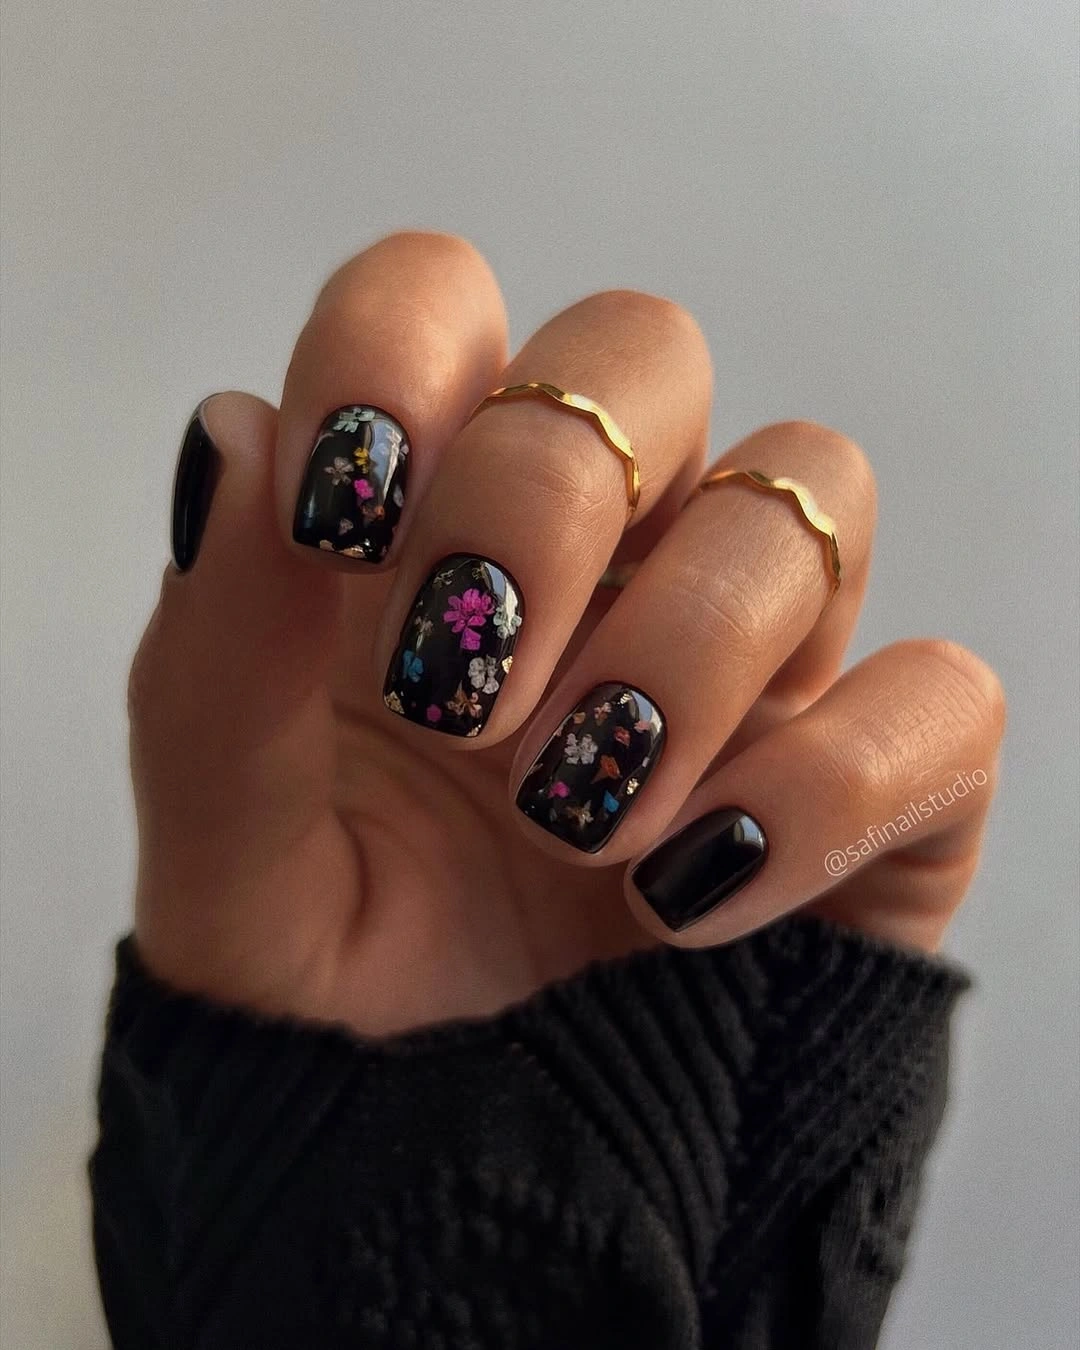
I would use black gel polish, clear or smoky builder gel, miniature dried flowers or floral decals, fine tweezers, and a high-shine top coat. Gold flakes can add another small flash of warmth without competing with the flowers.
I would keep several nails completely black and reserve the floral details for a few accent nails. That contrast is the secret here. Personally, I would save this manicure for November evenings, especially with a black sweater, gold rings, and a berry lip. Very autumn, very chic.
Colorful Retro Square Nails
This is my choice when I want fall nails to have a little more personality. The short square set mixes hot pink, orange, lavender, yellow, and blue with playful abstract patterns, including tiny floral shapes, irregular spots, and graphic brushstrokes. The colors are bold, but the repeated square shape gives the whole manicure enough structure to keep it looking intentional.
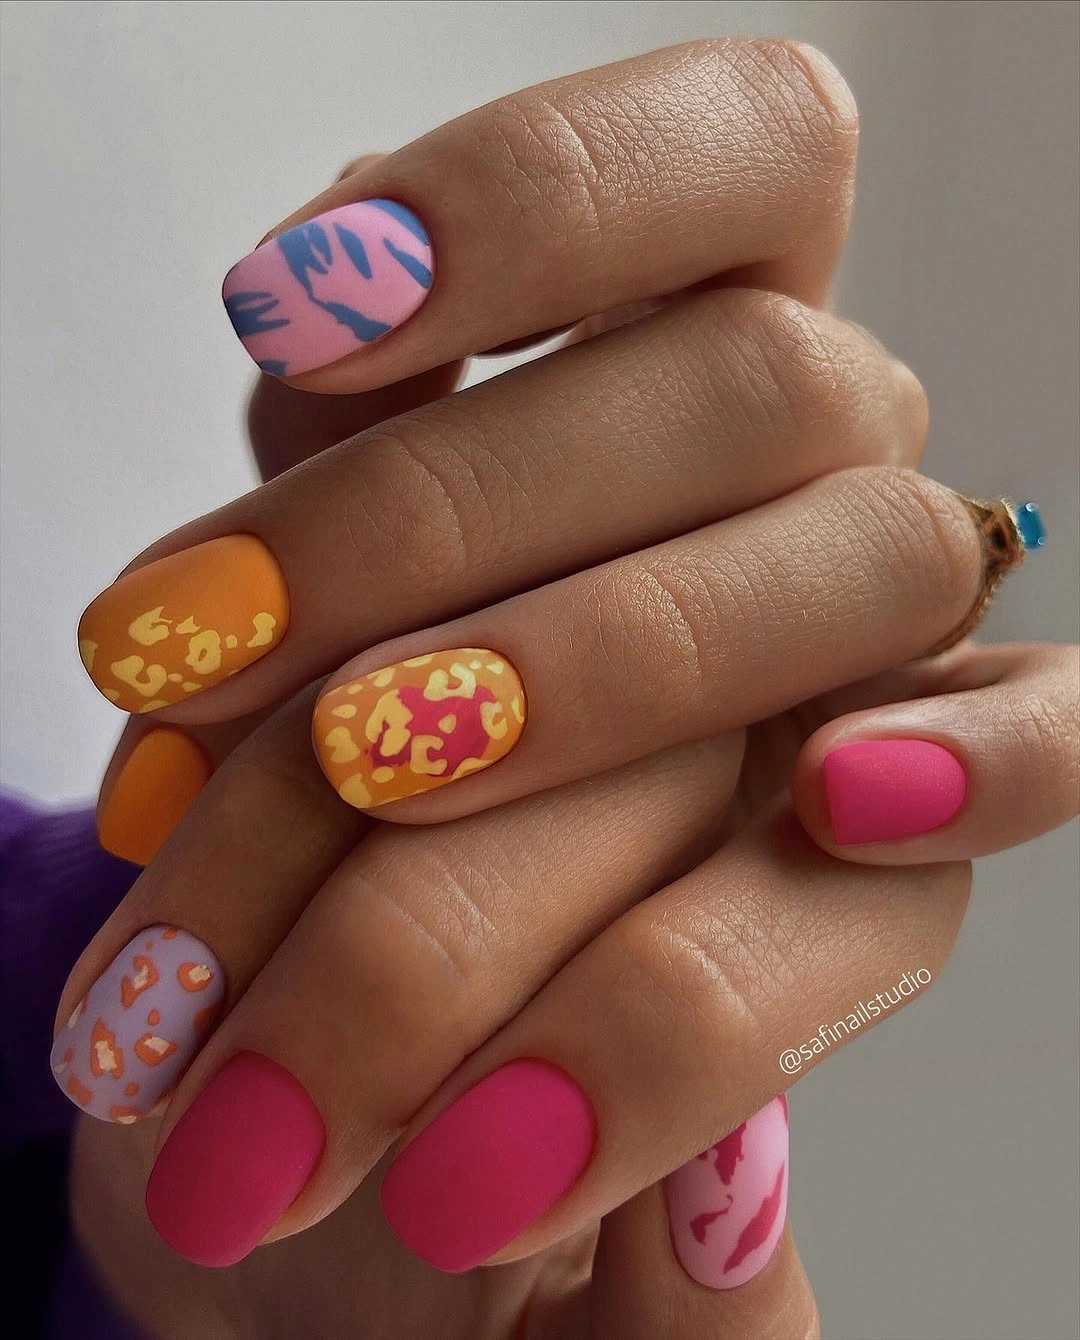
I would use a mix of matte and glossy cream-based polishes in saturated pink, orange, lavender, yellow, and blue. A detail brush and dotting tool would handle most of the decoration, while a matte top coat would give the colors that soft retro finish.
I would paint the solid-color nails first, then add the abstract accents one at a time, letting each color remain visible. This is not the quietest fall manicure, but that is precisely why I like it. On a gray October morning, a little unexpected color can be exactly what the outfit needs.